
Preparing Jenkins Server for CI CD Pipelines
Plan the final end-to-end project and install kubectl, the AWS CLI and Docker on the Jenkins server so the jenkins user can build images and talk to Amazon EKS.
Everything you learned in this bootcamp comes together in this section. We will build one pipeline that takes code from GitHub, builds it with Maven, packs it into a Docker image, pushes that image to Docker Hub, and deploys it to a Kubernetes cluster on Amazon EKS. A user then opens the application through an AWS load balancer.
Jenkins does not do any of this work by itself. It runs commands. So before we write a single line of the pipeline, the Jenkins server must have every tool those commands need. That is what this lesson is about.
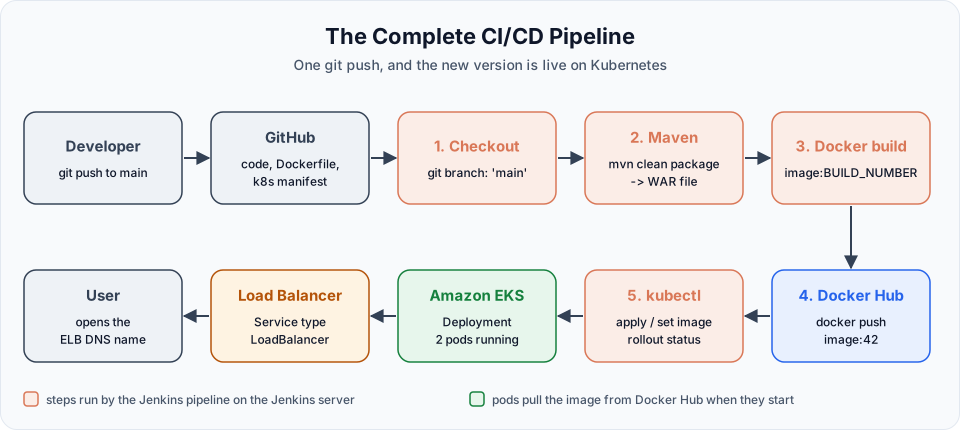
What each tool does in the pipeline
| Tool | Stage of the pipeline | Already on the server? |
|---|---|---|
| Git | Clone the project from GitHub | Yes, Ubuntu ships with it and the Git plugin uses it |
| Maven | Compile, test and package the WAR file | Yes, registered as the maven tool in Building Your First Java Application with Jenkins |
| Docker | Build the image and push it to Docker Hub | No, install it now |
| kubectl | Send Deployment and Service manifests to the cluster | No, install it now |
| AWS CLI | Give kubectl a login token for EKS (aws eks get-token) | No, install it now |
| Docker Hub account | Store the images | Create one at hub.docker.com if you do not have it |
| EKS cluster | Run the containers | Created in the next two lessons |
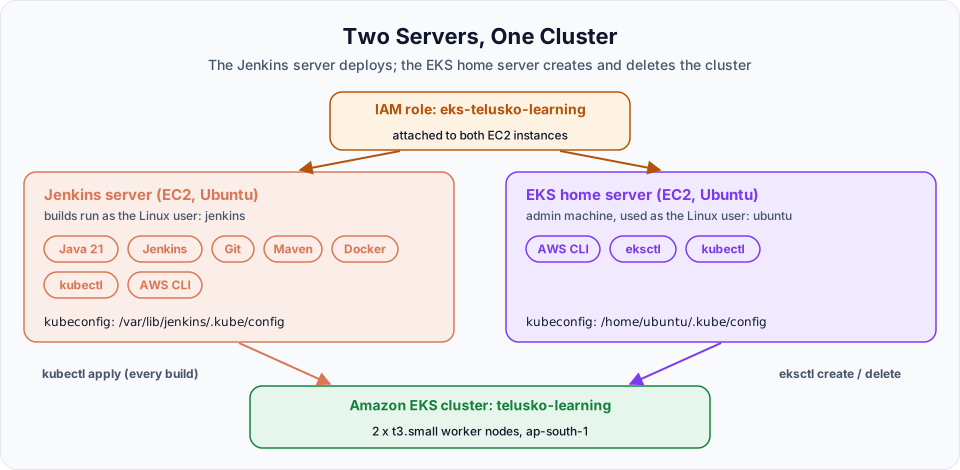
You do not need eksctl on the Jenkins server. eksctl creates and deletes clusters, and that is an admin task we do from a separate machine (the EKS home server in the next lesson). The pipeline only deploys into a cluster that already exists, and for that kubectl plus the AWS CLI are enough.
Before you start: check the server size
Docker images are large. The image we build in this section is about 650 MB on disk, and every build adds another one. On the default 8 GiB root volume the disk fills up after a handful of builds, and Jenkins starts failing with "no space left on device".
df -h /
free -h
For this project use at least 20 GiB of disk and 4 GiB of memory (the c7i-flex.large from Jenkins Installation and Initial Setup is fine). If your root volume is small, increase it in the EC2 console under Elastic Block Store > Volumes > Modify volume, then grow the partition and file system on the server:
sudo growpart /dev/nvme0n1 1     # grow partition 1 to fill the bigger volume
sudo resize2fs /dev/nvme0n1p1    # grow the ext4 file system
df -h /
Run lsblk first and use the device name it shows. EBS Basics and Root Volume explains volumes in more detail.
Step 1: install kubectl
SSH into the Jenkins server as ubuntu. The video uses commands generated by an AI assistant, and they match the official Kubernetes instructions. Here is the same thing with the checksum check the official page recommends:
cd /tmp
KVER=$(curl -L -s https://dl.k8s.io/release/stable.txt)
curl -LO "https://dl.k8s.io/release/${KVER}/bin/linux/amd64/kubectl"
curl -LO "https://dl.k8s.io/release/${KVER}/bin/linux/amd64/kubectl.sha256"
echo "$(cat kubectl.sha256)  kubectl" | sha256sum --check
sudo install -o root -g root -m 0755 kubectl /usr/local/bin/kubectl
rm -f kubectl kubectl.sha256
kubectl version --client| Part | Meaning |
|---|---|
stable.txt | Returns the newest stable Kubernetes version, for example v1.37.1 |
sha256sum --check | Confirms the file was not corrupted during download. It must print kubectl: OK |
install -m 0755 ... /usr/local/bin/kubectl | Copies the binary into a folder that is on every user's PATH, including the jenkins user |
Installing into /usr/local/bin matters here. If you install a tool into ~/bin of the ubuntu user, you can run it, but Jenkins cannot, because Jenkins runs every build as the separate Linux user jenkins.
Step 2: install the AWS CLI v2
sudo apt update
sudo apt install -y unzip curl
cd /tmp
curl "https://awscli.amazonaws.com/awscli-exe-linux-x86_64.zip" -o "awscliv2.zip"
unzip -q -o awscliv2.zip
sudo ./aws/install --update
rm -rf aws awscliv2.zip
aws --version
The installer puts aws in /usr/local/bin, so the jenkins user can run it too. Do not run aws configure with access keys on this server. In Configuring Jenkins to Connect with Amazon EKS we attach an IAM role to the instance instead, so no secret is stored on disk.
Use the AWS installer, not apt
Ubuntu's awscli package is often far behind and may even be version 1. EKS needs AWS CLI 2.12.3 or later for aws eks get-token to work with current clusters. The official zip installer always gives you the latest v2.
Step 3: install Docker and let Jenkins use it
This is the script shown in the video, updated to the current Docker Engine install guide for Ubuntu. Save it as install-docker.sh, then run chmod +x install-docker.sh && ./install-docker.sh.
#!/usr/bin/env bash
set -euo pipefail

# Docker's official GPG key
sudo apt update
sudo apt install -y ca-certificates curl
sudo install -m 0755 -d /etc/apt/keyrings
sudo curl -fsSL https://download.docker.com/linux/ubuntu/gpg -o /etc/apt/keyrings/docker.asc
sudo chmod a+r /etc/apt/keyrings/docker.asc

# Docker apt repository
sudo tee /etc/apt/sources.list.d/docker.sources > /dev/null <<EOF
Types: deb
URIs: https://download.docker.com/linux/ubuntu
Suites: $(. /etc/os-release && echo "${UBUNTU_CODENAME:-$VERSION_CODENAME}")
Components: stable
Architectures: $(dpkg --print-architecture)
Signed-By: /etc/apt/keyrings/docker.asc
EOF

# Install Docker Engine, CLI, containerd and the buildx/compose plugins
sudo apt update
sudo apt install -y docker-ce docker-ce-cli containerd.io docker-buildx-plugin docker-compose-plugin

# Start Docker now and on every boot
sudo systemctl enable --now docker

# Allow the jenkins user to talk to the Docker daemon
sudo usermod -aG docker jenkins

# Jenkins must restart to pick up the new group
sudo systemctl restart jenkins

docker --version
The two lines at the end are the ones that matter most for CI/CD:
| Command | Why |
|---|---|
usermod -aG docker jenkins | The Docker daemon listens on the socket /var/run/docker.sock, which only root and members of the docker group can use. Without this line every docker build in a pipeline fails with permission denied while trying to connect to the Docker daemon socket |
systemctl restart jenkins | Group membership is read when a process starts. The running Jenkins process does not see the new group until it restarts |
The video's generated script used an older style (docker.gpg key and a one-line docker.list file). It still works, but Docker's documentation now uses the docker.asc key and a docker.sources file, as above. Both install the same packages.
The docker group is as powerful as root
Anyone in the docker group can start a container that mounts the host's root file system, which is the same as having root on the server. That is acceptable on a dedicated Jenkins server for learning. In a company, protect who can create and edit pipelines, or build images on separate agents. We covered agents in Jenkins Master Agent Architecture Introduction.
After the restart, refresh Jenkins in the browser and log in again if it asks.
Step 4: verify as the jenkins user
Checking as ubuntu is not enough. What matters is what the jenkins user sees, because that is the user every pipeline runs as.
sudo -u jenkins kubectl version --client
sudo -u jenkins aws --version
sudo -u jenkins docker run --rm hello-world
id jenkins
The last command should list docker among the groups:
uid=111(jenkins) gid=113(jenkins) groups=113(jenkins),988(docker)If docker run prints "Hello from Docker!", the Jenkins server is ready for Docker builds. You can also confirm it from Jenkins itself with a tiny pipeline:
pipeline {
    agent any
    stages {
        stage('Tool check') {
            steps {
                sh 'whoami'
                sh 'docker version'
                sh 'kubectl version --client'
                sh 'aws --version'
            }
        }
    }
}
whoami prints jenkins, which proves the point about the build user.
About the kernel upgrade message
While installing packages, Ubuntu may print "Pending kernel upgrade" and suggest a reboot. The tools work without it, but rebooting the instance at a quiet moment (sudo reboot) applies security updates. Jenkins and Docker start automatically after the reboot because both are enabled with systemd.
What comes next
The Jenkins server can now build and push images. To deploy, it also needs a cluster and permission to use it:
- Create a machine with eksctl and use it to create the EKS cluster (next two lessons).
- Give the Jenkins server a kubeconfig and an IAM identity the cluster trusts.
- Write the pipelines.
If you already created the cluster in the Kubernetes course, you can skim the next two lessons and go straight to Configuring Jenkins to Connect with Amazon EKS.
Common errors
Try It Yourself
- Install kubectl, the AWS CLI and Docker on your Jenkins server and record the three versions.
- Run
sudo -u jenkins docker psbefore and afterusermod, and before and after restarting Jenkins. Note exactly when it starts working. - Create the "Tool check" pipeline above and confirm
whoamiprintsjenkins. - Run
df -h /anddocker system df, and decide whether your disk is big enough for 10 builds of a 650 MB image.
Official references
- Kubernetes: Install and set up kubectl on Linux
- AWS CLI: Install or update to the latest version
- Docker: Install Docker Engine on Ubuntu
- Docker: Linux post-installation steps
Written By: Shramik Masti
How is this guide?
Last updated on
Configuring Email Notifications in Jenkins
Configure the Email Extension plugin with Gmail SMTP and an app password stored as a Jenkins credential, then send success and failure emails from a pipeline post block.
Installing kubectl, AWS CLI and eksctl for EKS
Launch a small EKS home server next to your Jenkins server, install the AWS CLI, kubectl and eksctl on it with one script, and give it AWS credentials safely.