Getting Started
Learn the Model Context Protocol by building it up step by step, from a plain LLM application to tool calling, your own MCP servers and the GitHub MCP server.
Welcome to the MCP Docs.
Most explanations of the Model Context Protocol start with an architecture diagram full of new words: host, client, server, transport. It is hard to care about any of them until you have felt the problem they solve.
These docs take the other route, the same one as the video they are based on. We first write a small LLM application in Python. We watch it give a wrong answer. We fix that with a tool we write ourselves. Only then do we ask the question that leads to MCP: what if the tool I need was written by somebody else, in another application?
The video is MCP Explained & Built from Scratch on the Telusko YouTube channel, taught by Akshay Agarwal. Every page here follows one part of it, with the code, the output and the mistakes made along the way.
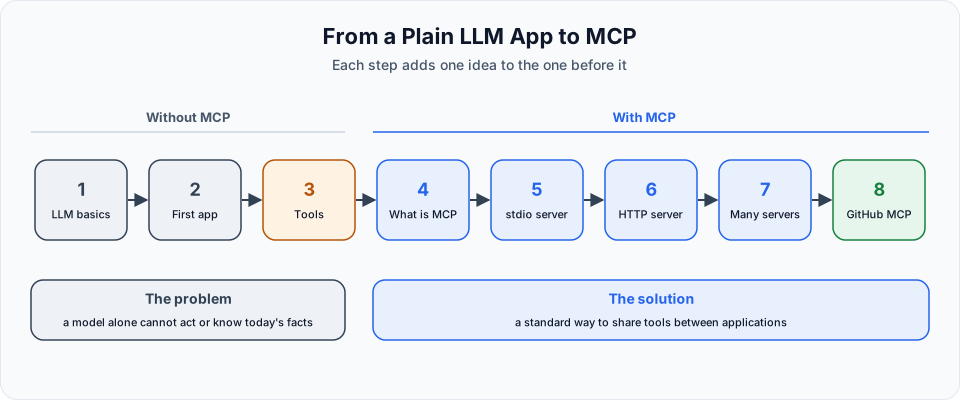
The path we follow
| Step | Page | In the video |
|---|---|---|
| 1 | AI Applications and LLMs | 01:08 to 12:13 |
| 2 | Building Your First LLM App | 12:13 to 25:04 |
| 3 | Tool Calling from Scratch | 25:04 to 46:03 |
| 4 | What is MCP | 46:03 to 58:33 |
| 5 | Building an MCP Server with stdio | 58:33 to 1:22:23 |
| 6 | Building an MCP Server with HTTP | 1:22:23 to 1:27:11 |
| 7 | Connecting to Multiple MCP Servers | 1:27:11 to 1:31:14 |
| 8 | Integrating the GitHub MCP Server | 1:31:14 to 1:45:57 |
The first three steps contain no MCP at all, and that is on purpose. By the time you reach step 4, you will already know what a tool is, how a model asks for one and what your code has to do in response. MCP then becomes a small addition, not a wall of theory.
What we build
One Python project, grown file by file:
| File | What it does |
|---|---|
main.py | An LLM program with two tools, written with LangChain only. No MCP |
mcp_server_stdio.py | An MCP server that runs on your machine and talks over stdio |
client.py | A minimal client that lists the server's tools and calls one directly |
client_stdio.py | A client that lets the LLM choose and use the stdio server's tools |
mcp_server_http.py | An MCP server that listens on a port and talks over HTTP |
client_http.py | The LLM client for the HTTP server |
client_combined.py | One client connected to both servers at the same time |
github_mcp_client.py | A client for GitHub's own MCP server that creates a repository, a branch, a file and a pull request |
The complete source code is on GitHub:
Source code for the video
All eight files, with pyproject.toml and a README
Official MCP documentation
The specification and guides from the MCP project
What you need
You should be comfortable with:
- Basic Python: functions, lists, dictionaries and imports
- Running commands in a terminal
async and await appear from step 5 onwards. They are explained where they first show up, so you do not need to know them in advance.
To run the code yourself:
| Requirement | Used for | Notes |
|---|---|---|
| Python 3.14 or later | Everything | The project file in the repository asks for >=3.14 |
| uv | Creating the project and installing packages | The video uses uv for every install and run command |
| An OpenAI API key | Steps 2 to 7 | API usage is paid. The video adds 5 dollars of credit and uses a low-cost model, gpt-4o-mini |
| A GitHub account | Step 8 only | Any account works. You create a personal access token for it |
You can use another model provider
The video uses OpenAI. The ideas are the same for any provider that supports tool calling. With LangChain you mostly change one import and the model name, so if you already have a key for another provider, you can follow along with that.
Keep your keys out of Git
You will create an OpenAI key and a GitHub token. Both go into a .env file, and .env goes into .gitignore before the first commit. A key that reaches a public repository must be treated as stolen: delete it and create a new one.
The libraries
Four packages do the work. It helps to know from the start who does what, because their names are easy to mix up.
| Package | Role |
|---|---|
langchain and langchain-openai | Talk to the LLM, define tools, pass messages |
python-dotenv | Load keys from the .env file |
fastmcp | Build an MCP server |
langchain-mcp-adapters | Act as the MCP client and turn a server's tools into LangChain tools |
MCP itself is a protocol, a set of rules. fastmcp and langchain-mcp-adapters are two libraries that follow those rules for you. You could replace either one with another library, or with another language, and the other side would not notice.
How to learn from these docs
Type the code
Create the project and write every file yourself. The repository is there to compare against when something does not work, not to copy from at the start.
Make the mistakes too
The video runs into several errors: a missing keyword argument, an empty tool list, a tool called the wrong way. Each page shows them with the cause and the fix. If you hit the same error, you are on the right track.
Print things
Almost every "aha" moment in the video comes from printing a full response and reading it. Do the same. The shape of a tool call, a tool list or a tool result is much easier to remember once you have seen it on your own screen.
Check the official docs for what is current
MCP and the libraries around it change quickly. Where something has changed since the video was recorded, the page says so in a note. For anything beyond that, the official documentation linked at the end of each page is the source of truth.
What you will be able to do
By the end, you will be able to:
- Explain what an LLM, a token, a context window and a knowledge cutoff are
- Call an LLM from Python and give a chat program memory
- Write a tool, bind it to a model and run the tool calls the model asks for
- Explain what MCP is, and what a host, a client and a server do
- Build an MCP server with FastMCP for both stdio and HTTP
- Connect one client to several MCP servers at once
- Use a real third-party MCP server, GitHub's, from your own code
Ready?
Start with AI Applications and LLMs.
Happy Learning! 🚀
Written By: Shramik Masti
How is this guide?
Last updated on
Artifact Registry, Cloud Run and Testing
Enable the required Google Cloud APIs, create an Artifact Registry repository, build the image with Cloud Build, deploy it to Cloud Run with a real secret, and test the live app.
AI Applications and LLMs
See what changes when an application starts using a large language model, and learn the terms you need to choose a model, tokens, pricing, context window and knowledge cutoff.