
Building an MCP Server with HTTP
Run a FastMCP server over HTTP on a port, connect to it by URL with the Streamable HTTP transport, and see how it differs from a stdio server that the client starts itself.
The stdio server from the previous page has one clear limit. The client has to start it, so it has to be a program on the same machine. You cannot offer such a server to a colleague, to another service or to the rest of the world.
For that, the server must run by itself and be reachable at an address. That is the second transport: Streamable HTTP. The good news is how little changes. The tools stay the same. On the server, one line is different. On the client, one dictionary.
Step 1: The server
Create a new file and copy the whole content of mcp_server_stdio.py into it. Then change only the last line:
from fastmcp import FastMCP
from datetime import date

mcp = FastMCP('MCPStdioServer')

@mcp.tool
def get_current_date() -> str:
    """Return today's date in ISO format (YYYY-MM-DD)."""
    return date.today().isoformat()

@mcp.tool
def multiply(num1 :int, num2 :int) -> int:
    """Multiply two integers and return the result."""
    return num1 * num2

if __name__ == "__main__":
mcp.run(transport='http', host='127.0.0.1', port=8000, show_banner=False)| Argument | Value | Meaning |
|---|---|---|
transport | 'http' | Serve the tools over HTTP. FastMCP uses the Streamable HTTP protocol for this |
host | '127.0.0.1' | The address to listen on. 127.0.0.1 is your own machine, also known as localhost |
port | 8000 | The port to listen on. Any free port works |
The server name is still 'MCPStdioServer', because the file was copied and the name was not changed. It is only a label and has no effect on how the server works. In your own project, give it a name that fits, such as 'MCPHttpServer'.
Step 2: Start it
With stdio we never started the server ourselves. Now we must:
uv run mcp_server_http.pyINFO Starting MCP server 'MCPStdioServer' with transport 'http' on
http://127.0.0.1:8000/mcp
INFO: Started server process [38092]
INFO: Waiting for application startup.
INFO: Application startup complete.
INFO: Uvicorn running on http://127.0.0.1:8000 (Press CTRL+C to quit)The first line gives you the complete address of the MCP endpoint:
http://127.0.0.1:8000/mcpHost and port are the ones you chose. The path /mcp is added by FastMCP by default. Clients need this full URL, including /mcp.
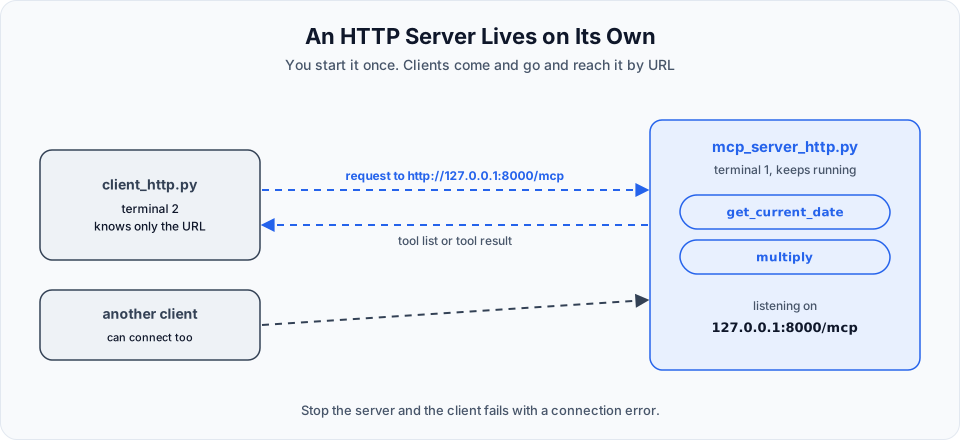
The server now keeps running and waits for requests. Leave this terminal open.
Step 3: The client
Open a second terminal for the client. Create a new file and copy client_stdio.py into it. Only the connection dictionary changes:
client = MultiServerMCPClient({
    'client': {
        'transport': 'streamable_http',
        'url': 'http://127.0.0.1:8000/mcp'
    }
})
Compare the two side by side:
| stdio | HTTP | |
|---|---|---|
transport | 'stdio' | 'streamable_http' |
| How to reach the server | command and args, a program to start | url, an address to call |
There is no command and no file path any more, because the client does not start anything. It only needs to know where the server is.
Everything below the dictionary stays exactly as it was: get_tools, bind_tools, the loop over tool_calls, the final call to the model. Here is the complete file. The video also prints the tool list right after loading it.
from dotenv import load_dotenv
from langchain_openai import ChatOpenAI
from langchain_mcp_adapters.client import MultiServerMCPClient
from langchain_core.messages import HumanMessage, ToolMessage, AIMessage

import asyncio

load_dotenv()

client = MultiServerMCPClient({
    'client': {
        'transport': 'streamable_http',
        'url': 'http://127.0.0.1:8000/mcp'
    }
})

async def main():
    tools = await client.get_tools()
    print(tools)

    llm = ChatOpenAI(model='gpt-4o-mini')
    llm_with_tools = llm.bind_tools(tools)

    messages = []

    user_input = input("User: ")
    messages.append(HumanMessage(content=user_input))

    response = llm_with_tools.invoke(user_input)
    messages.append(AIMessage(content=response.content, tool_calls=response.tool_calls))

    tools_by_name = {}
    for tool in tools:
        tools_by_name[tool.name] = tool

    for tool_call in response.tool_calls:
        tool = tools_by_name[tool_call["name"]]
        tool_response = await tool.ainvoke(tool_call['args'])
        messages.append(ToolMessage(content=tool_response, tool_call_id=tool_call['id']))

    final_response = await llm_with_tools.ainvoke(messages)
    print(f'AI: {final_response.content}')


if __name__ == "__main__":
    asyncio.run(main())
The file in the repository still has the SERVER_PATH line and its two imports from the stdio version. They are not used by the HTTP client, so they are left out here.
'streamable_http' or 'http'
The video writes the transport as 'streamable_http'. The library's README lists the transport as http and notes streamable_http as another accepted spelling. Both refer to the same Streamable HTTP transport.
Step 4: Run it
uv run client_http.pyThe tool list is printed, with the same two tools as before, get_current_date and multiply. Ask for the current date and the model answers with it.
Now compare this run with the stdio client. Something is missing from the client's terminal: the line Starting MCP server .... It does not appear even once. The client did not start a server. It sent its requests to the one that was already running in the other terminal.
Same tools, same descriptions, same answers. Only the way of reaching the server changed.
Step 5: Stop the server and try again
To make the difference visible, go to the server terminal and stop the server with Ctrl + C. Then run the client once more.
It ends with a long traceback. The last line is the one to read:
httpx.ConnectError: All connection attempts failedThere is nothing at http://127.0.0.1:8000/mcp any more, so the connection fails. With stdio this situation cannot occur, because the client brings the server up itself. With HTTP the server has its own life, and somebody has to keep it running.
When you see this error, check three things in this order: is the server running, is the port the same on both sides, and does the URL end in /mcp.
stdio and HTTP side by side
| stdio | HTTP | |
|---|---|---|
| Server code | mcp.run(transport='stdio') | mcp.run(transport='http', host=..., port=...) |
| Who starts the server | The client, for every operation | You, once. It keeps running |
| Client configuration | command and args | url |
| Where the server can be | The same machine only | Any machine the client can reach |
| Clients at the same time | The one that started it | Many |
| If the server is not running | Cannot happen | The client gets a connection error |
| Good for | Local tools, quick development | Shared, remote and third-party servers |
This is why HTTP is the transport you meet most often with real services. A company can run one MCP server at a public address, and any AI application can connect to it by URL. You will do exactly that with GitHub's server two pages from now.
A server on a network needs protection
127.0.0.1 accepts connections from your own machine only, which is the right choice while you are learning. As soon as a server listens on an address that others can reach, everybody who can reach it can call its tools. A server like that needs authentication, and its tools should be written with the same care as any public API. The server in this lesson has none of that and must stay local.
Try It Yourself
- Create
mcp_server_http.py, start it and find the full URL in the first log line. - Create
client_http.py, run it in a second terminal and ask a question that uses both tools. - Watch the server terminal while the client runs. What appears there for each request?
- Stop the server, run the client and read the last line of the error. Start the server again and confirm that the client works.
- Change the port to
9000in the server only. Run the client and see the error. Then fix the URL in the client. - Remove
/mcpfrom the URL in the client and see what happens.
Official references
- FastMCP: running your server
- FastMCP: HTTP deployment
- MCP specification: transports
- langchain-mcp-adapters on GitHub
Written By: Shramik Masti
How is this guide?
Last updated on
Building an MCP Server with stdio
Build your first MCP server with FastMCP, connect to it over stdio with a LangChain MCP client, call its tools directly and then let an LLM choose them.
Connecting to Multiple MCP Servers
Connect one client to a stdio server and an HTTP server at the same time, give the LLM the tools of both, and answer a single question that needs all of them.