
Integrating the GitHub MCP Server
Connect a Python client to GitHub's official remote MCP server with a personal access token, then create a repository, a branch, a file, a pull request and a review through its tools.
Until now we were on both sides of the connection. We wrote the servers and we wrote the clients. The reason MCP exists is the other case: using a server that somebody else built and runs.
GitHub provides an official MCP server. Its tools cover the things you do on GitHub every day, such as repositories, branches, files, issues, pull requests and reviews. On this page we connect to it from our own code and use it to do real work on a real account.
The client is the same MultiServerMCPClient as before. What is new is that the server is on the internet, and that it has to know who we are.
What we will do
The finished script runs these tools, one after the other:
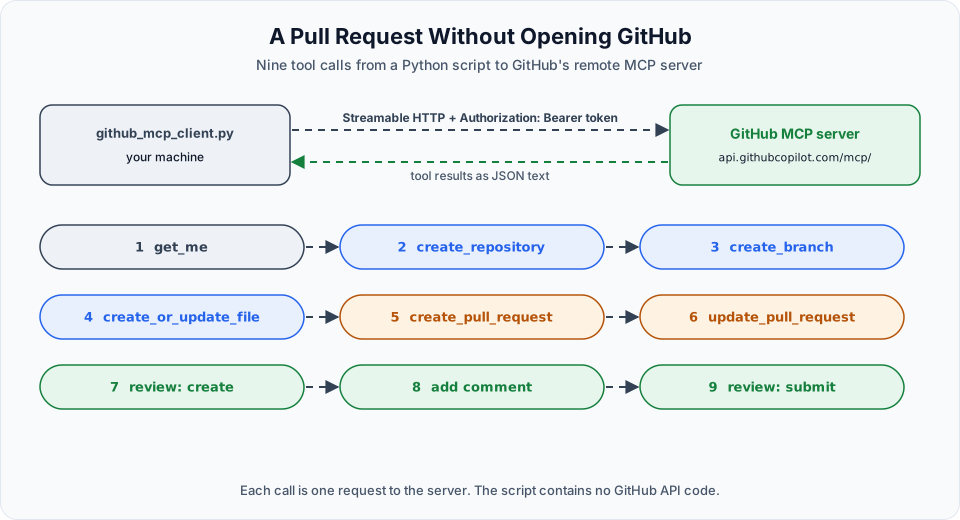
| # | Tool | Result on GitHub |
|---|---|---|
| 1 | get_me | Returns the profile of the logged-in user |
| 2 | create_repository | A new private repository, MCP-Youtube-Test |
| 3 | create_branch | A branch live-mcp, created from main |
| 4 | create_or_update_file | A file live_mcp.txt, committed to that branch |
| 5 | create_pull_request | A pull request from live-mcp into main |
| 6 | update_pull_request | A new title and description for the pull request |
| 7 | pull_request_review_write | A pending review is started |
| 8 | add_comment_to_pending_review | A comment on one line of the file |
| 9 | pull_request_review_write | The review is submitted |
This script changes your GitHub account
Running the finished script creates a private repository named MCP-Youtube-Test in your account, with a branch, a file, a pull request and a review. Nothing existing is touched, but these are real objects. Delete the repository when you are done.
Step 1: Create a personal access token
GitHub's server needs proof of who is calling. From our own code, the simplest proof is a personal access token, or PAT: a secret string that stands in for your login and carries a limited set of permissions.
On github.com:
- Click your profile picture and open Settings.
- In the left sidebar, open Developer settings.
- Under Personal access tokens, choose Fine-grained tokens.
- Click Generate new token.
Fill in the form the way the video does:
| Field | Value in the video | Why |
|---|---|---|
| Token name | A name you will recognise, such as MCP-Youtube | It must be unique among your tokens |
| Expiration | A custom date, the next day | The token is only needed for this exercise |
| Repository access | All repositories | The script creates a new repository, so it cannot be limited to an existing one |
| Permissions | Administration, Contents and Pull requests, each set to Read and write | Creating a repository, writing a file and working with pull requests |
GitHub adds read access to Metadata by itself.
Click Generate token and copy the token. Like the OpenAI key, it is shown only once.
Treat this token like a password
With these settings the token can create and administer repositories in your whole account. Keep it out of your code, out of Git and out of screenshots. Give it a short lifetime, as the video does, and delete it on the same page when you have finished. GitHub's own advice on that form is to choose the minimal repository access and the minimal permissions you need. For real work, follow it: limit a token to the repositories and permissions a task requires.
Step 2: Add the token to .env
OPENAI_API_KEY=your_openai_api_key_here
GITHUB_PERSONAL_ACCESS_TOKEN=your_github_personal_access_token_here
.env is already listed in .gitignore from the first project step. Check that it still is.
Step 3: Connect to the server
from dotenv import load_dotenv
from langchain_mcp_adapters.client import MultiServerMCPClient

import os
import asyncio

load_dotenv()

async def main():

    client = MultiServerMCPClient({
        'github': {
            'transport': 'streamable_http',
            'url': 'https://api.githubcopilot.com/mcp/',
            'headers': {
                'Authorization': f"Bearer {os.environ['GITHUB_PERSONAL_ACCESS_TOKEN']}"
            },
        }
    })

    tools = await client.get_tools()
    print(tools)

if __name__ == "__main__":
    asyncio.run(main())
Put this next to the HTTP client from two pages ago. The shape is the same:
| Key | Our own HTTP server | GitHub's server |
|---|---|---|
transport | 'streamable_http' | 'streamable_http' |
url | http://127.0.0.1:8000/mcp | https://api.githubcopilot.com/mcp/ |
headers | Not needed | Authorization with the token |
The URL is the address of GitHub's remote MCP server, taken from its documentation. The Authorization header is how the token is sent. The word Bearer, followed by a space and then the token, is the standard form for this kind of header. os.environ[...] reads the value that load_dotenv() loaded from .env.
The host name contains "copilot", but a paid Copilot plan is not required for this. GitHub's documentation states that the GitHub MCP server is available to all GitHub users regardless of plan type.
uv run github_mcp_client.pyNo server starts on your machine, and there is nothing to start. A long list of tools scrolls by. It begins with add_comment_to_pending_review and add_issue_comment and continues with dozens more.
Pick one entry and read it. It has the same parts as the tools we wrote: a name, a description and an args_schema. The descriptions are much more detailed than ours. For add_comment_to_pending_review, every parameter is explained: owner, repo, pullNumber, path, body, line, side and more. Those descriptions are written for a model to read, and they are the reason an LLM can use these tools without any help from you.
You connected to a large third-party system and learned everything it can do, with one dictionary and one function call. That is MCP doing its job.
Step 4: A small helper for calling tools
On this page we call the tools directly, without an LLM, so that each step is easy to follow. Every call follows the same routine, so it goes into one function:
import json

async def call(tool, args):
    response = await tool.ainvoke(args)
    text = response[0]['text']
    try:
        text = json.loads(text)
    except json.JSONDecodeError:
        pass

    print(f"\n--- {tool.name} ---\n{text}")
    return text
What it does:
- Runs the tool with
ainvoke, as on the earlier pages. - Takes the text out of the result. You saw on the stdio page that a tool result is a list of content blocks, and that the value is in the
textfield of the first block. - Tries to turn that text into a Python object with
json.loads. GitHub's tools usually answer with JSON, and a dictionary is easier to work with than a string. If the text is not JSON, it is kept as it is. - Prints the tool name and the result, and returns the result.
The tools are again collected in a dictionary by name, so that each one can be picked with its name:
tools = await client.get_tools()

tools_by_name = {}
for tool in tools:
    tools_by_name[tool.name] = tool
Step 5: Who am I?
me = await call(tools_by_name['get_me'], {})
owner = me['login']
get_me takes no arguments and returns the profile of the account the token belongs to: the login name, the id, the profile URL, the avatar URL, the date the account was created and more.
The script keeps the login name in owner, because every later tool needs to know whose repository it should work on. Nothing about the account is written into the code. The script works for whoever owns the token.
Step 6: Create a repository
repo = 'MCP-Youtube-Test'
await call(tools_by_name['create_repository'], {
    'name': repo,
    'description': 'This is just for testing',
    'private': True,
    'autoInit': True
})| Argument | Meaning |
|---|---|
name | The name of the new repository |
description | The short text shown under the name |
private | True makes the repository visible only to you |
autoInit | True creates the repository with a first commit that contains a README |
autoInit matters for the next step. An empty repository has no commit and therefore no branch. With the first commit in place, the main branch exists and a new branch can be created from it.
Run the script up to here, open your repositories on GitHub and the new one is there.
If you run it a second time, the call fails, because a repository with that name already exists. Delete the repository on GitHub, or change the name, before each new run. The video deletes it at this point for the same reason.
Step 7: The complete script
The remaining steps follow the same pattern, so the video shows them as one finished file:
from dotenv import load_dotenv
from langchain_mcp_adapters.client import MultiServerMCPClient

import os
import json
import asyncio

load_dotenv()

BRANCH = 'live-mcp'
BASE_BRANCH = 'main'
FILE_PATH = 'live_mcp.txt'

async def call(tool, args):
    response = await tool.ainvoke(args)
    text = response[0]['text']
    try:
        text = json.loads(text)
    except json.JSONDecodeError:
        pass

    print(f"\n--- {tool.name} ---\n{text}")
    return text

async def main():

    client = MultiServerMCPClient({
        'github': {
            'transport': 'streamable_http',
            'url': 'https://api.githubcopilot.com/mcp/',
            'headers': {
                'Authorization': f"Bearer {os.environ['GITHUB_PERSONAL_ACCESS_TOKEN']}"
            },
        }
    })

    tools = await client.get_tools()

    tools_by_name = {}
    for tool in tools:
        tools_by_name[tool.name] = tool


    me = await call(tools_by_name['get_me'], {})
    owner = me['login']

    # Create the repo
    repo = 'MCP-Youtube-Test'
    await call(tools_by_name['create_repository'], {
        'name': repo,
        'description': 'This is just for testing',
        'private': True,
        'autoInit': True
    })

    target = {'owner': owner, 'repo': repo}

    # Create Branch
    await call(tools_by_name['create_branch'], {
        **target, 'branch': BRANCH,
        'from_branch': BASE_BRANCH})

    # Create File
    created = await call(tools_by_name['create_or_update_file'], {
        **target,
        'branch': BRANCH,
        'path': FILE_PATH,
        'content': '# Live MCP\n\nThis file was created through the GitHub MCP server.\n',
        'message': 'Add live_mcp.txt',
    })

    #Create PR
    pr = await call(tools_by_name['create_pull_request'], {
        **target,
        'title': 'Live MCP demo',
        'head': BRANCH,
        'base': BASE_BRANCH,
        'body': 'Opened through the GitHub MCP server.',
    })
    pr_number = pr['number'] if isinstance(pr, dict) and 'number' in pr else int(pr['url'].rstrip('/').split('/')[-1])

    # Update PR
    await call(tools_by_name['update_pull_request'], {
        **target,
        'pullNumber': pr_number,
        'title': 'Live MCP demo (updated)',
        'body': 'Opened and updated through the GitHub MCP server.',
    })

    # Make PR in Pending State
    await call(tools_by_name['pull_request_review_write'], {
        **target,
        'pullNumber': pr_number,
        'method': 'create'
    })

    # Add a comment to Pending Review
    await call(tools_by_name['add_comment_to_pending_review'], {
        **target,
        'pullNumber': pr_number,
        'path': FILE_PATH,
        'line': 3,
        'side': 'RIGHT',
        'subjectType': 'LINE',
        'body': 'Looks good. Nice use of the GitHub MCP server.',
    })

    # Submit the pending review so the comment becomes visible
    await call(tools_by_name['pull_request_review_write'], {
        **target,
        'pullNumber': pr_number,
        'method': 'submit_pending',
        'event': 'COMMENT',
        'body': 'Review submitted through the GitHub MCP server.',
    })

if __name__ == "__main__":
    asyncio.run(main())
Reading it step by step
The three constants at the top hold the names that are used in several places: the new branch, the branch it starts from and the file.
target is a small dictionary with owner and repo. Almost every tool needs these two arguments. Writing **target inside a call unpacks the dictionary, which is the same as typing 'owner': owner, 'repo': repo each time.
Create the branch. create_branch makes live-mcp, starting from main.
Create the file. create_or_update_file writes live_mcp.txt to the new branch. content is the text of the file and message is the commit message. One call creates the file and the commit together.
Open the pull request. head is the branch with the changes and base is the branch they should go into.
Find the pull request number. The later tools need the number of the pull request. The line after the call takes it from the result. If the result has a number field, it uses that. If not, it takes the last part of the pull request URL, which is the same number.
Update the pull request. A new title and body. Note the parameter name pullNumber. The names must be written exactly as the tool's schema defines them, and the tool list from Step 3 is where you look them up.
The review, in three calls. This is how reviews work on GitHub itself, when you click "Start a review":
| Call | Arguments | What happens |
|---|---|---|
pull_request_review_write | method: 'create' | A review is started in the pending state. Nobody else can see it yet |
add_comment_to_pending_review | path, line: 3, side: 'RIGHT', subjectType: 'LINE' | A comment is attached to line 3 of the file. RIGHT means the new version of the file in the diff |
pull_request_review_write | method: 'submit_pending', event: 'COMMENT' | The pending review is submitted, and the comment becomes visible |
The review is a comment, not an approval
While walking through the file, the video says the last step approves the pull request. The code submits the review with event: 'COMMENT', so what is posted is a review with comments. The pull request is not approved. GitHub's review events are APPROVE, REQUEST_CHANGES and COMMENT, and the script uses the third.
Step 8: Run it and check GitHub
uv run github_mcp_client.pyEach call prints a block that starts with the tool name between dashes, for example --- create_branch ---, followed by what GitHub returned. The whole script is done in a few seconds.
Then look at the result on github.com, as the video does:
- The repository
MCP-Youtube-Testexists and is private. - The branch
live-mcpcontainslive_mcp.txtwith the text from the script. - There is one pull request, with the title
Live MCP demo (updated)and one commit. - In the pull request, the review comment "Looks good. Nice use of the GitHub MCP server." is attached to the file, and the conversation shows the updated description and the submitted review.
Nobody clicked anything on GitHub, and we did not write a single line of GitHub API code. Every action was a tool on GitHub's MCP server, called from a Python script.
When you have seen it, delete the test repository and the token.
Where the LLM comes in
This page called the tools by hand to keep the steps visible. You already know the other way. The list from get_tools() is a list of LangChain tools, so it can be bound to a model exactly as in client_stdio.py:
llm_with_tools = llm.bind_tools(tools)A user could then type "create a private repository called demo and open a pull request that adds a README", and the model would choose the tools and fill in the arguments, in the same loop you wrote on the earlier pages.
Two things to keep in mind before you do that:
- The list is long. Binding dozens of detailed tool descriptions costs input tokens on every request. GitHub's remote server documentation describes ways to expose only a part of the tools, for example selected toolsets or a read-only mode. Use them when an application needs only a few tools.
- These tools change real things. A model that can create repositories can also be talked into creating the wrong ones. For any tool that writes or deletes, ask the user to confirm before your code runs it, and give the token only the permissions that application needs.
What you have built
Look back at the path:
- A program that talks to an LLM.
- Memory, by sending the history.
- Tools, so that the model can ask for things it does not know.
- An MCP server of your own, over stdio and over HTTP.
- A client connected to several servers at once.
- A client that uses a third-party MCP server on the internet.
At every step from 4 onwards, the client side was the same few lines: describe the server, get the tools, call them. That sameness is the whole point of the protocol. Many other services publish MCP servers too, and you now know how to connect to any of them.
There is more to explore in MCP: resources, prompts, authentication with OAuth, and building agents on top of all this. What you have here is the foundation those topics stand on.
Try It Yourself
- Create a fine-grained token with the settings from Step 1 and a lifetime of one day. Connect to the server and print only the names of the tools with
print([tool.name for tool in tools]). How many are there? - Print the full description and
args_schemaofcreate_branch. Find the parameter names the script uses. - Call only
get_meand print your login name. - Run the complete script and check each of the nine steps on github.com.
- Run it a second time without deleting the repository. Read the output of
create_repositoryand of the calls after it. - Change the script so that the repository name comes from a command line argument, then run it with a different name.
- Bind the tools to the LLM as in
client_stdio.pyand ask "What is my GitHub username?". Check which tool the model chooses. - Delete the test repositories and the token when you have finished.
Official references
- GitHub MCP server
- GitHub MCP server: remote server
- GitHub Docs: setting up the GitHub MCP server
- GitHub Docs: managing your personal access tokens
- GitHub Docs: pull request reviews
Written By: Shramik Masti
How is this guide?
Last updated on
Connecting to Multiple MCP Servers
Connect one client to a stdio server and an HTTP server at the same time, give the LLM the tools of both, and answer a single question that needs all of them.
Getting Started
The complete DevOps Bootcamp roadmap, from Linux and shell scripting to Git, Maven, AWS, Terraform, Ansible, Docker, Kubernetes on EKS and Jenkins CI/CD.