
Building Your First LLM App
Set up a Python project with uv, call an OpenAI model through LangChain, read the response and its token usage, and give a chat loop memory by sending the conversation history.
Time to write code. On this page we go from an empty folder to a chat program in the terminal that remembers what you said. It is about twenty lines of Python, and every later page builds on it.
The video uses Python with VS Code. If you prefer another language, the steps are the same in spirit: load a key, create a model object, send text, read the reply.
Step 1: Create an API key
Open the OpenAI API platform, go to the API keys page and create a new secret key. Give it a name you will recognise later, such as MCP-Youtube.
The key is shown only once. Copy it right away and keep it somewhere safe until Step 4.
An API key is a password that spends money
Anyone who has your key can make requests that are billed to you. Never paste it into code, a screenshot or a chat. If a key leaks, delete it on the same page and create a new one.
Step 2: Create the project with uv
uv is a fast tool that manages Python versions, virtual environments and packages. Create a folder, open a terminal in it and run:
uv init
uv sync
uv init creates the starting files, including main.py and pyproject.toml. uv sync creates the virtual environment in a .venv folder.
pyproject.toml is where the project's dependencies are listed. At this point the list is empty.
Step 3: Add the packages
uv add python-dotenv
uv add langchain
uv add langchain-openai| Package | Why we need it |
|---|---|
python-dotenv | Reads the API key from a .env file into the program |
langchain | A framework that gives one common way to work with LLMs, messages and tools |
langchain-openai | The connector between LangChain and OpenAI's models |
Each uv add installs the package and writes it into pyproject.toml. Adding langchain pulls in many other packages, such as langchain-core and langgraph. That is normal. We only use LangChain itself here.
Step 4: Store the key in a .env file
Create a file called .env in the project folder:
OPENAI_API_KEY=paste_your_key_hereThe name OPENAI_API_KEY is not a free choice. It is the name the OpenAI connector looks for.
Now make sure this file never reaches GitHub. Create .gitignore and add:
.envIn VS Code, the .env file name turns grey in the explorer once it is ignored.
Step 5: The first call
from dotenv import load_dotenv
from langchain_openai import ChatOpenAI

load_dotenv()

def main():
    llm = ChatOpenAI(model='gpt-4o-mini')

    response = llm.invoke('Hi how are you?')
    print(response)

if __name__ == "__main__":
    main()
Line by line:
| Line | What it does |
|---|---|
load_dotenv() | Reads .env and makes OPENAI_API_KEY available to the program |
ChatOpenAI(model='gpt-4o-mini') | Creates the object that talks to the model. Nothing is sent yet |
llm.invoke(...) | Sends the text to the model and waits for the reply |
invoke is the method you will use for everything in these docs. Remember the name.
Run it:
uv run main.pyuv run uses the project's virtual environment automatically. The video also activates the environment by hand with source .venv/bin/activate (on Windows the script is .venv\Scripts\activate). After that the project name appears in brackets at the start of the prompt, and you can tell the environment is active.
The mistake from the video
The first version in the video passed the model name without a keyword:
llm = ChatOpenAI('gpt-4o-mini')and Python stopped with an error saying that BaseModel.__init__() takes 1 positional argument but 2 were given.
ChatOpenAI accepts its settings as named arguments only. Write model='gpt-4o-mini', as in the code above.
Step 6: Read the response
The program prints much more than a sentence:
content="I'm just a program, but thanks for asking! ..." additional_kwargs={...}
response_metadata={'token_usage': {'completion_tokens': 17, 'prompt_tokens': 12, 'total_tokens': 29, ...}, 'model_name': 'gpt-4o-mini-2024-07-18', ...}
usage_metadata={'input_tokens': 12, 'output_tokens': 17, 'total_tokens': 29, ...}
The response is an object, not a string. The parts worth knowing:
| Field | Value in this run | Meaning |
|---|---|---|
content | The sentence | The model's actual answer |
input_tokens | 12 | Tokens used by what we sent |
output_tokens | 17 | Tokens used by the answer |
total_tokens | 29 | The sum, which is what you are billed for |
Our four-word greeting became 12 input tokens, because the request carries a little structure around the text as well.
To show only the answer, print response.content:
print(response.content)Step 7: Turn it into a chat
One question and one answer is not a conversation. Put the call in a loop that keeps asking until the user types bye:
def main():
    llm = ChatOpenAI(model='gpt-4o-mini')

    while(True):
        user_input = input("User: ")

        if user_input == 'bye':
            print(f'AI: Bye!')
            break

        response = llm.invoke(user_input)
        print(f'AI: {response.content}')
User: Hi my name is Akshay
AI: Hi Akshay! How can I assist you today?
User: bye
AI: Bye!It looks like a chat application. Ask one follow-up question and the illusion breaks.
Step 8: The model has no memory
Run it again, introduce yourself, and then ask:
User: What is my nameThe model answers that it does not know your name. One line earlier you told it.
The reason is in the loop. Each round calls llm.invoke(user_input) with only the newest line. For the model, every call is a brand new conversation. It has no memory between requests. This is the point from the previous page: the model knows only what is inside the request.
Step 9: Send the history
If the model needs the earlier messages, send them. Keep a list, add every user message and every answer to it, and pass the whole list on each call:
def main():
    llm = ChatOpenAI(model='gpt-4o-mini')

    history = []

    while(True):
        user_input = input("User: ")
        history.append(user_input)

        if user_input == 'bye':
            print(f'AI: Bye!')
            break

        response = llm.invoke(history)
        print(f'AI: {response.content}')
        history.append(response.content)
Three lines changed: the list is created, the user input is appended, and the answer is appended. invoke now receives history and not just user_input.
User: Hi I am Akshay
AI: Hello, Akshay! How can I assist you today?
User: What is my name
AI: Your name is Akshay. How can I help you today?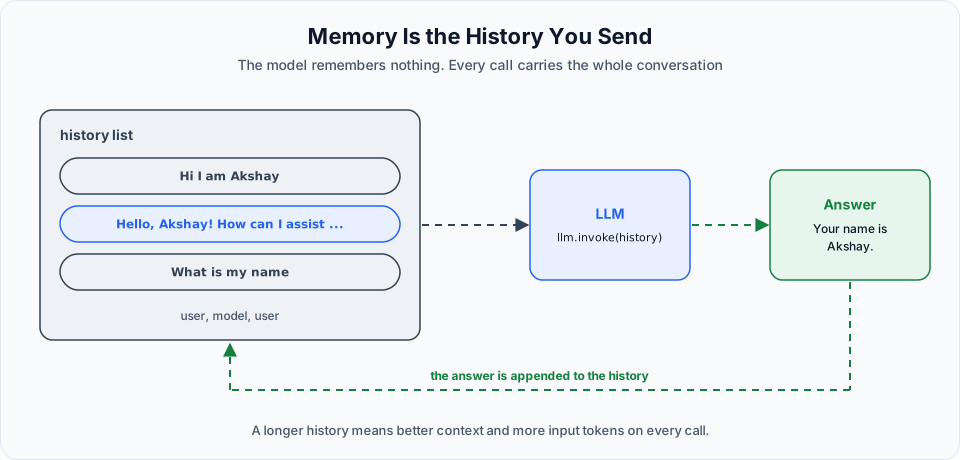
This is all that "memory" means in a chat application. When ChatGPT remembers what you said five minutes ago, it is because the application sends the earlier messages along again.
Memory costs tokens
Print the whole response again and compare the token counts of the two rounds in the video:
| Round | What was sent | Input tokens |
|---|---|---|
| 1 | "Hi my name is Akshay" | 13 |
| 2 | The first message, the model's answer and "What is my name" | 36 |
The second question is only four words, yet it cost almost three times as many input tokens, because the whole history went with it. In a long conversation, every new message pays again for all the earlier ones.
Real applications deal with this by keeping only the most recent messages, or by replacing older messages with a short summary. That is outside the scope of these docs. What to remember is the trade: more context gives better answers and a higher bill.
Plain strings carry no role
The history list above holds plain strings. That is enough to show the idea, but the list no longer says who said what. LangChain has message classes that carry this information: HumanMessage for the user, AIMessage for the model and ToolMessage for tool results. The next page uses them, because with tools the role of each message starts to matter.
Try It Yourself
- Create the project with
uv init, add the three packages and run the first call. Print the full response and find the token counts. - Remove
model=to reproduce the error from the video, read the message, then put it back. - Build the chat loop without history and confirm that the model forgets your name.
- Add the
historylist and ask the same question again. - Print
response.usage_metadatain every round and watchinput_tokensgrow as the conversation gets longer. - Change the model name to another one your key has access to and compare the answers to the same question.
Official references
Written By: Shramik Masti
How is this guide?
Last updated on
AI Applications and LLMs
See what changes when an application starts using a large language model, and learn the terms you need to choose a model, tokens, pricing, context window and knowledge cutoff.
Tool Calling from Scratch
Understand why an LLM needs tools, turn Python functions into tools with LangChain, run the tool the model asks for, and handle several tool calls in one question.