
Building a Java Application Using Jenkins Pipeline
Turn the echo-only pipeline into a real one that clones the Spring Boot project from GitHub and builds it with Maven, using the Snippet Generator to write each step.
The previous pipeline only printed messages. Now we make it do the same real work as the freestyle java-app-build job: clone the Spring Boot project from GitHub and build a WAR with Maven. The difference is that this time the whole process is written as code.
Quick recap of the structure
| Part | Role |
|---|---|
pipeline | The starting point. Everything lives inside it |
agent any | Where to run: any available node, the controller's built-in node or an agent |
tools { maven "maven" } | Makes the Jenkins tool named maven available to every stage |
stages | Container for all stages |
stage('...') | One phase of the CI/CD process, such as cloning or building |
steps | The actual commands executed in that phase |
You do not have to memorise step syntax
Jenkins has hundreds of pipeline steps, each with its own parameters. Nobody remembers them all. Jenkins gives you a generator: on any pipeline job, click Pipeline Syntax (the link under the script box). It opens the Snippet Generator.
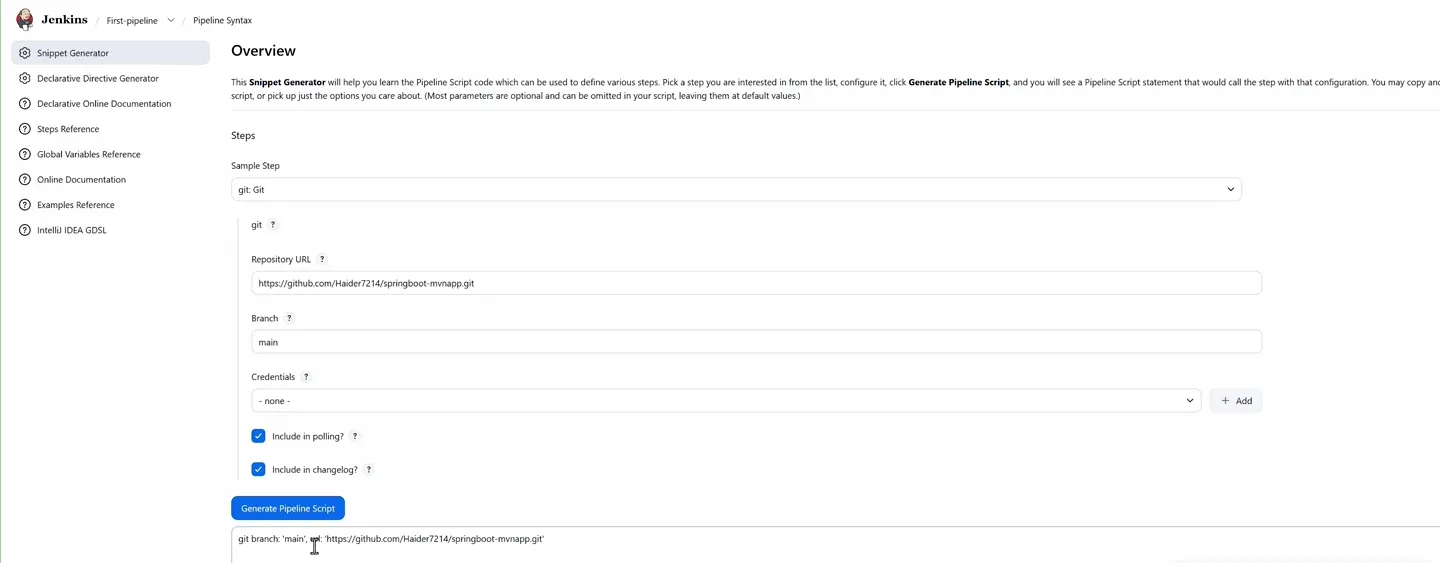
The Snippet Generator: choose a step, fill the form, click Generate Pipeline Script, copy the line.
Generate the Git step
- Sample Step:
git: Git - Repository URL:
https://github.com/Haider7214/springboot-mvnapp.git - Branch:
main - Credentials:
- none -(public repository) - Click Generate Pipeline Script.
Result:
git branch: 'main', url: 'https://github.com/Haider7214/springboot-mvnapp.git'Generate the shell step
- Sample Step:
sh: Shell Script - Shell Script:
mvn clean compile package - Click Generate Pipeline Script.
Result:
sh 'mvn clean compile package'The left menu of the same page has more helpers: the Declarative Directive Generator (for blocks like tools, environment, post, triggers), the Steps Reference and the Global Variables Reference (env, params, currentBuild).
The complete pipeline
Open First-pipeline, click Configure, and replace the echo steps with the generated lines:
pipeline {
    agent any

    tools {
        maven "maven"
    }

    stages {

        stage('Git Clone') {
            steps {
                git branch: 'main', url: 'https://github.com/Haider7214/springboot-mvnapp.git'
            }
        }

        stage('Building project using Maven') {
            steps {
                sh 'mvn clean compile package'
            }
        }
    }
}
The deploy stage is left out for now. We add real deployment in the end-to-end section.
Why does plain mvn work inside sh here, when it failed in a freestyle Execute shell step? Because of the tools block. Jenkins installs the maven tool and adds its bin folder to the PATH for every step of this pipeline. Remove the tools block and the build fails with mvn: not found, unless Maven is installed on the node itself.
As before, clean compile package works, but clean package is enough: package already runs compile and test.
Run it and read the stage view
Click Save, then Build Now. Open the build and click Stages:
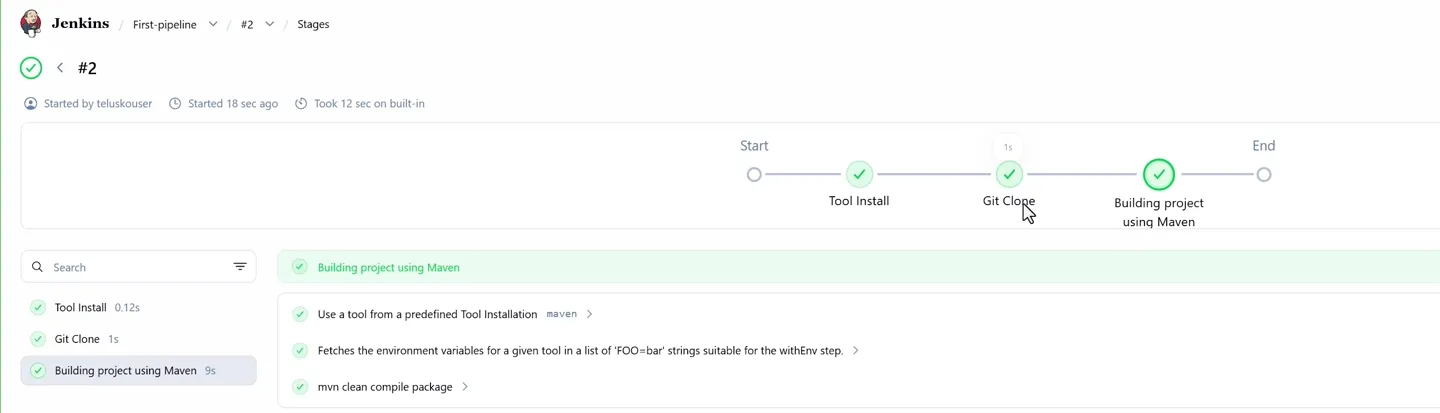
Each stage is a node in the graph. Click a stage to see its steps and their logs.
The graph shows three stages: Tool Install (added by Jenkins for the tools block), Git Clone and Building project using Maven. Clicking the Maven stage lists its steps: "Use a tool from a predefined Tool Installation", "Fetches the environment variables for a given tool...", and mvn clean compile package. Each step has its own log, so you do not have to scroll through one giant console output to find a problem.
The console output ends exactly like the freestyle build did:
[INFO] Building war: /var/lib/jenkins/workspace/First-pipeline/target/springbootmvnapp-0.0.1-SNAPSHOT.war
[INFO] BUILD SUCCESS
...
[Pipeline] End of Pipeline
Finished: SUCCESS
The header of the build page also tells you where it ran, for example "Took 12 sec on built-in". If it ran on your agent, the WAR is under /home/ubuntu/slavenode/workspace/First-pipeline/target/ on that machine.
Freestyle job vs pipeline, side by side
Freestyle java-app-build | Pipeline First-pipeline | |
|---|---|---|
| Git | Source Code Management form | git branch: 'main', url: '...' |
| Maven | Invoke top-level Maven targets form | tools { maven "maven" } + sh 'mvn ...' |
| Visual progress | One log | Stage graph with per-step logs |
| Where the definition lives | Only in Jenkins | In the job, or in a Jenkinsfile in Git |
Same result, but the pipeline version can be copied, reviewed and versioned as text.
Useful additions
Two small things that make this pipeline more realistic:
    post {
        success {
            archiveArtifacts artifacts: 'target/*.war', fingerprint: true
        }
    }
Placed after stages, this keeps the WAR with the build so you can download it from the build page. (We look at post in detail in the email notification lesson.)
And for a private repository, create a credential (username plus GitHub personal access token), then pick it in the Snippet Generator. It adds credentialsId: 'your-id' to the git step. Never write the token in the script.
Try It Yourself
- Use the Snippet Generator to produce the
gitandshlines yourself instead of copying them from this page. - Run the pipeline, open Stages, and click each step to read its log.
- Remove the
toolsblock, run again, and read the error. Put it back. - Add the
post { success { archiveArtifacts ... } }block and download the WAR from the build page. - Point the
gitstep at your own fork, push a change, and rebuild.
Official references
- Jenkins: Pipeline Syntax (tools directive)
- Jenkins: Pipeline Steps Reference
- Jenkins: Getting started with Pipeline (Snippet Generator)
Written By: Shramik Masti
How is this guide?
Last updated on
Introduction to Jenkins Pipeline
Learn what a Jenkins Pipeline is, why pipeline as code replaced click-configured jobs, the difference between declarative and scripted syntax, and write and run your first declarative pipeline.
Jenkins Pipelines: Parallel Stages
Run independent pipeline stages at the same time with the parallel block, understand which stages can safely run together, use failFast, and visualise parallel branches in Jenkins.