
Creating Your First Jenkins Freestyle Job
Understand what a Jenkins job is, create a freestyle project that runs shell commands, read its console output and find the files it created in the workspace.
Jenkins does nothing on its own. It waits for you to tell it what to do, and the way you tell it is a job: a set of instructions describing a task Jenkins should perform.
That task can be almost anything:
- run Linux shell commands,
- download source code from GitHub,
- build a Java application with Maven,
- run automated tests,
- create a Docker image,
- deploy an application to Kubernetes.
We start with the simplest possible job, a few shell commands, so you can see exactly what Jenkins does with them and where.
Freestyle project: the classic job type
A freestyle project is a job you configure entirely through web forms. You fill in sections from top to bottom, and Jenkins runs them in that order.
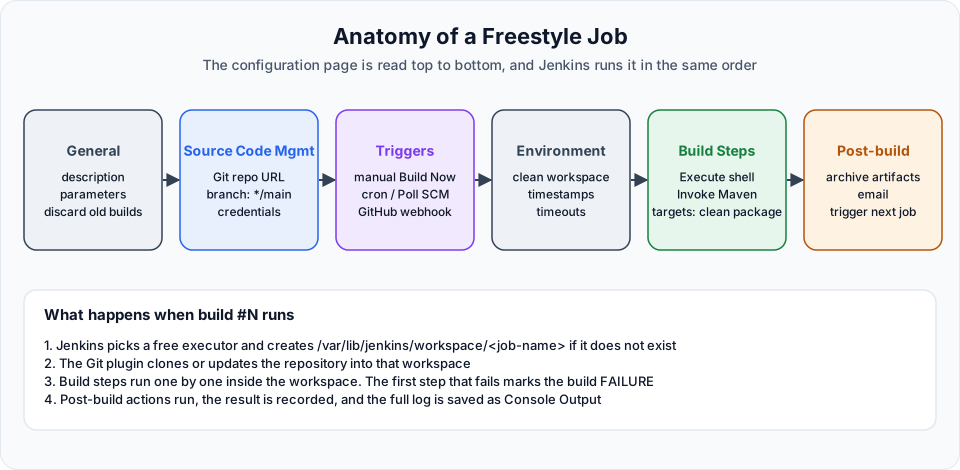
Freestyle jobs are great for learning and for small tasks. Larger teams usually move to pipelines (a Jenkinsfile kept in Git), which you will write in Section 5. The ideas you learn here (workspace, build steps, console output) carry over directly.
Create the job
New Item
On the dashboard click + New Item (or Create a job). Enter the name first-job, select Freestyle project, and click OK.
Use lowercase names with hyphens. The job name becomes part of the URL and the folder name on disk, so spaces cause awkward paths like first%20job.
Description
In General, add a description such as This is our first demo. Leave the other sections (Source Code Management, Triggers, Environment) empty for now. Each gets its own lesson.
Add a build step
Scroll to Build Steps, click Add build step and choose Execute shell. In Command, type:
echo "Telusko Jenkins First Job"

touch alien.txt

echo "Telusko Jenkins First Job Completed"
touch alien.txt creates an empty file. We use it to prove that Jenkins really runs commands on the server.
Save and build
Click Save (or Apply, which saves and keeps you on the page). Then click Build Now on the job page. A build #1 appears in the build list a second later with a green tick.
Read the console output
Click build #1, then Console Output.
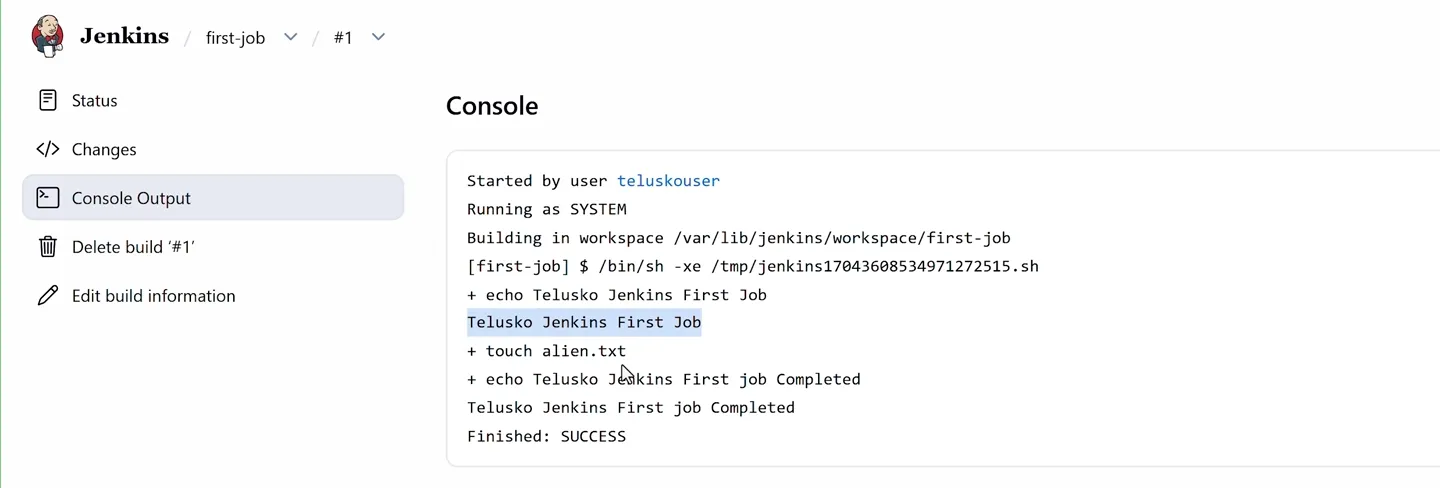
The console output of the first build. Every command and its output is recorded.
Read it line by line, because every Jenkins log follows the same pattern:
| Line | What it tells you |
|---|---|
Started by user teluskouser | What triggered the build. Later you will see "Started by timer" or "Started by GitHub push" |
Running as SYSTEM | The Jenkins permission identity of the build (not the Linux user) |
Building in workspace /var/lib/jenkins/workspace/first-job | The folder where the build ran |
$ /bin/sh -xe /tmp/jenkins....sh | Jenkins wrote your commands into a temporary script and ran it with sh |
+ echo ... | Thanks to -x, each command is printed with a + before it runs |
Finished: SUCCESS | The final result |
The two flags on /bin/sh matter more than they look:
| Flag | Meaning | Effect on your job |
|---|---|---|
-x | Print each command before running it | You can see exactly which command produced which output |
-e | Exit immediately if any command returns a non-zero exit code | The first failing command fails the whole build. Commands after it never run |
Try it: add ls /does-not-exist as the first line, build again, and watch the build turn red with Finished: FAILURE before the echo lines run.
Find the workspace on the server
Every job gets its own workspace, a folder under /var/lib/jenkins/workspace/ named after the job. SSH into the Jenkins server and look:
cd /var/lib/jenkins/workspace/first-job
ls
# alien.txt
The file is there. Jenkins ran your commands on this machine, inside this folder.
Two details worth knowing:
- Files in the workspace belong to the
jenkinsLinux user, because the Jenkins service runs as that user. Your build commands also run asjenkins, not asubuntuorroot. That is why a build step likeapt installfails with a permission error. - The workspace is kept between builds. Run the job again and
alien.txtis still there from the last run. That is handy for speed, but it can also hide problems. You will learn to clean it when needed.
Change, rebuild, delete
From the job page you can:
- Configure: change any setting and save. The next build uses the new configuration.
- Build Now: run it again. Each run gets the next number (
#2,#3, ...). - Open a build and choose Delete build to remove that run and its log.
- Delete Project (in the job menu) removes the job and its build history.
Builds run on the Jenkins server itself for now
So far there are no agents, so every build runs on the built-in node, the same machine as Jenkins. That is fine for learning. In Configure a Jenkins Agent Using SSH you will move builds to a separate machine.
Try It Yourself
- Create
first-jobexactly as shown and run it twice. Compare the console output of#1and#2. - Add
whoami,pwdandhostnameto the shell step. Which user, folder and machine does the build report? - Make the build fail on purpose with a bad command, then fix it. Watch how the job's weather icon changes on the dashboard.
- Print some built-in variables:
echo "Job $JOB_NAME build $BUILD_NUMBER in $WORKSPACE". The link See the list of available environment variables under the Command box shows the full list. - On the server, list
/var/lib/jenkins/jobs/first-job/builds/and find where Jenkins stores each build's log.
Official references
Written By: Shramik Masti
How is this guide?
Last updated on
Jenkins Dashboard Overview
Tour the Jenkins dashboard and the Manage Jenkins page, and learn what New Item, Build History, the build queue, executors, tools, plugins, nodes, credentials and users are for.
Building Your First Java Application with Jenkins
Configure Maven as a Jenkins tool, create a freestyle job that clones a Spring Boot project from GitHub and runs Maven, then find the generated WAR file in the workspace.