
Configure a Jenkins Agent Using SSH & Run Jobs on an Agent
Launch a second EC2 instance, install Java 21, connect it to Jenkins as a permanent SSH agent with a stored private key, fix the Java version error, and run the Maven job on the agent.
In the previous lesson we saw why builds should not run on the Jenkins server. Now we do it for real: create a second Linux machine, connect it to the controller over SSH, and move our java-app-build job onto it.
The plan:
Controller (Jenkins server)  --SSH, port 22-->  Agent (jenkins-slave-node)
  stores the job + key                           Java 21, remoting.jar
  schedules the build                            /home/ubuntu/slavenode/workspace/java-app-build
The controller logs into the agent over SSH with a private key it keeps in its credential store, copies a small Java program (remoting.jar) to the agent, starts it, and from then on sends build steps to it.
Step 1: launch the agent instance
In the EC2 console, Launch instance with:
| Setting | Value |
|---|---|
| Name | JenkinsSlave (or jenkins-agent) |
| AMI | Ubuntu Server 24.04 LTS, same as the controller |
| Instance type | t3.small. Builds run here, so do not go smaller |
| Key pair | The same key pair as the Jenkins server, to keep the demo simple |
| Security group | Must allow SSH (port 22) from the Jenkins controller |
The last row is the one people miss. The controller connects to the agent on port 22. If the agent's security group only allows SSH from your home IP, the controller is blocked and the agent never comes online. The neat way is to allow port 22 from the controller's security group (choose it as the source), or from the controller's private IP.
Step 2: prepare the agent machine
Connect to the new instance with SSH from your laptop, the same way as before.
# Optional: a clear hostname so you never confuse the two terminals
sudo hostnamectl set-hostname jenkins-slave-node
exit          # reconnect to see the new name in the prompt

# Java is the only hard requirement for an agent
sudo apt update
sudo apt install -y openjdk-21-jdk-headless
java --version
javac --version

# The folder Jenkins will use on this machine
mkdir ~/slavenode
cd ~/slavenode
pwd           # /home/ubuntu/slavenode
Copy the pwd output. You need it as the remote root directory.
The video uses sudo hostname jenkins-slave-node, which changes the name only until the next reboot. hostnamectl set-hostname makes it permanent.
Why the JDK and not just a JRE: the Java runtime runs the agent process, and the JDK is also what Maven needs to compile our project on this machine. Git is already installed on Ubuntu 24.04. Maven is not needed, because Jenkins installs the maven tool we configured automatically on whichever node runs the build.
The Java version must be one Jenkins supports
In the video, the agent first had Java 17, and the connection failed. The agent log showed java.lang.UnsupportedClassVersionError ... has been compiled by a more recent version of the Java Runtime (class file version 65.0), this version of the Java Runtime only recognizes class file versions up to 61.0. Class file version 65 is Java 21 and 61 is Java 17. Current Jenkins requires Java 21 or 25 on the controller and on every agent. Install openjdk-21-jdk-headless from the start and you will not see this error.
Step 3: create the node in Jenkins
On the controller's web UI, go to Manage Jenkins > Nodes > New Node. Enter the name slave-node, choose Permanent Agent, and click Create. Fill in the form:
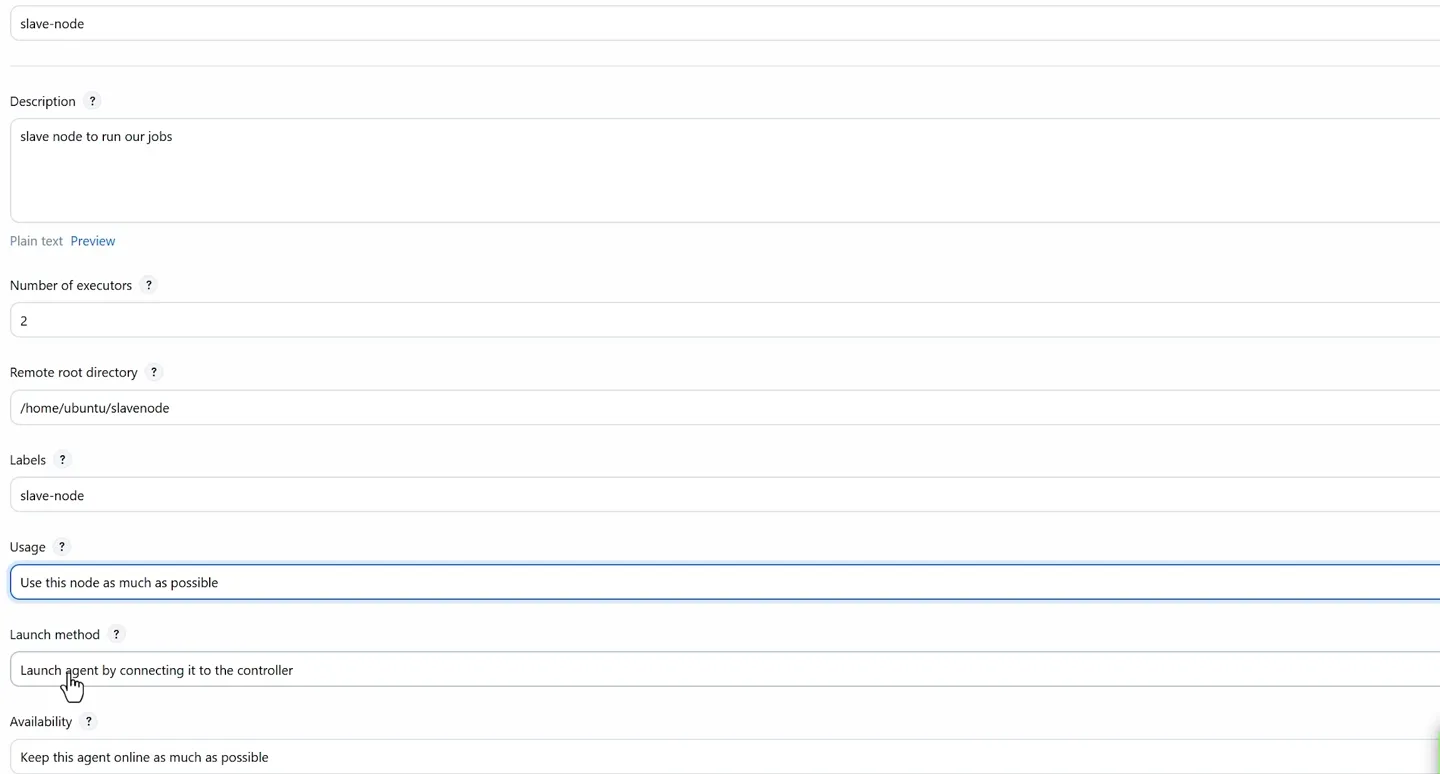
The node configuration before the launch method is changed to SSH.
| Field | Value | Meaning |
|---|---|---|
| Description | slave node to run our jobs | Free text |
| Number of executors | 2 | How many builds can run on this agent at the same time. A common rule is one per CPU core |
| Remote root directory | /home/ubuntu/slavenode | Where Jenkins puts remoting.jar and the workspace folder on the agent. Must exist and be writable by the SSH user |
| Labels | slave-node | A tag jobs use to ask for this agent. Real setups use descriptive labels like linux maven |
| Usage | Use this node as much as possible | Any job may run here. The other option, "Only build jobs with label expressions matching this node", reserves the agent for jobs that ask for its label |
| Launch method | Launch agents via SSH | The controller starts the agent over SSH. The default, "Launch agent by connecting it to the controller", is the inbound method |
| Host | The agent's DNS name or IP | Not the controller's. The video first pasted the controller's DNS by mistake. Inside one VPC, the agent's private IP is the better choice, because it does not change on stop/start |
| Credentials | The SSH key credential (next step) | |
| Host Key Verification Strategy | Manually trusted key Verification Strategy | See the table below |
| Availability | Keep this agent online as much as possible | Jenkins reconnects it automatically if the connection drops |
Step 4: add the SSH credential
Next to Credentials, click + Add (or create it first under Manage Jenkins > Credentials > System > Global credentials). Choose the kind SSH Username with private key:
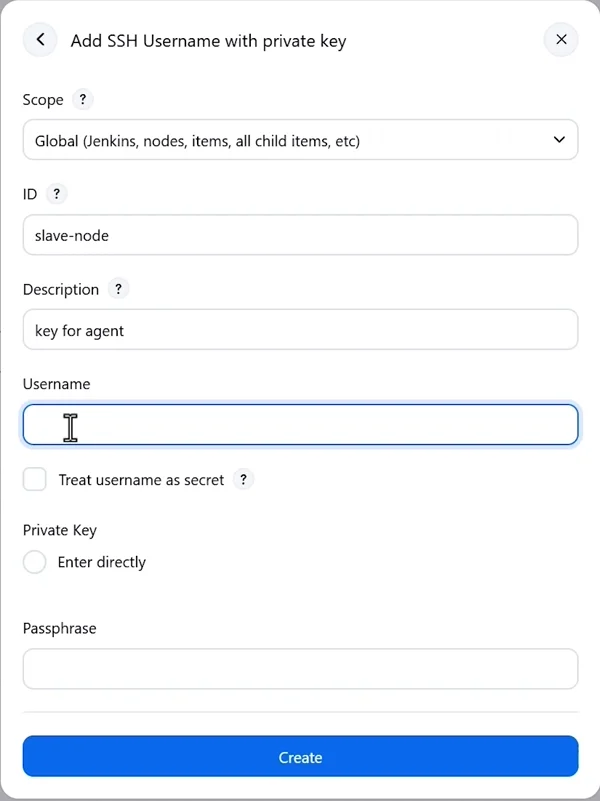
The credential form. The private key is pasted into the Enter directly box.
| Field | Value |
|---|---|
| Scope | Global |
| ID | slave-node (a readable ID, so pipelines can refer to it later) |
| Description | key for agent |
| Username | ubuntu, the Linux user on the agent |
| Private Key | Enter directly, then paste the full contents of the key file, including the -----BEGIN ... KEY----- and -----END ... KEY----- lines |
| Passphrase | Empty if the key has none |
To get the key contents, on your laptop in the folder with the key: cat jenkins-key-pair.pem, then copy everything. Click Create and select the new ubuntu (key for agent) credential in the node form.
Use a dedicated key in real setups
The demo reuses the EC2 key pair you also use to log in yourself. It works because AWS already placed the matching public key in /home/ubuntu/.ssh/authorized_keys on the agent. In real environments, create a separate key only for Jenkins (ssh-keygen -t ed25519 -f ~/.ssh/jenkins_agent_key), add its public key to the agent's authorized_keys (ideally for a dedicated jenkins user), and store only that private key in Jenkins. Then you can revoke Jenkins' access without touching your own. Never paste a private key into a chat, a screenshot or a Git repository.
Host Key Verification Strategy
SSH normally asks "Are you sure you want to continue connecting?" the first time it sees a server. Jenkins cannot answer that prompt, so you choose a strategy:
| Strategy | Behaviour | Use it when |
|---|---|---|
| Known hosts file Verification Strategy (default) | Checks ~/.ssh/known_hosts of the jenkins user on the controller | You already SSHed from the controller as jenkins and accepted the key |
| Manually provided key Verification Strategy | You paste the agent's host public key into the form | Strictest option |
| Manually trusted key Verification Strategy | Trusts the key it sees on the first connection and refuses if it changes later | Good balance, used in the demo |
| Non verifying Verification Strategy | Accepts any key | Avoid. Open to man-in-the-middle attacks |
With the default strategy and an empty known_hosts, the connection fails with a host key error, which is why the demo switches to Manually trusted key.
Click Save.
Step 5: check that the agent is online
Open Manage Jenkins > Nodes > slave-node > Log. A successful launch ends with lines like:
[SSH] Starting agent process: cd "/home/ubuntu/slavenode" && java -jar remoting.jar ...
Agent successfully connected and online
On the agent, the remote root now contains the remoting files:
ls ~/slavenode
# remoting  remoting.jar
The Nodes page should show slave-node without a red cross, and the dashboard's Build Executor Status now reads "built-in node + 1 agent".
If the log shows "Connection was broken" or a stack trace, read it from the bottom up. The cause is almost always one of the errors in the table at the end of this page.
Step 6: run the Maven job on the agent
Open java-app-build, click Configure, and in General tick Restrict where this project can be run. In Label Expression type slave-node. (While you are here, untick the every-minute Poll SCM trigger from the triggers lesson if it is still on.)
Save and click Build Now. The first run downloads Maven and all dependencies again, this time onto the agent, so it takes a few minutes.
In the console output, the workspace is now on the agent:
Building remotely on slave-node in workspace /home/ubuntu/slavenode/workspace/java-app-build
...
[INFO] Building war: /home/ubuntu/slavenode/workspace/java-app-build/target/springbootmvnapp-0.0.1-SNAPSHOT.war
[INFO] BUILD SUCCESS
Confirm it on the agent:
cd ~/slavenode/workspace/java-app-build/target
ls
# springbootmvnapp-0.0.1-SNAPSHOT.war  ...
The controller only scheduled the job and stored the log. All the compiling, testing and packaging happened on the agent.
Label expressions can be more than one label: linux && maven (both labels), linux || windows (either), !windows (anything but). In a pipeline you will write the same idea as agent { label 'slave-node' }.
Common errors
| Agent log shows | Cause | Fix |
|---|---|---|
UnsupportedClassVersionError ... class file version 65.0 ... up to 61.0 | Agent runs Java 17 | sudo apt install -y openjdk-21-jdk-headless, then Launch agent again |
java: command not found or "Java not found" | No Java on the agent | Install Java 21 |
Connection timed out | Security group blocks port 22 from the controller, or wrong host | Allow SSH from the controller's security group; check the host is the agent |
Authentication failed / Permission denied (publickey) | Wrong username or key | Username ubuntu on Ubuntu AMIs, paste the full private key |
No entry currently exists in the Known Hosts file for this host | Default host key strategy | Use Manually trusted key, or add the host to known_hosts of the jenkins user |
Remote root directory ... does not exist or permission denied | Folder missing or owned by another user | mkdir ~/slavenode as the SSH user |
| Build waits forever with "There are no nodes with the label" | Label in the job does not match the agent | Compare the label exactly, it is case-sensitive |
Clean up
When you finish practising, stop the agent instance as well as the controller. A stopped agent appears offline in Jenkins and reconnects automatically after you start it again (update the Host field if you used the public DNS, because it changes).
Try It Yourself
- Create the agent exactly as above and get it online.
- Restrict
java-app-buildtoslave-node, build it, and find the WAR on the agent. - Set the built-in node's executors to
0. Runfirst-job(which has no label). Where does it run now? - Change the agent's Usage to "Only build jobs with label expressions matching this node", and run
first-jobagain. What happens, and why? - Replace the reused EC2 key with a dedicated
ed25519key for Jenkins and reconnect the agent.
Official references
- Jenkins: Using Jenkins agents
- SSH Build Agents plugin
- Jenkins: Using Credentials
- Jenkins: Java Support Policy
Written By: Shramik Masti
How is this guide?
Last updated on
Jenkins Master Agent Architecture Introduction
Understand why running every build on the Jenkins server becomes a problem, how the controller and agent architecture (formerly master and slave) spreads the work, and the vocabulary behind it.
Introduction to Jenkins Pipeline
Learn what a Jenkins Pipeline is, why pipeline as code replaced click-configured jobs, the difference between declarative and scripted syntax, and write and run your first declarative pipeline.