
Maven Java Project Linux VM
Generate the same Maven Java project on the Amazon Linux VM, inspect it with ls and tree, and understand the Maven standard directory layout that every project follows.
The command from the previous lesson is exactly the same on Linux. What changes is how you look at the result: there is no File Explorer to double click through, so you explore the project with ls, cd and a handy tool called tree. If you are practising only on Windows, you can skip this lesson. The directory layout section at the end is useful for everyone, though.
Generate the project
SSH into your EC2 instance (see Maven Installation on Cloud Linux VM), confirm Maven is there, and run the generator:
mvn -v
clear

mvn archetype:generate \
  -DgroupId=com.telusko \
  -DartifactId=telusko-app \
  -DarchetypeArtifactId=maven-archetype-quickstart \
  -DarchetypeVersion=1.5 \
  -DinteractiveMode=false
The backslash \ at the end of a line tells Bash that the command continues on the next line. You can also paste it all on one line.
To recap the parameters (full table in Maven Java Project):
| Parameter | Value | Meaning |
|---|---|---|
groupId | com.telusko | Organisation, reverse domain name, also the Java package |
artifactId | telusko-app | Project name, folder name, and the start of the JAR name |
archetypeArtifactId | maven-archetype-quickstart | Template for a simple standalone Java project (JAR) |
archetypeVersion | 1.5 | Version of the template. The video uses 1.0, which also works but generates an older POM |
interactiveMode | false | Do not prompt, use these values |
On a fresh VM the first run downloads plugins from Maven Central, so expect a long list of Downloading from central lines followed by BUILD SUCCESS.
Look inside
ls -l
# drwxr-xr-x. 3 ec2-user ec2-user 32 Jul 28 11:38 telusko-app

cd telusko-app
ls -l
# -rw-r--r--. 1 ec2-user ec2-user ... pom.xml
# drwxr-xr-x. 4 ec2-user ec2-user ... src
Two things, as on Windows: pom.xml (how you talk to Maven) and src (your code). Moving through src/main/java/com/telusko one cd at a time is slow, so install tree, which prints the whole folder structure at once:
cd ~
sudo dnf install -y tree
tree telusko-app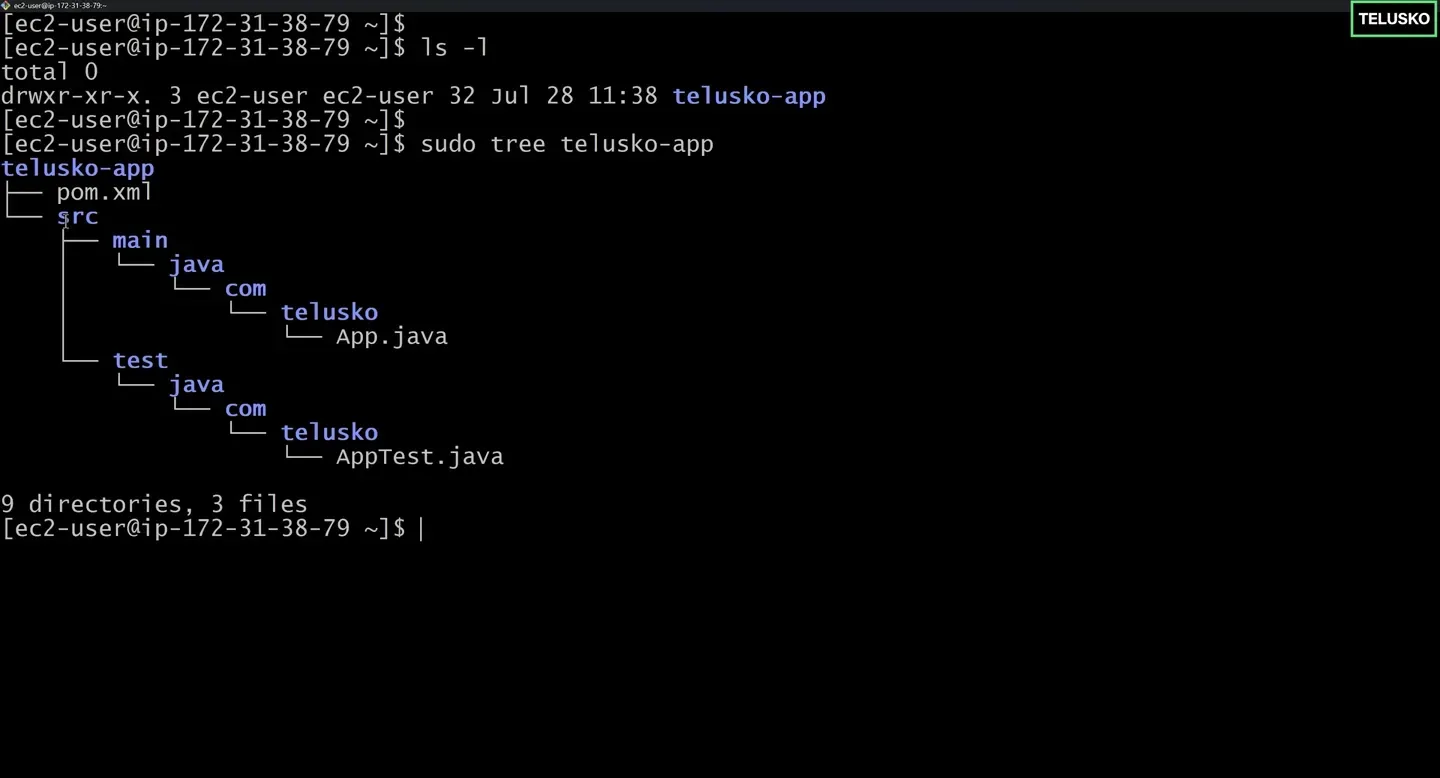
The tree output on the VM. Generated with archetype 1.0 in the video, so there is no .mvn folder.
The video runs sudo tree telusko-app. sudo is not needed here: the files belong to ec2-user, so a normal tree can read them. Only installing the package needs sudo. Getting into the habit of using sudo only when you must is a good security practice.
If you prefer an editor, vi pom.xml opens the POM (press Esc then type :q to quit). The vi editor basics lesson in the Linux course covers the keys you need.
The Maven standard directory layout
Whatever you used to create it (terminal, IntelliJ, Eclipse), every Maven project follows the same layout. Once a build runs, a target folder joins it.
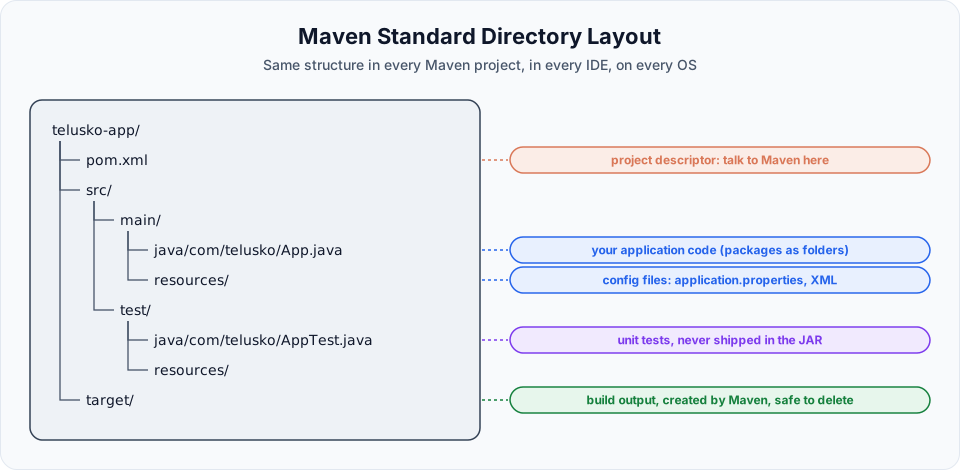
| Path | Contents | Ends up in the JAR? |
|---|---|---|
pom.xml | Project descriptor | A copy goes into META-INF/maven/ |
src/main/java | Application source code | Yes, compiled to .class |
src/main/resources | Config files, properties, XML, templates | Yes, copied as is |
src/main/webapp | JSP, HTML, WEB-INF/web.xml for web apps | Yes, inside a WAR |
src/test/java | Unit test source code | No |
src/test/resources | Config files used only by tests | No |
target/ | Everything Maven generates: classes, reports, the JAR or WAR | It is the output. Never commit it to Git |
Add target/ to .gitignore
target/ can always be regenerated by running a build, and it often holds large files. Every Maven project should have target/ in its .gitignore. See Cloning repos and .gitignore in the Git course.
Try It Yourself
- Generate
telusko-appon the VM and print its structure withtree. - Run
find telusko-app -name "*.java"and compare the result with the tree output. - Create
src/main/resourceswithmkdir -p telusko-app/src/main/resourcesand add anapp.propertiesfile. Runtreeagain. - Generate a second project with
-DartifactId=calculator-appand confirm the folder name and package match your parameters.
Official references
Written By: Shramik Masti
How is this guide?
Last updated on
Maven Java Project
Generate your first Maven Java project on Windows with mvn archetype:generate, understand every -D parameter in the command, and explore the pom.xml and src folders it creates.
Maven Terminologies
Learn the core Maven vocabulary (archetype, groupId, artifactId, version, packaging, dependencies, goals and repositories) and how the GAV coordinates identify every artifact.