
Maven Goals
Set the Java version in pom.xml, then run mvn compile, mvn clean, mvn test, mvn package and mvn clean package, and see exactly what each one creates in the target folder.
A project is only useful once you can build it. In Maven you ask for work with one simple syntax:
mvn <goal>You name the step you want (compile, test, package) and Maven does it, including every step that has to happen before it. In this lesson we run the everyday goals on telusko-app and watch what appears in the target folder after each one. The commands are identical on Windows and Linux.
Goal or phase?
The video calls clean, compile, test and package "goals", and that is how most people talk. Strictly speaking they are lifecycle phases, and each phase runs one or more plugin goals (for example the compile phase runs compiler:compile). The difference becomes important in Maven Build LifeCycle Summary. For now, "goal" is fine.
Before the first build: set the Java version
If you generated the project with archetype 1.0, as the video does, the POM says nothing about the Java version. Maven then uses the compiler plugin's built-in default, which is old:
| Maven version | Compiler plugin it uses by default | Default Java level |
|---|---|---|
| 3.8.x (the Amazon Linux package) | 3.1 | 1.5 (Java 5) |
| Recent 3.9.x (the video's 3.9.11) and 3.10.x | 3.13.0 or newer | 1.8 (Java 8) |
Modern JDKs cannot even compile for Java 5 any more, so on the Linux VM the first mvn compile fails with an error like Source option 5 is no longer supported. Use 7 or later. (that is the Java 17 wording; Java 21 and newer say "Use 8 or later"). The fix is to tell Maven which Java version to target.
The video adds the compiler plugin to pom.xml, inside <build> and after </dependencies>:
<build>
  <plugins>
    <plugin>
      <groupId>org.apache.maven.plugins</groupId>
      <artifactId>maven-compiler-plugin</artifactId>
      <version>3.11.0</version>
      <configuration>
        <source>17</source>
        <target>17</target>
      </configuration>
    </plugin>
  </plugins>
</build>
That works. On JDK 9 and newer, the cleaner modern way is a single property that sets both levels and also checks that you only use Java 17 APIs:
<properties>
  <maven.compiler.release>17</maven.compiler.release>
  <project.build.sourceEncoding>UTF-8</project.build.sourceEncoding>
</properties>
Use 21 instead of 17 if your JDK is 21 or newer and you want Java 21 features. If you generated the project with archetype 1.5, this property is already in the POM and you can skip this step.
cd ~/telusko-app
vi pom.xml
Press i for insert mode, paste the XML, press Esc, type :wq and press Enter to save and quit.
Right click pom.xml, choose Open with, and pick Notepad, VS Code or IntelliJ IDEA. Paste the XML and save the file. An unsaved editor tab is the most common reason a change "does not work".
mvn compile
Open a terminal inside the project folder (the folder that contains pom.xml) and run:
mvn compileMaven compiles everything in src/main/java and prints BUILD SUCCESS. A new target folder appears:
target/
├── classes/
│   └── com/telusko/App.class       <- your compiled bytecode
├── generated-sources/
└── maven-status/
Run Maven from the right folder
In the video, the first mvn compile on Windows ends in BUILD FAILURE because the Command Prompt was open in the parent folder, not inside the project. Maven looks for pom.xml in the current folder. If you see "there is no POM in this directory", cd into the project and try again.
mvn clean
mvn cleanDeletes the whole target folder, so the next build starts from nothing. Run ls -l (Linux) or dir (Windows) before and after to see it disappear. clean never touches src or pom.xml.
mvn test
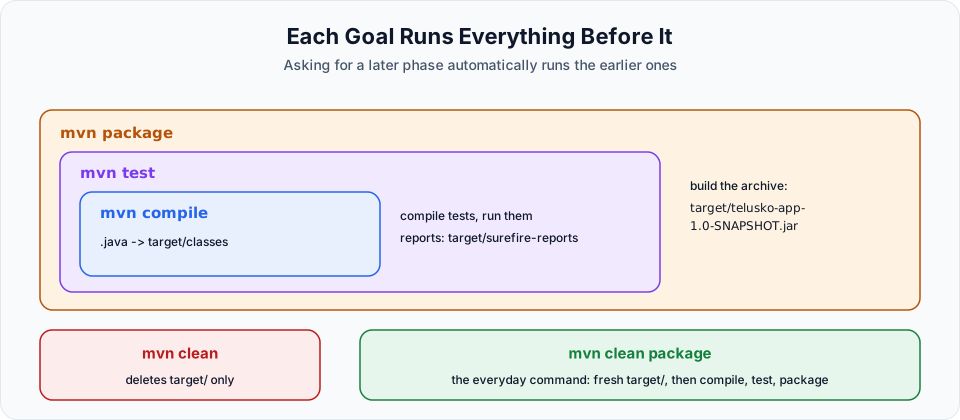
mvn testCompiles the application, compiles the tests in src/test/java, and runs them with the Surefire plugin. In other words: test = compile + test. Look for the summary:
-------------------------------------------------------
 T E S T S
-------------------------------------------------------
Running com.telusko.AppTest
Tests run: 1, Failures: 0, Errors: 0, Skipped: 0
New folders appear in target: test-classes (compiled tests) and surefire-reports (a text and an XML report per test class). If any test fails, the build fails and stops here. You will write your own test in Maven Java Project Unit Testing.
mvn package
mvn packageCompiles, runs the tests, and then packages the compiled classes into the format set by <packaging>. For our quickstart project that is a JAR. So package = compile + test + package.
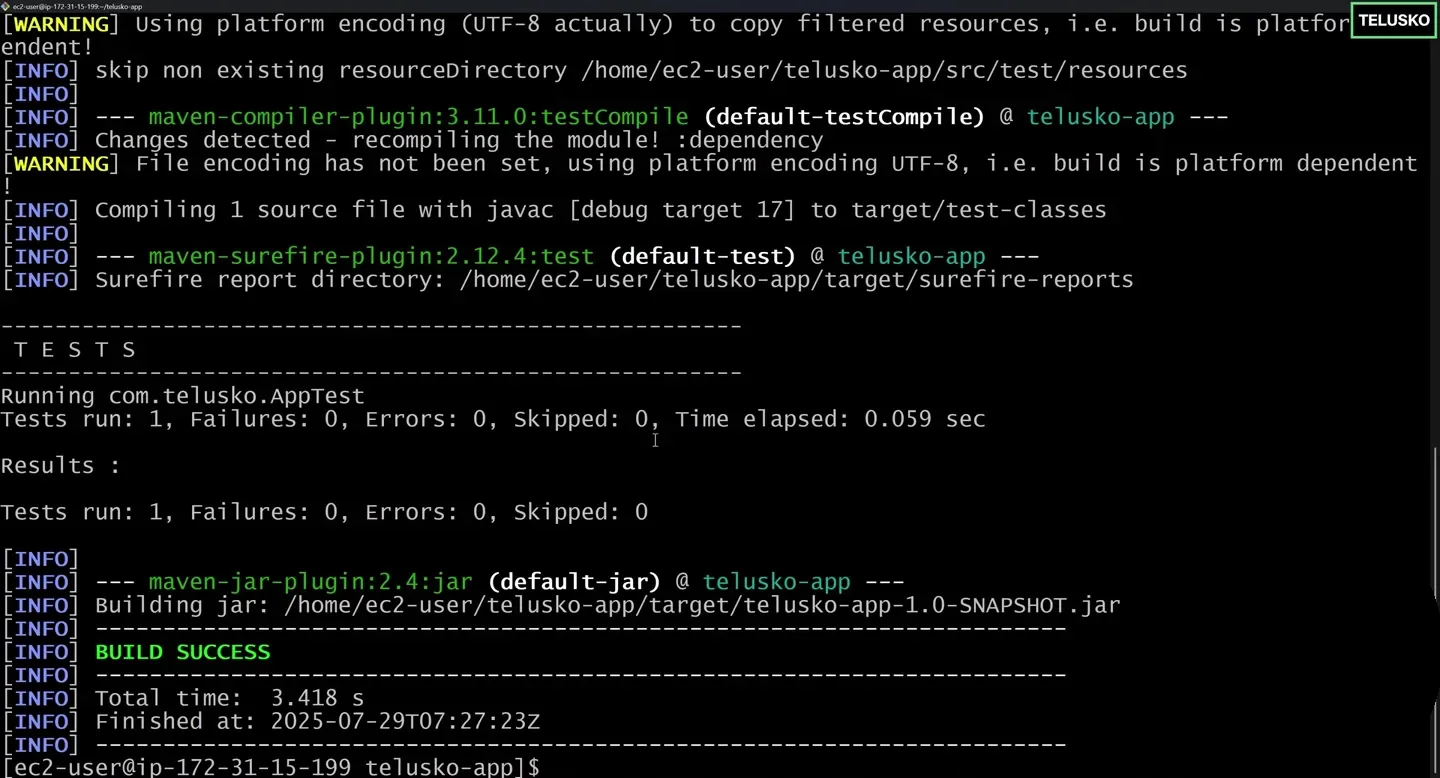
End of mvn package on the VM: one test passed, then the jar plugin built target/telusko-app-1.0-SNAPSHOT.jar.
Read the output from top to bottom and you can see the plugins running in order: maven-resources-plugin, maven-compiler-plugin:compile, maven-compiler-plugin:testCompile, maven-surefire-plugin:test, and finally maven-jar-plugin:jar. The plugin versions in your output depend on your Maven version, so do not worry if they differ from the screenshot.
Check the result and run it:
ls -l target
java -cp target/telusko-app-1.0-SNAPSHOT.jar com.telusko.App
# Hello World!
-cp puts the JAR on the classpath and com.telusko.App is the class whose main method should run. (java -jar does not work yet because the quickstart JAR has no Main-Class entry in its manifest. Spring Boot JARs do, as you will see later.)
mvn clean package
mvn clean packageTwo steps in one command: delete target, then compile, test and package from scratch. This is the command you will type most often in real projects and see most often in CI pipelines, because it guarantees no leftover files from an older build end up in the JAR.
Summary
| Command | What it does | Creates or removes |
|---|---|---|
mvn clean | Deletes the previous build output | Removes target/ |
mvn compile | Compiles src/main/java | target/classes |
mvn test | compile + compile tests + run tests | target/test-classes, target/surefire-reports |
mvn package | compile + test + package | target/<artifactId>-<version>.jar (or .war) |
mvn clean package | clean, then a full fresh package | A fresh target/ with the archive |
Useful flags you will meet soon:
| Flag | Meaning |
|---|---|
-q | Quiet: show only errors |
-o | Offline: use only what is in the local repository |
-DskipTests | Compile tests but do not run them (use carefully, never as a habit) |
-e / -X | Show the full error stack trace / full debug output when a build fails |
Try It Yourself
- Run
mvn compileand listtarget/classes. Then runmvn cleanand confirmtargetis gone. - Run
mvn testand open the file intarget/surefire-reportsthat ends in.txt. - Run
mvn clean package, then run the JAR withjava -cp. Change the message inApp.java, rebuild, and run it again. - Remove the Java version setting from
pom.xml, runmvn clean compile, and read the error (or warning) your Maven and JDK combination produces. Put the setting back. - Time
mvn packagetwice in a row. Explain why the second run is faster.
Official references
- Apache Maven: Introduction to the Build Lifecycle
- Apache Maven: Compiler Plugin, compile goal parameters
- Apache Maven: Maven in 5 Minutes
Written By: Shramik Masti
How is this guide?
Last updated on
Maven Terminologies
Learn the core Maven vocabulary (archetype, groupId, artifactId, version, packaging, dependencies, goals and repositories) and how the GAV coordinates identify every artifact.
Maven Web App
Generate a Java web application with the maven-archetype-webapp template, see how its structure and packaging differ from a JAR project, and build a deployable WAR file with mvn clean package.