
Maven Build LifeCycle Summary
Learn Maven's three built-in lifecycles and the key phases of the default lifecycle, from validate through compile, test, package, verify, install and deploy, and what each one produces.
When you typed mvn package, Maven did not run just one step. It ran a whole sequence: validate, compile, test, and only then package. That fixed sequence is called a build lifecycle. A lifecycle is an ordered list of phases, and when you ask for one phase Maven runs every phase before it, in order. This is why mvn package always compiles and tests first, and why you never have to remember the order yourself.
Three built-in lifecycles
| Lifecycle | Purpose | How often you use it |
|---|---|---|
| default | Builds and distributes the project: validate, compile, test, package, verify, install, deploy | Every day. This is the main one |
| clean | Removes the output of previous builds (target/) | Every day, usually as mvn clean ... |
| site | Generates a documentation website for the project | Rarely |
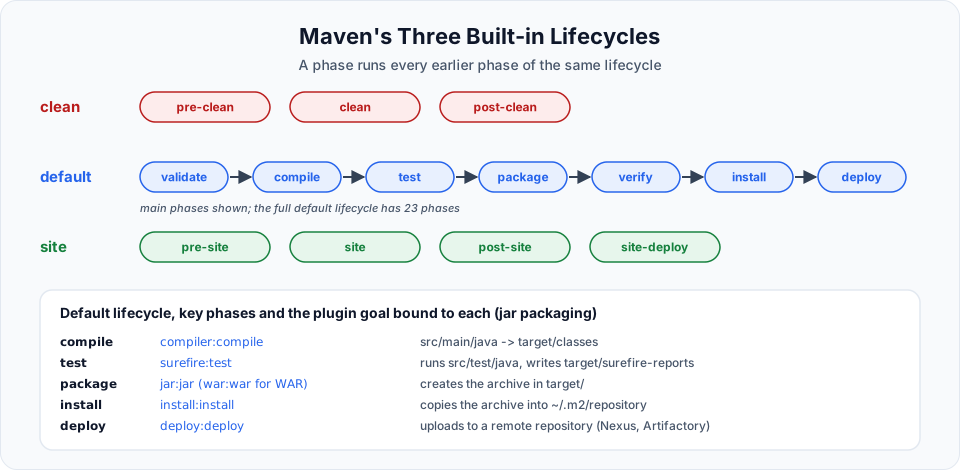
The lifecycles are independent. mvn clean package runs the clean lifecycle up to clean, then the default lifecycle up to package.
Key phases of the default lifecycle
The default lifecycle has 23 phases in total, many of them hooks for plugins (such as process-resources or prepare-package). These are the ones you use and see in IntelliJ's Lifecycle node:
| Phase | What happens | Plugin goal bound by default (jar) |
|---|---|---|
validate | Checks the project is correct and all needed information is available: the POM is valid, required values such as the coordinates are present | none by default |
compile | Compiles src/main/java into target/classes | compiler:compile |
test | Compiles and runs unit tests from src/test/java | compiler:testCompile, surefire:test |
package | Bundles the compiled code into a JAR or WAR in target/ | jar:jar (or war:war) |
verify | Runs checks on the package: integration tests, code coverage limits (for example with JaCoCo), quality gates | none by default. Plugins you add hook in here |
install | Copies the package into your local repository (~/.m2/repository) | install:install |
deploy | Uploads the package to a remote repository such as Nexus or Artifactory | deploy:deploy |
A small correction about validate
The video explains validate as checking that the folders like src/main/java exist. What it really checks is the project model: the POM must be valid and complete (for example the coordinates must be set). Maven does not fail because a folder such as src/test/java is missing. It simply has nothing to compile there.
Each command runs everything up to and including the phase you name:
| Command | Runs |
|---|---|
mvn compile | validate, compile |
mvn test | validate, compile, test |
mvn package | validate, compile, test, package |
mvn verify | ... package, verify |
mvn install | ... package, verify, install |
mvn deploy | ... install, deploy |
install: share with your other projects
mvn clean installAfter packaging and verifying, install copies the JAR (and its POM) into your local repository, under its coordinates:
~/.m2/repository/com/telusko/telusko-app/1.0-SNAPSHOT/
├── telusko-app-1.0-SNAPSHOT.jar
└── telusko-app-1.0-SNAPSHOT.pom
Now any other Maven project on the same machine can use it as a normal dependency:
<dependency>
  <groupId>com.telusko</groupId>
  <artifactId>telusko-app</artifactId>
  <version>1.0-SNAPSHOT</version>
</dependency>
That is how you reuse your own code as a library without publishing it anywhere.
deploy: share with the team
install only helps on your machine. To share an artifact with other developers and CI servers, deploy uploads it to the company's remote repository. Maven needs to know where to upload, which you configure in the POM:
<distributionManagement>
  <repository>
    <id>company-releases</id>
    <url>https://nexus.example.com/repository/maven-releases/</url>
  </repository>
  <snapshotRepository>
    <id>company-snapshots</id>
    <url>https://nexus.example.com/repository/maven-snapshots/</url>
  </snapshotRepository>
</distributionManagement>
The username and password go in ~/.m2/settings.xml under a <server> whose <id> matches, never in the POM. SNAPSHOT versions go to the snapshot repository, release versions to the release repository. Without distributionManagement, mvn deploy fails, which is what you saw if you clicked deploy in IntelliJ.
Do you really need install?
In CI pipelines, mvn clean verify is usually the right command: it builds and runs every check without writing to the local repository. Use install when another local project needs your artifact, and deploy when the whole team does.
Phases versus plugin goals
Phases do nothing on their own. Work happens when a plugin goal is bound to a phase. The packaging type decides the default bindings (the table above is for jar; for war only the package step changes to war:war). Plugins you add, such as JaCoCo or the Spring Boot plugin, bind more goals to phases.
You can also call a plugin goal directly, outside any lifecycle, with plugin:goal. You have done this already:
mvn archetype:generate      # a goal, no lifecycle
mvn dependency:tree         # a goal, no lifecycle
mvn help:effective-pom      # a goal, no lifecycle
mvn clean dependency:tree package   # mix: phase, goal, phase
Try It Yourself
- Run
mvn verifyontelusko-appand list the plugin goals that ran, in order, from the output. - Run
mvn clean installand find your JAR in~/.m2/repository/com/telusko/telusko-app. - Create a second quickstart project, add
telusko-appas a dependency, and build it. Then deletetelusko-appfrom~/.m2and build the second project again to see the error. - Run
mvn deploywithoutdistributionManagementand read the error message.
Official references
- Apache Maven: Introduction to the Build Lifecycle
- Apache Maven: Install Plugin
- Apache Maven: Deploy Plugin
Written By: Shramik Masti
How is this guide?
Last updated on
Maven Project in Eclipse IDE
Create a Maven project from the quickstart archetype in Eclipse, explore Maven Dependencies and the POM editor tabs, add a dependency, and use Maven Update Project to keep Eclipse in sync.
Maven Java Project Unit Testing
Write a small Calc class and a JUnit 5 test in a Maven project, add the JUnit dependency, run mvn test from Eclipse and the terminal, and read both a passing and a failing test report.