
Maven Project in Eclipse IDE
Create a Maven project from the quickstart archetype in Eclipse, explore Maven Dependencies and the POM editor tabs, add a dependency, and use Maven Update Project to keep Eclipse in sync.
Eclipse is still common in many companies, especially in large enterprise and service projects. Its Maven support comes from a plugin called m2e (Maven Integration for Eclipse), which is already included in the "Eclipse IDE for Enterprise Java and Web Developers" and "Eclipse IDE for Java Developers" packages. As with IntelliJ, the project structure is exactly the same Maven structure. Only the screens look different.
Create the project
Open the wizard
Make sure you are in the Java EE perspective (top right corner of the window). Then choose File > New > Maven Project. If you do not see it in the menu, use File > New > Other... > Maven > Maven Project.
Keep archetype selection
On the first page, leave Create a simple project (skip archetype selection) unticked this time, so you can choose a template. Click Next. Eclipse loads the archetype catalogs, which can take a few seconds.
Choose the quickstart archetype
Select org.apache.maven.archetypes : maven-archetype-quickstart and click Next.
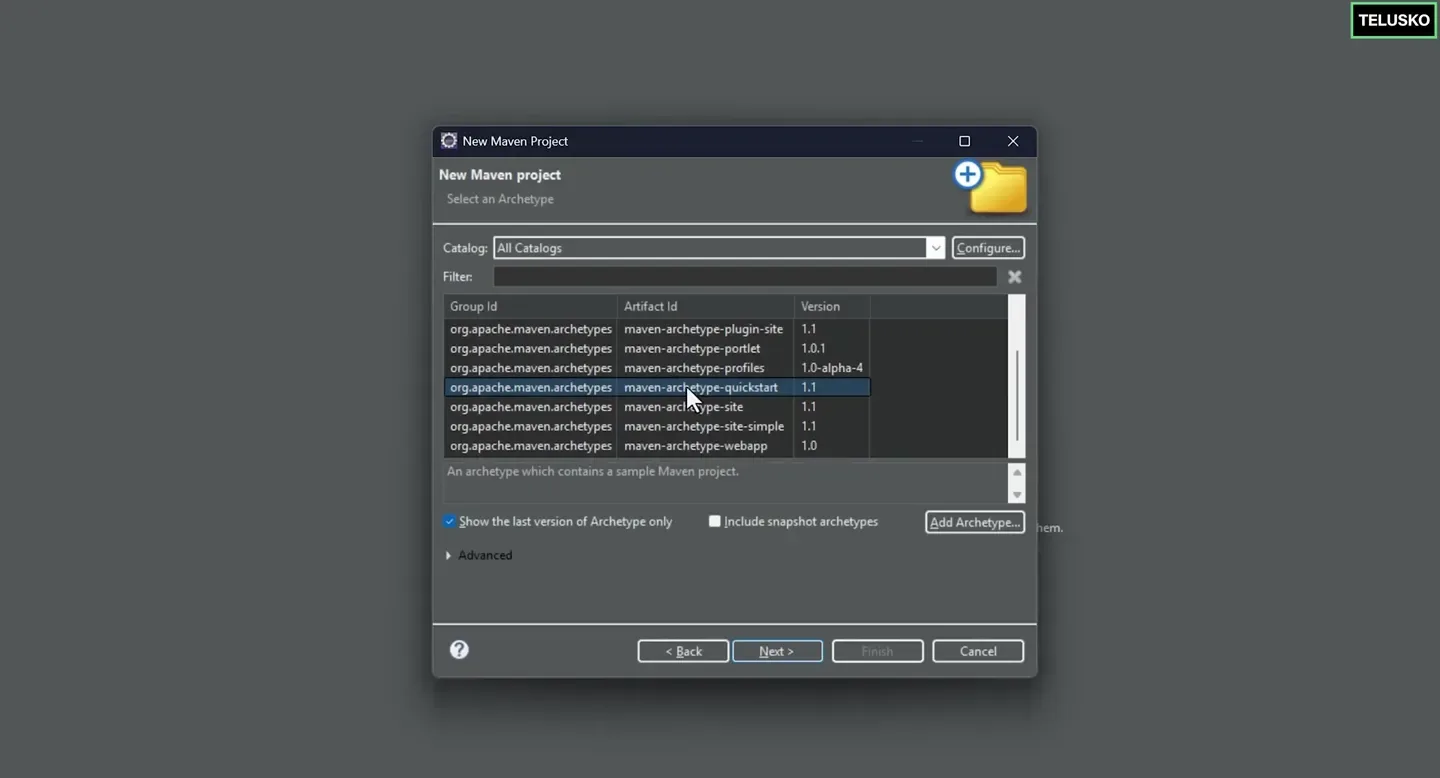
The archetype list in Eclipse. The built-in catalog shows quickstart 1.1.
Eclipse's built-in catalog only offers the old version 1.1 (no Java version in the POM, JUnit 3.8.1). To get the current 1.5 template, click Add Archetype... and enter groupId org.apache.maven.archetypes, artifactId maven-archetype-quickstart, version 1.5. Either works for this lesson.
Enter the coordinates
| Field | Value |
|---|---|
| Group Id | com.telusko |
| Artifact Id | MavenSimpleApp |
| Version | 0.0.1-SNAPSHOT (Eclipse's default) |
| Package | filled in automatically from group and artifact |
Click Finish. Eclipse runs archetype:generate in the background. The Console view may ask you to confirm the properties with Y: click in the console, type Y and press Enter. That is the interactive mode you switched off with -DinteractiveMode=false on the command line.
Explore the project
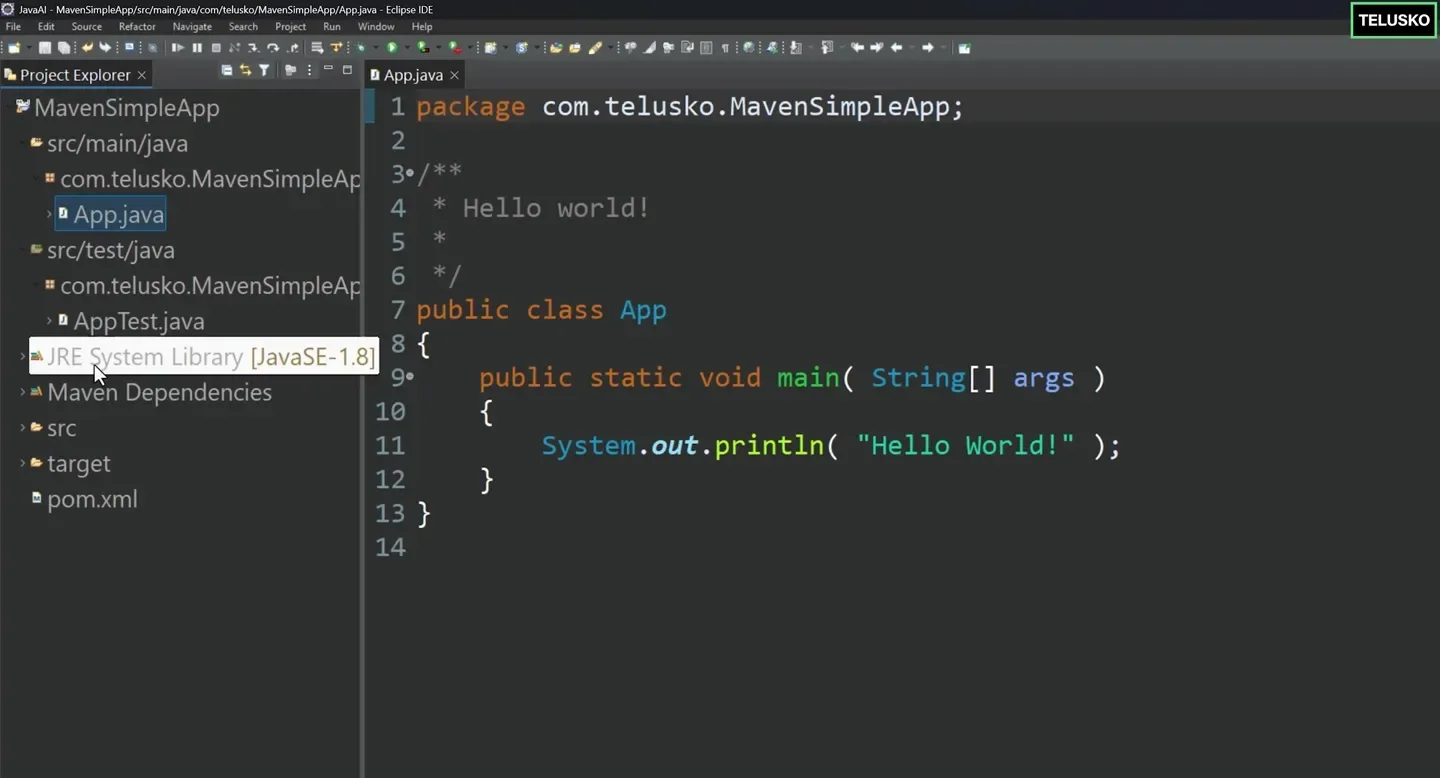
The generated project in Eclipse's Project Explorer, with the sample App.java open.
| Node | Meaning |
|---|---|
src/main/java | Application code, with the generated App.java |
src/test/java | Tests, with the generated AppTest.java |
| JRE System Library | The Java version Eclipse compiles against. Eclipse reads it from the POM |
| Maven Dependencies | Every JAR Maven resolved for the project, including transitive ones. Right now only junit-3.8.1.jar |
target | Build output, same as on the command line |
pom.xml | The same POM you have been studying |
Notice JRE System Library [JavaSE-1.8]. The quickstart 1.1 POM does not set a Java version, so Eclipse falls back to Java 1.8. Fix it the Maven way, in the POM, not in Eclipse's project settings:
<properties>
  <project.build.sourceEncoding>UTF-8</project.build.sourceEncoding>
  <maven.compiler.release>17</maven.compiler.release>
</properties>
Then right click the project and choose Maven > Update Project... (shortcut Alt+F5). The node changes to JavaSE-17. If you change Eclipse settings by hand instead, the next Update Project overwrites them, and command line builds ignore them anyway.
The POM editor tabs
Double click pom.xml. Eclipse's POM editor has tabs at the bottom:
| Tab | Use it to |
|---|---|
| Overview | See and edit coordinates in a form |
| Dependencies | Add or remove dependencies through dialogs |
| Dependency Hierarchy | See the dependency tree, like mvn dependency:tree |
| Effective POM | See the merged effective POM, exactly as explained in Effective POM |
| pom.xml | Edit the raw XML. Most developers work here |
Open Effective POM and you will find the Maven Central repository, the plugin list and all the defaults you did not write.
Add a dependency
Copy the spring-core dependency from Maven Dependencies into the pom.xml tab, inside <dependencies>:
<dependency>
  <groupId>org.springframework</groupId>
  <artifactId>spring-core</artifactId>
  <version>6.2.8</version>
</dependency>
Save the file (Ctrl+S). m2e usually refreshes the project automatically, and the Spring JARs appear under Maven Dependencies. If they do not, run Maven > Update Project.... Check the Effective POM tab again and the dependency is there too.
Run Maven goals in Eclipse
Right click the project and choose Run As. You get shortcuts such as Maven clean, Maven install and Maven test. For anything else choose Maven build... and type the goals yourself, for example clean package. Output appears in the Console view.
Which Maven does Eclipse run?
m2e ships with an embedded Maven. To use the Maven you installed, add it under Window > Preferences > Maven > Installations. Using the same Maven version everywhere avoids "works in Eclipse, fails in Jenkins" surprises.
Try It Yourself
- Create
MavenSimpleAppfrom the quickstart archetype and findjunit-3.8.1.jarunder Maven Dependencies. - Set
maven.compiler.releaseto 17, run Maven > Update Project, and confirm the JRE System Library changes. - Add spring-core 6.2.8, save, and open the Dependency Hierarchy tab to find spring-jcl.
- Use Run As > Maven build... with goals
clean packageand find the JAR intarget.
Official references
Written By: Shramik Masti
How is this guide?
Last updated on
Effective POM
Learn why a nearly empty pom.xml can still compile, test and package a project, what the Super POM and effective POM are, and how to view the effective POM in IntelliJ or with mvn help:effective-pom.
Maven Build LifeCycle Summary
Learn Maven's three built-in lifecycles and the key phases of the default lifecycle, from validate through compile, test, package, verify, install and deploy, and what each one produces.