
Maven in IntelliJ IDE
Create a Maven project in IntelliJ IDEA, find the same standard structure you built from the terminal, and run clean, compile, test and package from the Maven tool window.
Everything we did in the terminal also works from an IDE, and in day to day development that is how most people use Maven. The important thing to understand is that the IDE does not replace Maven. It runs the same Maven, reads the same pom.xml, and produces the same target folder. The project structure is identical whichever IDE you use.
Create the project
Open the New Project dialog
In IntelliJ IDEA choose File > New > Project (or New Project on the welcome screen).
Fill in the basics
| Field | Value in the demo | Notes |
|---|---|---|
| Name | MavenDemoApp | Becomes the folder name and the default artifactId |
| Location | D:\Maven Projects | Any folder you like |
| Build system | Maven | The choice that matters. IntelliJ and Gradle are the other options |
| JDK | 21 | Any JDK 17 or newer |
| Add sample code | ticked | Creates a Main class |
Expand Advanced Settings to set the GroupId (for example com.telusko) and ArtifactId. If you leave GroupId alone, IntelliJ uses org.example, which is why the video's project ends up with an org.example package.
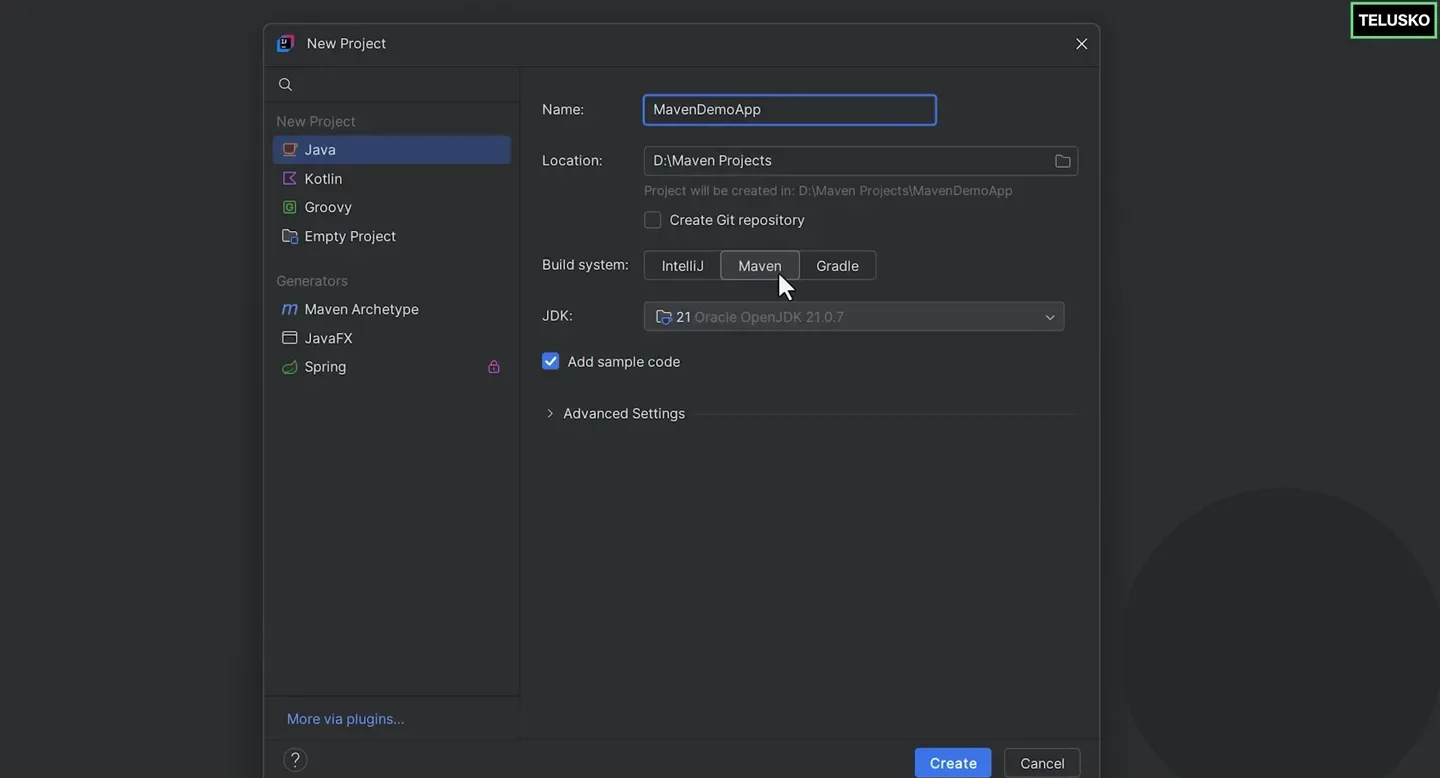
The New Project dialog with Maven selected as the build system.
Create
Click Create and choose to open it in the current window or a new one. IntelliJ generates the project and imports it as a Maven project.
The same structure as before
The project tool window on the left shows a familiar layout:
MavenDemoApp/
├── pom.xml
└── src/
    ├── main/
    │   ├── java/org/example/Main.java
    │   └── resources/
    └── test/
        └── java/
Open pom.xml. IntelliJ already set the Java version through properties, the same technique you learned in Maven POM.xml file:
<properties>
  <maven.compiler.source>21</maven.compiler.source>
  <maven.compiler.target>21</maven.compiler.target>
  <project.build.sourceEncoding>UTF-8</project.build.sourceEncoding>
</properties>
The Maven tool window
Click the m icon on the right edge (or View > Tool Windows > Maven). It has three useful nodes:
| Node | What it shows |
|---|---|
| Lifecycle | The common phases: clean, validate, compile, test, package, verify, install, site, deploy |
| Plugins | Every plugin the project uses (clean, compiler, surefire, jar, install, deploy and so on) with its version, and each plugin's individual goals such as compiler:compile |
| Repositories | The local repository (~/.m2/repository) and central (https://repo.maven.apache.org/maven2) you learned about in Maven Repositories |
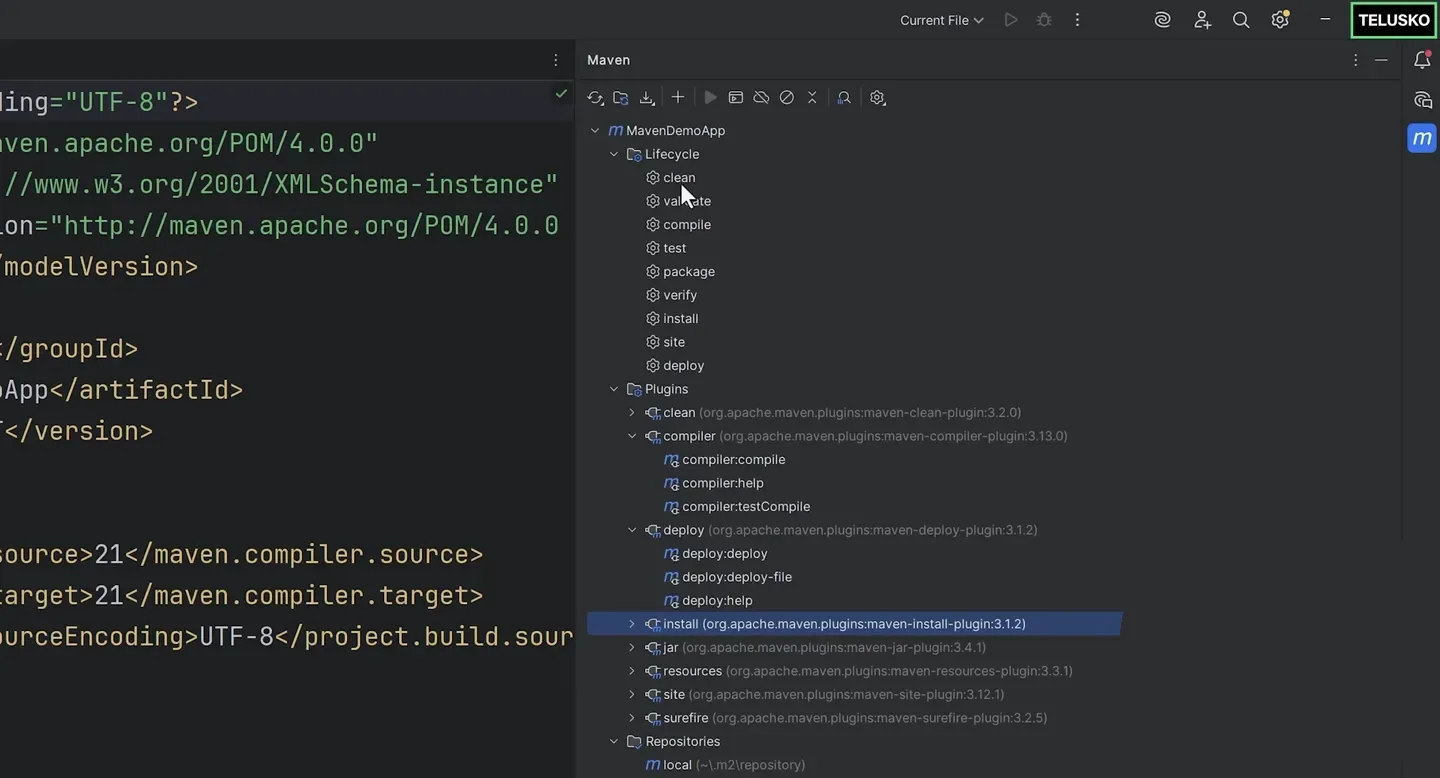
The Maven tool window: lifecycle phases at the top, plugins with their versions, then the local and central repositories.
Notice that the Plugins node lists plugins you never added to pom.xml. They come from Maven's built-in defaults, which is exactly what the next lesson, Effective POM, explains.
Run goals from the IDE
Double click a phase under Lifecycle to run it (or right click it and choose Run). The Run panel at the bottom shows the same output you saw in the terminal.
| Double click | Same as | Result |
|---|---|---|
clean | mvn clean | target/ deleted |
compile | mvn compile | target/classes created |
test | mvn test | Tests compiled and run |
package | mvn package | target/MavenDemoApp-1.0-SNAPSHOT.jar created. The Run panel prints the full path |
You can select several phases with Ctrl+click and run them together, for example clean and package. install and deploy work too, and we cover what they do in the lifecycle lesson. deploy needs extra configuration (where to deploy), so it will fail on this demo project, which is expected.
You can still open the Terminal tab inside IntelliJ and type mvn clean package yourself. Both ways give the same result.
Two IntelliJ habits worth learning
Try It Yourself
- Create
MavenDemoAppin IntelliJ with GroupIdcom.teluskoand runpackagefrom the Maven tool window. - In the Plugins node, find the version of
maven-surefire-pluginyour project uses. - Add the spring-core dependency to the POM, reload the project, and confirm it appears under External Libraries.
- Run
mvn clean packagefrom IntelliJ's Terminal tab and compare the output with the tool window run.
Official references
Written By: Shramik Masti
How is this guide?
Last updated on
Maven POM.xml file
Read a pom.xml from top to bottom, understand the project root, coordinates, dependencies, build plugins and properties, and use ${property} placeholders to avoid repeating values.
Effective POM
Learn why a nearly empty pom.xml can still compile, test and package a project, what the Super POM and effective POM are, and how to view the effective POM in IntelliJ or with mvn help:effective-pom.