
Terraform Taint and Untaint
Force Terraform to destroy and recreate a resource without changing code, using terraform taint and untaint, and the modern replacement terraform apply -replace.
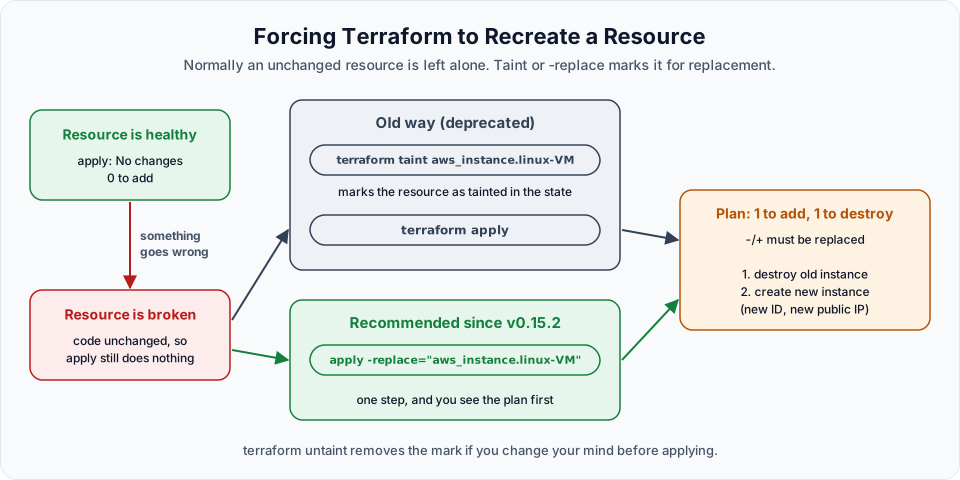
Here is a situation you will meet in real work. Terraform created an EC2 instance last week. Today the instance is misbehaving: someone changed a config file by hand, a disk filled up, the application on it is broken. Your Terraform code is fine and has not changed. You simply want a fresh instance built from the same code.
What happens if you run terraform apply?
terraform apply -auto-approveNo changes. Your infrastructure matches the configuration.
Apply complete! Resources: 0 added, 0 changed, 0 destroyed.Nothing. As we learned in Terraform Statefile, Terraform compares code, state and reality. The instance exists and matches the code, so as far as Terraform is concerned, there is nothing to do. It cannot see that the software inside the machine is broken.
The long way round
Without any special command, you could:
terraform destroy(deletes everything in the configuration, not just the broken instance)terraform applyagain
Or, as the lecture mentions, delete the state file and re-initialise, which as you know creates orphans and is never a good idea. Both are heavy handed. What you want is: "replace this one resource, leave the rest alone".
terraform taint
Tainting a resource marks it in the state file as "damaged, must be replaced". The next apply destroys and recreates it.
The lecture uses the 03-tf-ec2vars project from the variables and outputs lessons, where the instance was created as aws_instance.linux-VM.
The command takes the resource address: <type>.<local name>.
terraform taint aws_instance.linux-VMResource instance aws_instance.linux-VM has been marked as tainted.On the first try in the lecture, the name was typed slightly wrong and Terraform replied:
No such resource instanceThe address must match exactly what is in main.tf, including case and hyphens: linux-VM is not linux_vm or Linux-VM. When in doubt, list the addresses Terraform knows:
terraform state listaws_instance.linux-VMNow apply, without changing any code:
terraform apply -auto-approve # aws_instance.linux-VM is tainted, so must be replaced
-/+ resource "aws_instance" "linux-VM" {
~ id = "i-0abc1234def567890" -> (known after apply)
~ public_ip = "203.0.113.25" -> (known after apply)
...
}
Plan: 1 to add, 0 to change, 1 to destroy.
Changes to Outputs:
~ ec2_vm_public_ip = "203.0.113.25" -> (known after apply)
aws_instance.linux-VM: Destroying... [id=i-0abc1234def567890]
aws_instance.linux-VM: Destruction complete after 40s
aws_instance.linux-VM: Creating...
aws_instance.linux-VM: Creation complete after 13s [id=i-0def9876abc543210]
Apply complete! Resources: 1 added, 0 changed, 1 destroyed.Read the symbol -/+: destroy, then create. The old instance is terminated, a new one is launched with a new instance ID and a new public IP, which our output prints for us.
terraform untaint
Marked a resource by mistake? Remove the mark before you apply:
terraform taint aws_instance.linux-VM
terraform untaint aws_instance.linux-VM
Resource instance aws_instance.linux-VM has been successfully untainted.The next apply goes back to normal:
No changes. Your infrastructure matches the configuration.Untaint is also useful in one more case. If a resource fails halfway through creation (for example a provisioner script fails), Terraform marks it as tainted automatically. If you know the resource is actually fine, untaint stops Terraform from replacing it.
The modern way: apply -replace
terraform taint still works, but HashiCorp has deprecated it. The official docs say: "This command is deprecated. Instead, add the -replace option to your terraform apply command." The -replace option exists since Terraform v0.15.2.
terraform apply -replace="aws_instance.linux-VM"Same result, but better:
terraform taint + apply | terraform apply -replace | |
|---|---|---|
| Steps | Two commands | One command |
| When the state changes | Immediately, when you run taint | Only when you approve the apply |
| Preview | You see the effect only in the next plan | The plan shows the replacement before you type yes |
| Teams | A colleague running apply in between replaces your resource without expecting it | Nothing is changed for anyone until you approve |
| Status | Deprecated | Recommended |
You can preview first with plan too:
terraform plan -replace="aws_instance.linux-VM"And replace several resources at once by repeating the flag:
terraform apply -replace="aws_instance.web" -replace="aws_instance.worker"Learn both
You will still find terraform taint in older scripts, tutorials and interview questions, so know what it does. For your own work, use -replace.
Replacing deletes data
Replacing an instance destroys its root disk. Anything stored only on that machine is gone. For servers built with user data or configuration tools this is fine, because the new machine rebuilds itself. For a database, think very carefully before replacing.
When to use it
- An instance's software is broken and rebuilding is faster than repairing
- You changed a user data script and want the new script to run (alternatively use
user_data_replace_on_change, see the user data lesson) - You want to test that your configuration really can rebuild a resource from scratch
Try It Yourself
- Apply the
03-tf-ec2varsproject, then runterraform applyagain and confirmNo changes. - Run
terraform taintwith a wrong address and read the error. Useterraform state listto find the right one. - Taint the instance, apply, and compare the old and new public IP in the outputs.
- Taint it again, then untaint it, and confirm that
terraform planshows no changes. - Use
terraform plan -replace="aws_instance.linux-VM"and thenterraform apply -replace=.... Finish withterraform destroy.
Official references
Written By: Shramik Masti
How is this guide?
Last updated on
Terraform to create s3 bucket on aws
Create an S3 bucket with Terraform, understand why the acl argument now shows a deprecation warning, and add versioning and public access blocking the current way.
Terraform Modules Theory
Understand what a Terraform module is, why one big folder stops scaling, and how a root module with child modules keeps EC2, S3 and other infrastructure organised.