
Terraform Statefile
Learn what terraform.tfstate stores, why a second apply creates nothing, what goes wrong when the state file is deleted, and how the backup file and remote state work.
Run terraform apply twice with the same code and you still get one EC2 instance, not two. How does Terraform know the instance already exists? It did not ask you, and it did not search your AWS account for something that looks similar. It remembered. That memory is the state file.
What the state file is
After the first successful terraform apply, a new file appears next to main.tf:
ls -l-rw-r--r--. 1 ec2-user ec2-user 312 main.tf
-rw-r--r--. 1 ec2-user ec2-user 4710 terraform.tfstateterraform.tfstate is a JSON file that maps each resource in your code to the real object it created in the cloud. For our instance it records the resource address aws_instance.linux-VM, the real instance ID (i-0abc...), the AMI, the IP addresses, tags and every other attribute AWS returned.
cat terraform.tfstate{
"version": 4,
"terraform_version": "1.16.5",
"serial": 3,
"resources": [
{
"mode": "managed",
"type": "aws_instance",
"name": "linux-VM",
"provider": "provider[\"registry.terraform.io/hashicorp/aws\"]",
"instances": [
{
"attributes": {
"id": "i-0abc1234def567890",
"ami": "ami-062f0cc54dbfd8ef1",
"instance_type": "t2.micro",
"tags": { "Name": "Telusko_Terraform_Linux_VM" }
}
}
]
}
]
}You can read it, but do not edit it by hand. Terraform has proper commands for looking inside:
| Command | What it shows |
|---|---|
terraform show | Human readable view of everything in the state |
terraform state list | Just the resource addresses, for example aws_instance.linux-VM |
terraform state show aws_instance.linux-VM | All attributes of one resource |
How Terraform uses it
Every plan, apply and destroy works with three pictures of the world:
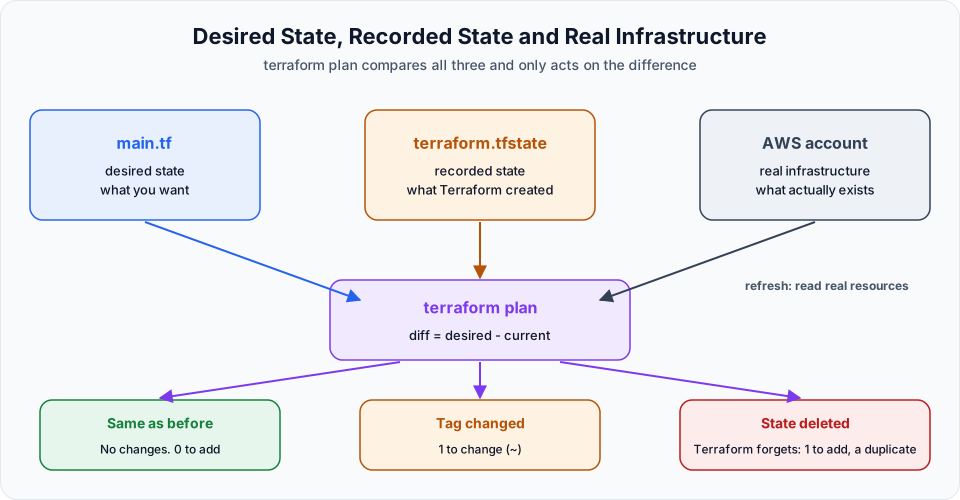
- Desired state: what
main.tfsays - Recorded state: what
terraform.tfstatesays Terraform created earlier - Real infrastructure: Terraform refreshes the recorded resources by asking AWS about their current attributes
The plan is the difference. If all three agree, there is nothing to do.
Experiment 1: apply twice
Create the instance from the previous lesson again:
terraform init
terraform plan
terraform apply
Now, without changing anything, apply once more:
terraform applyNo changes. Your infrastructure matches the configuration.
Apply complete! Resources: 0 added, 0 changed, 0 destroyed.Terraform looked in the state, found aws_instance.linux-VM with an instance ID, checked that instance in AWS, and saw it already matches the code. Run apply ten times and you still have one instance. This property is called idempotency, and it is the reason you can safely re-run Terraform.
Experiment 2: delete the state file (do not do this in real life)
The lecture deletes the state file on purpose to prove how important it is:
rm terraform.tfstate
terraform apply
Plan: 1 to add, 0 to change, 0 to destroy.Terraform has lost its memory. It does not know the first instance exists, so it creates a second one. In the console you now see two instances with the name Telusko_Terraform_Linux_VM. The first one is now an orphan: Terraform does not manage it, and terraform destroy will not delete it. You have to terminate it by hand in the console.
This is the most important lesson about state: losing the state file means losing control of your infrastructure. In a real project it could mean a duplicate database, or a server nobody remembers to delete, quietly costing money.
Clean up the orphan
If you tried this experiment, open EC2 > Instances and terminate the extra instance manually. Then run terraform destroy to remove the one Terraform still knows about.
Experiment 3: destroy needs the state
terraform destroy -auto-approvedestroy reads the state to find out what to delete. With the state present, it deletes the instance. Without the state, it would print that there is nothing to destroy, even though the instance is still running and billing you.
The backup file
After the destroy, list the folder again:
ls -lmain.tf
terraform.tfstate
terraform.tfstate.backupEvery time Terraform writes a new version of the state, it first saves the previous version as terraform.tfstate.backup. The lecture shows this by changing the Name tag and applying:
vi main.tf          # change Name to something else
terraform apply
Plan: 0 to add, 1 to change, 0 to destroy.Notice 1 to change, not 1 to add. Changing a tag does not need a new instance, so Terraform updates the existing one in place. Afterwards:
| File | Contains |
|---|---|
terraform.tfstate | The current state, with the new tag |
terraform.tfstate.backup | The state from just before this apply, with the old tag |
The backup is only one step deep. It is a small safety net, not a real backup strategy.
The state file contains secrets
State stores every attribute of every resource, including values you would not want public: database passwords, private keys generated by Terraform, connection strings. Terraform stores them in plain text, even when they are marked sensitive in your code.
So:
- Never commit
terraform.tfstateorterraform.tfstate.backupto Git. Use the.gitignorefrom Terraform Security Credentials. - Never share the file in chat or email.
Remote state: how teams do it
A state file on one laptop or one VM has obvious problems. If the disk dies, the state is gone. If two people run apply at the same time from two machines, each has a different state and they overwrite each other's work.
The answer is a remote backend. On AWS, the standard choice is an S3 bucket:
terraform {
  backend "s3" {
    bucket       = "telusko-terraform-state-<your-unique-suffix>"
    key          = "01-tf-ec2/terraform.tfstate"
    region       = "ap-south-1"
    use_lockfile = true
  }
}| Argument | Meaning |
|---|---|
bucket | An existing S3 bucket that stores the state. Turn on versioning for it, so every old state can be restored |
key | Path of the state file inside the bucket. Use one key per project |
region | Region of the bucket |
use_lockfile | Native S3 state locking. While one person runs apply, a .tflock file blocks everyone else |
After adding a backend, run terraform init again. Terraform offers to copy your local state into S3.
DynamoDB locking is deprecated
Older tutorials (and many company repositories) lock S3 state with a DynamoDB table through the dynamodb_table argument. Since Terraform 1.11, native S3 locking with use_lockfile = true is generally available and DynamoDB based locking is deprecated. Use use_lockfile for new projects.
For this course, local state is fine. Just remember that a real team project always starts with a remote backend.
Rules to remember
- One folder per Terraform project. Each folder gets its own state.
- Never delete or hand edit
terraform.tfstate. - Never commit state to Git.
- If something was created by Terraform, change or delete it through Terraform, not the console. Otherwise code, state and reality drift apart.
- Use a remote backend with locking for anything shared.
Try It Yourself
- Apply the EC2 configuration and run
terraform state listandterraform state show aws_instance.linux-VM. Find the instance ID and compare it with the console. - Run
terraform applyagain and confirmNo changes. - Change the
Nametag, apply, and compareterraform.tfstatewithterraform.tfstate.backupusinggrep Name terraform.tfstate*. - (Optional, careful) Copy the state to a safe place, delete it, run
terraform plan, and see that Terraform wants to create a new instance. Do not apply. Put the state back and runplanagain. - Finish with
terraform destroyand check the console.
Official references
Written By: Shramik Masti
How is this guide?
Last updated on
First Terraform Script locally on Windows
Run the same EC2 Terraform script from VS Code on Windows, use the integrated terminal for init, plan and apply, and fix credential errors without hardcoding keys.
Creating EC2 VM with user Data using Terraform
Use Terraform's user_data argument and the file() function to launch an EC2 instance that installs Apache and serves a static web page on first boot.