
Terraform Output Variables
Add an output.tf that prints the public IP of the new EC2 instance after apply, and learn how to read, format and protect output values.
After terraform apply creates an EC2 instance, what is the first thing you need? Usually its public IP, so you can SSH in or open it in a browser. So far we have been opening the AWS console to find it. That defeats the point of automation.
Terraform can print that information for you. Values that go into a configuration are input variables, which we used in the previous lesson. Values that come out after apply are output values, often called output variables.
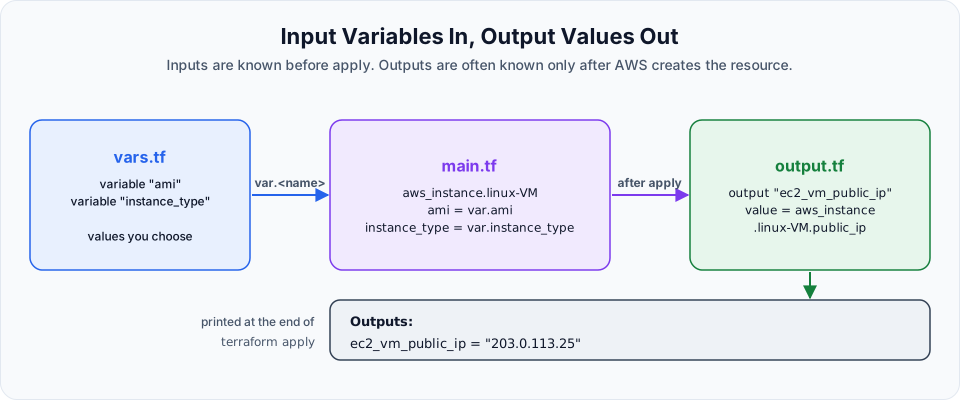
What outputs are for
Anything Terraform knows about a resource after creating it can be an output:
| Resource | Typical outputs |
|---|---|
| EC2 instance | Public IP, private IP, instance ID, public DNS name |
| S3 bucket | Bucket name, ARN, regional domain name |
| RDS database | Endpoint and port to put in your application config |
| IAM user | User name and ARN |
Outputs are also how modules pass data to each other, which we use in the module project.
Step 1: Prepare the folder
The lecture continues in the 03-tf-ec2vars folder from the variables lesson. It deletes terraform.tfstate and terraform.tfstate.backup there so it can create a fresh instance.
Destroy, do not delete the state
As you saw in Terraform Statefile, deleting the state while the instance from the last lesson is still running leaves that instance orphaned: it keeps running and Terraform forgets about it. Run terraform destroy first if anything is still up. You do not need to delete any files after that, because a destroyed configuration simply creates new resources on the next apply.
cd 03-tf-ec2vars
terraform destroy -auto-approve   # only if the previous instance still exists
ls
# main.tf  provider.tf  vars.tf  terraform.tfstate  terraform.tfstate.backup
Step 2: Write output.tf
vi output.tfoutput "ec2_vm_public_ip" {
value = aws_instance.linux-VM.public_ip
}| Part | Meaning |
|---|---|
output | Keyword for an output value |
"ec2_vm_public_ip" | Name you choose. It is printed next to the value |
value | What to print. Here a reference to an attribute of a resource |
The reference has three parts: <resource type>.<local name>.<attribute>.
aws_instanceis the resource typelinux-VMis the local name we gave the resource inmain.tfpublic_ipis one of the attributes the provider exposes foraws_instance
Where do attribute names come from? The Attribute Reference section of each resource's page in the provider documentation. For aws_instance that includes id, arn, public_ip, private_ip, public_dns and instance_state, among others.
You can define as many outputs as you like. A more complete output.tf:
output "ec2_vm_public_ip" {
  description = "Public IP of the Linux VM"
  value       = aws_instance.linux-VM.public_ip
}

output "ec2_vm_private_ip" {
  description = "Private IP inside the VPC"
  value       = aws_instance.linux-VM.private_ip
}

output "ec2_vm_id" {
  description = "Instance ID"
  value       = aws_instance.linux-VM.id
}

output "ssh_command" {
  description = "Ready to paste SSH command"
  value       = "ssh -i terraform_keypair.pem ec2-user@${aws_instance.linux-VM.public_ip}"
}
The last one shows where the "${...}" string syntax is genuinely useful: building a longer string around a value.
Step 3: Apply
The folder now has four files:
| File | Role |
|---|---|
provider.tf | Which cloud and region |
vars.tf | Input variables |
main.tf | The resources |
output.tf | What to print afterwards |
Reconnected to the VM? Export your AWS credentials again first. Then:
terraform init
terraform fmt
terraform validate
terraform plan
The plan now has an extra section:
Plan: 1 to add, 0 to change, 0 to destroy.

Changes to Outputs:
  + ec2_vm_public_ip = (known after apply)
(known after apply) is honest: AWS assigns the public IP only when the instance launches, so Terraform cannot know it during planning.
terraform apply -auto-approveaws_instance.linux-VM: Creation complete after 22s [id=i-0abc1234def567890]
Apply complete! Resources: 1 added, 0 changed, 0 destroyed.
Outputs:
ec2_vm_public_ip = "203.0.113.25"Open the instance in the EC2 console and compare. The public IPv4 address is the same one Terraform printed.
Reading outputs later
Outputs are saved in the state file, so you can read them any time without applying again:
terraform output                         # all outputs
terraform output ec2_vm_public_ip        # one output, with quotes
terraform output -raw ec2_vm_public_ip   # just the value, ideal for scripts
terraform output -json                   # everything as JSON
-raw is the one you will use in shell scripts:
ssh -i terraform_keypair.pem ec2-user@$(terraform output -raw ec2_vm_public_ip)Sensitive outputs
Some outputs should not appear on screen, such as a generated database password:
output "db_password" {
  value     = random_password.db.result
  sensitive = true
}
Terraform then prints db_password = <sensitive> after apply. terraform output db_password still shows the value when you ask for it directly, and the value is stored in plain text in the state file, which is another reason to protect state.
Common errors
| Error | Cause |
|---|---|
Reference to undeclared resource | The local name in the output does not match main.tf, for example linux_vm instead of linux-VM |
Unsupported attribute | The attribute does not exist, for example public-ip instead of public_ip. Check the provider docs |
Output is empty "" | The instance has no public IP, for example in a subnet without auto assign public IP |
Clean up
terraform destroy -auto-approveThe destroy plan shows the outputs being removed too: - ec2_vm_public_ip = "203.0.113.25" -> null.
Try It Yourself
- Add
output.tfwithec2_vm_public_ipand apply. Compare the printed IP with the console. - Add outputs for
private_ip,idandinstance_state, then runterraform applyagain. Notice that only outputs change, no resources. - Run
terraform output -raw ec2_vm_public_ipand use it inside ansshcommand. - Add the
ssh_commandoutput and copy-paste it to log in. - Destroy everything and run
terraform outputagain. What does it print now?
Official references
Written By: Shramik Masti
How is this guide?
Last updated on
Using Variables in Terraform
Split a Terraform project into provider.tf, vars.tf and main.tf, define input variables for the AMI and instance type, and learn every way to pass variable values.
Terraform to create s3 bucket on aws
Create an S3 bucket with Terraform, understand why the acl argument now shows a deprecation warning, and add versioning and public access blocking the current way.