
Creating StatefulSets with Persistent Storage on Amazon EKS
Run MySQL as a StatefulSet on EKS with a headless Service and volumeClaimTemplates, watch EBS volumes get created dynamically, and prove that pods keep their name and data.
Time to build what we drew in the previous lesson: a two-replica MySQL StatefulSet where every pod gets its own EBS-backed volume, with no manual PV or PVC at all.
We also hit a real error on the way, the same one you will probably hit, and fix it.
Step 1: The headless Service
vi headless-service.ymlapiVersion: v1
kind: Service
metadata:
name: mysql
spec:
clusterIP: None
selector:
app: mysql
ports:
- port: 3306
targetPort: 3306| Field | Meaning |
|---|---|
clusterIP: None | This one line makes it headless: no virtual IP, no load balancing. DNS returns a record per pod instead. Leave it out and you get a normal ClusterIP Service |
selector: app: mysql | Pods with this label are part of the Service. Must match the StatefulSet's pod labels |
port: 3306, targetPort: 3306 | MySQL's default port |
Create it before the StatefulSet:
kubectl apply -f headless-service.yml
kubectl get svc
NAME TYPE CLUSTER-IP EXTERNAL-IP PORT(S) AGE
kubernetes ClusterIP 10.100.0.1 <none> 443/TCP 3d
mysql ClusterIP None <none> 3306/TCP 5sCLUSTER-IP is None. That is a headless Service.
Step 2: A StorageClass for EBS
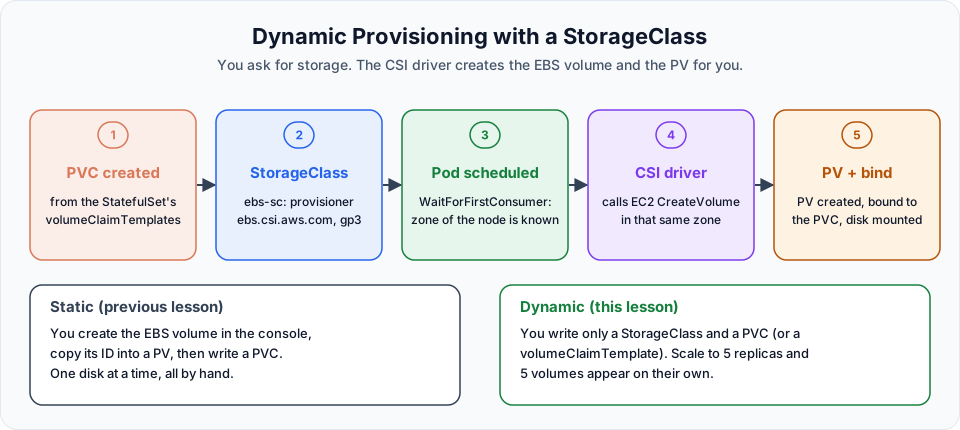
A volumeClaimTemplate only describes a PVC. Something has to turn that PVC into a real disk, and that is the job of a StorageClass. Check what your cluster has:
kubectl get storageclassNAME PROVISIONER RECLAIMPOLICY VOLUMEBINDINGMODE ALLOWVOLUMEEXPANSION AGE
gp2 kubernetes.io/aws-ebs Delete WaitForFirstConsumer false 3dEKS creates a gp2 class, but on clusters running Kubernetes 1.30 or later it is not marked as default. That matters, as you will see in Step 4.
The lecture uses this gp2 class. It works because EKS redirects the old kubernetes.io/aws-ebs provisioner to the EBS CSI driver. The better choice today is your own class that uses the CSI driver directly and creates gp3 volumes, which are cheaper and faster than gp2:
apiVersion: storage.k8s.io/v1
kind: StorageClass
metadata:
  name: ebs-sc
provisioner: ebs.csi.aws.com
volumeBindingMode: WaitForFirstConsumer
reclaimPolicy: Delete
allowVolumeExpansion: true
parameters:
  type: gp3
encrypted: "true"| Field | Meaning |
|---|---|
provisioner: ebs.csi.aws.com | The EBS CSI driver you installed in Preparing AWS EBS Storage |
volumeBindingMode: WaitForFirstConsumer | Do not create the disk until a pod using the PVC is scheduled. The disk is then created in that node's zone, so it can always attach. Immediate would pick a zone first and might strand the pod |
reclaimPolicy: Delete | When the PVC is deleted, delete the PV and the EBS volume too. Use Retain for data you cannot lose |
allowVolumeExpansion: true | Lets you grow a volume later by editing the PVC's storage request |
parameters.type: gp3 | EBS volume type. gp3 is the driver's default |
parameters.encrypted: "true" | Encrypt with the default aws/ebs KMS key |
kubectl apply -f ebs-sc.ymlIf you want PVCs without a storageClassName to use it, mark it default by adding storageclass.kubernetes.io/is-default-class: "true" under metadata.annotations. Another option: recent versions of the EBS CSI add-on can install a recommended default class for you when you set its configuration value defaultStorageClass.enabled: true.
Step 3: The StatefulSet
vi statefulset.ymlapiVersion: apps/v1
kind: StatefulSet
metadata:
name: mysql
spec:
serviceName: mysql
replicas: 2
selector:
matchLabels:
app: mysql
template:
metadata:
labels:
app: mysql
spec:
containers:
- name: mysql
image: mysql:8.0
env:
- name: MYSQL_ROOT_PASSWORD
value: password123
ports:
- containerPort: 3306
volumeMounts:
- name: mysql-storage
mountPath: /var/lib/mysql
volumeClaimTemplates:
- metadata:
name: mysql-storage
spec:
accessModes:
- ReadWriteOnce
storageClassName: ebs-sc # the lecture uses gp2
resources:
requests:
storage: 10Gi| Field | Meaning |
|---|---|
kind: StatefulSet, apiVersion: apps/v1 | Same API group as Deployment |
serviceName: mysql | The headless Service that gives pods their DNS names. Must exist |
replicas: 2 | Creates mysql-0 then mysql-1 |
selector / template.metadata.labels | Same rule as a Deployment: they must match |
image: mysql:8.0 | Official MySQL image |
env: MYSQL_ROOT_PASSWORD | The MySQL image refuses to start without a root password (or an explicit "allow empty" setting) |
volumeMounts: mysql-storage at /var/lib/mysql | MySQL's data directory. Mounting the volume here means the database files go to EBS, not into the container |
volumeClaimTemplates | The PVC template. Its metadata.name must match the volumeMounts name. One PVC per pod is created from it |
storageClassName | Which StorageClass creates the disks |
storage: 10Gi | Each pod gets its own 10 GiB volume |
Never put a real password in YAML
value: password123 in plain text is only acceptable in a throwaway lab. Anyone who can read the file or run kubectl get sts mysql -o yaml sees it. The proper way, a Secret referenced with valueFrom.secretKeyRef, is covered in Environment Variables, ConfigMaps & Secrets.
Step 4: Apply, and the first error
In the lecture, the first version of statefulset.yml had no storageClassName. Here is what happens then:
kubectl apply -f statefulset.yml
kubectl get sts
kubectl get pods
NAME READY STATUS RESTARTS AGE
mysql-0 0/1 Pending 0 40sTwo things to notice already. The pod is called mysql-0, not mysql-7f9c.... And there is no mysql-1 yet, because mysql-1 waits until mysql-0 is Ready. But why Pending?
kubectl describe pod mysql-0Warning FailedScheduling ... 0/2 nodes are available: pod has unbound immediate PersistentVolumeClaims.kubectl get pvc
kubectl describe pvc mysql-storage-mysql-0Normal FailedBinding ... persistentvolume-controller no persistent volumes available for this claim and no storage class is setThe PVC has no StorageClass, the cluster has no default class, and there is no pre-made PV. Nobody is going to create a disk. The fix is to set storageClassName in the template.
You cannot change volumeClaimTemplates on an existing StatefulSet, so delete and recreate. The PVC that was already created must be deleted too, otherwise the new pod reuses the old, broken claim:
kubectl delete -f statefulset.yml
kubectl delete pvc mysql-storage-mysql-0
# add storageClassName to statefulset.yml, then
kubectl apply -f statefulset.yml
Still Pending? Check the old PVC and the driver
In the lecture the first fix did not work straight away. After adding storageClassName: gp2 and applying again, describe pvc still said no storage class is set. The reason: kubectl delete -f statefulset.yml removed the StatefulSet but not the PVC from the first attempt, so the new pod picked up the old claim that had no class. The lecture then ran kubectl delete pvc --all (fine on a lab cluster, dangerous anywhere else) and also reinstalled the EBS CSI driver add-on, because the cluster had been recreated since the storage lesson and a recreated cluster does not remember add-ons you installed by hand. Check both: delete the stale PVC, and run eksctl get addon --cluster telusko-learning --region ap-south-1. If aws-ebs-csi-driver is not listed, repeat Steps 3 and 4 of Preparing AWS EBS Storage. The PVCs bind within a minute after that.
Step 5: Watch it work
kubectl get pvc
kubectl get sts
kubectl get pods
NAME STATUS VOLUME CAPACITY ACCESS MODES STORAGECLASS AGE
mysql-storage-mysql-0 Bound pvc-a35faf6e-310e-4337-a1de-1a687c4bf152 10Gi RWO ebs-sc 2m
NAME READY AGE
mysql 1/2 23s
NAME READY STATUS RESTARTS AGE
mysql-0 1/1 Running 0 36s
mysql-1 0/1 ContainerCreating 0 14smysql-0 is Running, and only now is mysql-1 being created. That is ordered creation. A few seconds later:
kubectl get pods
kubectl get pvc
kubectl get pv
You see two pods, two PVCs (mysql-storage-mysql-0, mysql-storage-mysql-1) and two PVs with generated names like pvc-a35faf6e-.... You wrote none of them.
kubectl get sts and kubectl get statefulset are the same command. sts is the short name.
Now open EC2, Elastic Block Store, Volumes in the console:

Two new 10 GiB volumes named telusko-learning-dynamic-pvc-... appeared on their own, one per pod, each in the zone of the node its pod runs on. (These are gp2 because the lecture used the gp2 class. With ebs-sc they are gp3.)
Step 6: Delete a pod, keep its name and data
kubectl delete pod mysql-1
kubectl get pods
NAME READY STATUS RESTARTS AGE
mysql-0 1/1 Running 0 7m
mysql-1 1/1 Running 0 52sThe replacement is called mysql-1 again. Compare that with the random names a Deployment gives. And:
kubectl get pvcThe PVC ages are still 6 or 7 minutes. No new PVC was created. The new mysql-1 mounted the same mysql-storage-mysql-1 claim, so the same EBS volume, so the same database files.
To prove the data survives, create a database before deleting the pod:
kubectl exec -it mysql-0 -- mysql -uroot -ppassword123 -e "CREATE DATABASE telusko;"
kubectl delete pod mysql-0
kubectl get pods -w                       # wait for mysql-0 to be Running, then Ctrl+C
kubectl exec -it mysql-0 -- mysql -uroot -ppassword123 -e "SHOW DATABASES;"
telusko is still in the list.
You can also check the stable DNS names from a temporary pod:
kubectl run dns-test --rm -it --image=busybox --restart=Never -- nslookup mysql-0.mysqlTwo MySQL pods are not a MySQL cluster
mysql-0 and mysql-1 are two independent MySQL servers, each with its own empty database. The StatefulSet gave them stable names and disks, but it did not set up replication between them. Real MySQL replication needs extra configuration, usually from a Helm chart or an operator.
Clean up (important for your AWS bill)
The lecture finishes with kubectl delete all --all. Be careful: all covers pods, Services, Deployments, StatefulSets and a few other types, but not PVCs, PVs or StorageClasses. After that command, your EBS volumes are still there and still billed.
Clean up explicitly:
kubectl delete -f statefulset.yml
kubectl delete -f headless-service.yml
kubectl get pvc                               # the PVCs are still there
kubectl delete pvc mysql-storage-mysql-0 mysql-storage-mysql-1
kubectl get pv                                # should be empty after a few seconds
Because the StorageClass has reclaimPolicy: Delete, deleting the PVCs deletes the PVs and the EBS volumes. Confirm in EC2, Volumes that no dynamic-pvc volumes remain.
Delete PVCs before deleting the cluster
eksctl delete cluster does not delete EBS volumes created by PVCs. If you delete the cluster first, those volumes stay in your account, unattached and billed every month. Delete PVCs first, or remove leftover volumes by hand in the console afterwards.
Try It Yourself
- Scale the StatefulSet to 3 with
kubectl scale sts mysql --replicas=3and watchkubectl get pods -w. In what order do pods appear? How many EBS volumes exist now? - Scale back to 1. Which pods go away, in what order, and how many PVCs remain?
- Add
podManagementPolicy: Parallelto a fresh StatefulSet and compare how the pods start. - Increase the claim size of
mysql-storage-mysql-0to 15Gi withkubectl edit pvc(this needsallowVolumeExpansion: true). Check the new size in the EC2 console. - Run the
nslookuptest above for bothmysql-0.mysqlandmysql. What is the difference in the answers?
Official references
- Kubernetes: StatefulSet Basics (tutorial)
- Kubernetes: Storage Classes
- Kubernetes: Dynamic Volume Provisioning
- Amazon EKS: Use Kubernetes volume storage with Amazon EBS
Written By: Shramik Masti
How is this guide?
Last updated on
Behind the Scenes of Kubernetes StatefulSets
See how a StatefulSet combines a headless Service, ordered pods and volumeClaimTemplates so that every pod gets a stable name, a stable DNS address and its own persistent volume.
Environment Variables, ConfigMaps & Secrets in Kubernetes
Pass configuration to pods at runtime with environment variables, ConfigMaps and Secrets, see why base64 is not encryption, and learn the YAML way to inject them.