
Maven Installation Guide
Choose how you will practise Maven in this course, either on your own Windows machine or on a Linux VM in AWS, and see what each setup needs before you install.
Before we can explore projects, goals and the POM, Maven has to be installed somewhere you can run commands. You have two options, and both lead to exactly the same Maven. Pick the one that suits you and use it for the rest of the course.
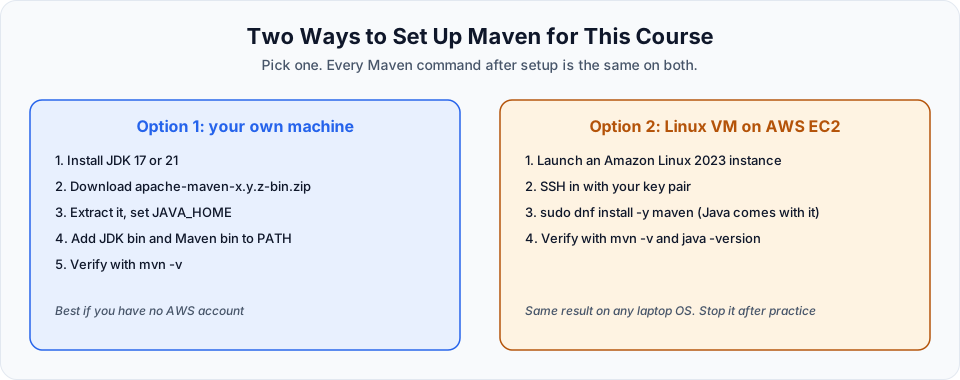
Option 1: install locally on your machine
This is the approach to use if you do not have an AWS account or do not want to create one. You install a JDK, download the Maven ZIP from the Apache website, extract it, and set two environment variables. The next lesson walks through it on Windows: Maven Installation on Windows.
On macOS and Linux desktops the steps are the same idea (extract and add bin to PATH), or you can use a package manager:
Follow the next lesson. You will download apache-maven-x.y.z-bin.zip, extract it and add its bin folder to Path.
brew install maven
mvn -v
Homebrew installs a JDK as a dependency if you do not already have one.
sudo apt update
sudo apt install -y openjdk-21-jdk maven
mvn -v
Distribution packages are often one or two releases behind the newest Maven, which is fine for learning.
Option 2: a Linux VM on AWS
If you have an AWS account (free tier is enough), you can create a small Linux server on EC2 and install Maven there. This works the same whatever laptop you have, and it is closer to how Maven runs in real life: on a Linux build server or inside a CI agent. The steps are in Maven Installation on Cloud Linux VM.
Which one should you choose?
| Local install | Linux VM on AWS | |
|---|---|---|
| Needs an AWS account | No | Yes |
| Cost | Free | Free tier eligible, but you must stop or terminate the instance after practice |
| Editing files | Any editor or IDE | vi or nano in the terminal |
| IDE lessons (IntelliJ, Eclipse) | Work directly | You still need a local IDE for those lessons |
| Closest to a real build server | Less | More |
If you are unsure, start locally. You will need a local JDK and IDE anyway for the IntelliJ and Eclipse lessons later. You can always try the Linux VM as extra practice.
What every setup needs
Whichever option you pick, the requirements are the same:
- A JDK, not just a JRE. Maven itself only needs Java to run, but compiling your code needs the compiler (
javac), which only a JDK has. Maven 3.9 and 3.10 run on Java 8 or newer. Use Java 17 or 21, which are long term support releases and what Spring Boot needs. - Maven's
binfolder on yourPATH, so themvncommand works from any folder. - Internet access the first time you build, because Maven downloads plugins and libraries from Maven Central.
When both java -version and mvn -v print a version, you are ready.
You might not even need a global install later
Many real projects include the Maven Wrapper (mvnw and mvnw.cmd). The wrapper downloads the exact Maven version the project expects, so team members and CI servers all use the same one. You will see it in the Spring Boot demo. For learning, a normal install is still the best start.
Official references
- Apache Maven: Installing Apache Maven
- Apache Maven: Download page and system requirements
- Apache Maven: Maven Wrapper
Written By: Shramik Masti
How is this guide?
Last updated on
What is Maven and What it can do
Learn what Apache Maven is, why it is called a project management tool and not only a build tool, and the four jobs it does for every Java project.
Maven Installation on Windows
Install a JDK and Apache Maven on Windows, set JAVA_HOME and Path correctly, verify with mvn -v, and fix the errors beginners hit most often.