
Argo CD: Continuous Deployment for Kubernetes
Install Argo CD on EKS with Helm, open its UI, create an Application that tracks a Git repository, and watch a commit change the cluster with no kubectl apply.
Every deployment in this course so far ended the same way: log in to the EKS home server, run kubectl apply -f .... In a team, that does not work for long. A developer pushes a change to GitHub, and then somebody has to remember to apply it. Somebody else edits a live object with kubectl edit and nobody knows. After a few weeks, nobody can say exactly what is running in the cluster or why.
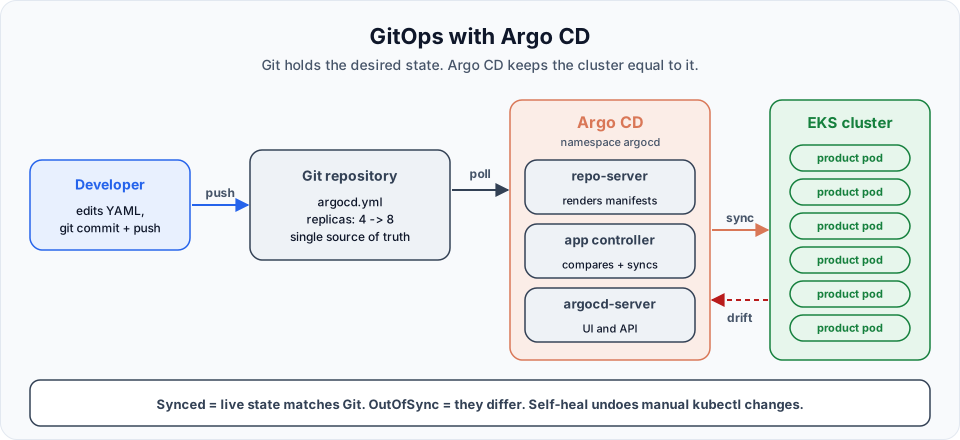
Argo CD fixes this with an idea called GitOps:
- The Kubernetes YAML for your application lives in a Git repository. Git is the single source of truth.
- Argo CD runs inside the cluster and keeps watching that repository.
- When the YAML in Git changes, Argo CD applies the change to the cluster. When the cluster drifts away from Git, Argo CD shows it, and can put it back.
The "CD" means continuous deployment (or delivery). You commit, Argo CD deploys. Nobody runs kubectl apply by hand.
Step 1: Install Argo CD with Helm
We installed Helm in the previous lesson. On Artifact Hub search for argo-cd, sort by stars, and open the chart from the argo repository (published by the Argo project). Its install tab gives the repository command:
helm repo add argo https://argoproj.github.io/argo-helm
helm repo update
kubectl create namespace argocd
helm install argocd argo/argo-cd --namespace=argocd| Part | Meaning |
|---|---|
helm repo add argo <url> | Register the Argo project's chart repository under the name argo |
kubectl create namespace argocd | A dedicated namespace. Not mandatory, but keeping each tool in its own namespace is good practice. (helm install ... --create-namespace does the same in one step) |
helm install argocd | The release name |
argo/argo-cd | <repository>/<chart> |
--namespace=argocd | Where to install it |
NAME: argocd
NAMESPACE: argocd
STATUS: deployed
REVISION: 1
NOTES:
In order to access the server UI you have the following options:

1. kubectl port-forward service/argocd-server -n argocd 8080:443
    and then open the browser on http://localhost:8080 and accept the certificate
...
After reaching the UI the first time you can login with username: admin and the random password generated during the installation. You can find the password by running:

kubectl -n argocd get secret argocd-initial-admin-secret -o jsonpath="{.data.password}" | base64 -d
The NOTES are written by the chart author for exactly this moment. Always read them. helm status argocd -n argocd prints them again later.
See how much Helm created for us:
kubectl get all -n argocdYou see Deployments for argocd-server, argocd-repo-server, argocd-applicationset-controller, argocd-dex-server, argocd-notifications-controller and argocd-redis, a StatefulSet for argocd-application-controller, their ReplicaSets and pods, and a set of Services. Imagine writing all of that by hand.
| Component | Job |
|---|---|
argocd-server | The web UI and the API that the CLI talks to |
argocd-repo-server | Clones Git repositories and renders manifests (plain YAML, Helm, Kustomize) |
argocd-application-controller | Compares rendered manifests with the live cluster and syncs them |
argocd-redis | Cache |
argocd-dex-server | Single sign-on (GitHub, Google, LDAP login). Optional |
Step 2: Get the admin password and open the UI
Every Service is ClusterIP, so nothing is reachable from outside yet. First, the password. The username is admin:
kubectl -n argocd get secret argocd-initial-admin-secret \
  -o jsonpath="{.data.password}" | base64 -d; echo
-o jsonpath picks one field from the Secret, and base64 -d decodes it, exactly like in the Secrets lesson. The trailing echo adds a newline, so the password does not run into your shell prompt as it did in the lecture.
The lecture exposes the UI by turning the argocd-server Service into a LoadBalancer:
kubectl patch svc argocd-server -n argocd -p '{"spec":{"type":"LoadBalancer"}}'
kubectl get svc argocd-server -n argocd
Wait a minute or two for the EXTERNAL-IP hostname, then open https://<that-hostname> in the browser. Argo CD uses a self-signed certificate, so the browser warns you: choose Advanced and Proceed. Log in as admin with the password.
Security and cost of a public Argo CD
A LoadBalancer makes the Argo CD login page reachable from the whole internet, protected only by the admin password, and it is a paid AWS Classic Load Balancer. For a lab, a safer option costs nothing:
kubectl port-forward svc/argocd-server -n argocd 8080:443 --address 0.0.0.0and open port 8080 only to your own IP in the home server's security group. Either way, after the first login change the admin password (User Info, Update Password) and delete the bootstrap Secret, as the Argo CD docs advise: kubectl -n argocd delete secret argocd-initial-admin-secret. Never share or screenshot the password.
Step 3: Put your application in Git
Create a GitHub repository of your own (for example k8s-argocd) with one file, argocd.yml, holding a Deployment and a Service. This is the same shape you have written many times:
apiVersion: apps/v1
kind: Deployment
metadata:
  name: product-deployment
  labels:
    app: telusko
spec:
  replicas: 4
  selector:
    matchLabels:
      app: telusko
  template:
    metadata:
      labels:
        app: telusko
    spec:
      containers:
        - name: cont1
          image: <your-dockerhub-username>/springboot-app:latest
          ports:
            - containerPort: 8080
---
apiVersion: v1
kind: Service
metadata:
  name: teluskoappsvc
spec:
  type: LoadBalancer
  selector:
    app: telusko
  ports:
    - port: 80
      targetPort: 8080
A public repository is easiest for practice. For a private one, add credentials under Settings, Repositories in Argo CD first.
Step 4: Create the Application
In the UI click + New App and fill in:
| Field | Value | Meaning |
|---|---|---|
| Application Name | telusko-learning | Name of the Argo CD Application |
| Project Name | default | Argo CD projects group apps and restrict where they may deploy |
| Sync Policy | Automatic | Apply Git changes without anyone clicking Sync. With Manual, Argo CD only shows OutOfSync and waits |
| Repository URL | https://github.com/<you>/k8s-argocd.git | Where the YAML lives |
| Revision | HEAD | The branch, tag or commit to follow. HEAD means the default branch |
| Path | . | Folder inside the repository with the YAML. . is the root |
| Cluster URL | https://kubernetes.default.svc | "This same cluster", the one Argo CD runs in |
| Namespace | default | Where the app's objects are created if their YAML has no namespace |
Click Create. The app shows Synced and then Healthy. Click it to see the tree that Argo CD builds from live objects: the Application, the Service and the Deployment, its ReplicaSet, and four pods.
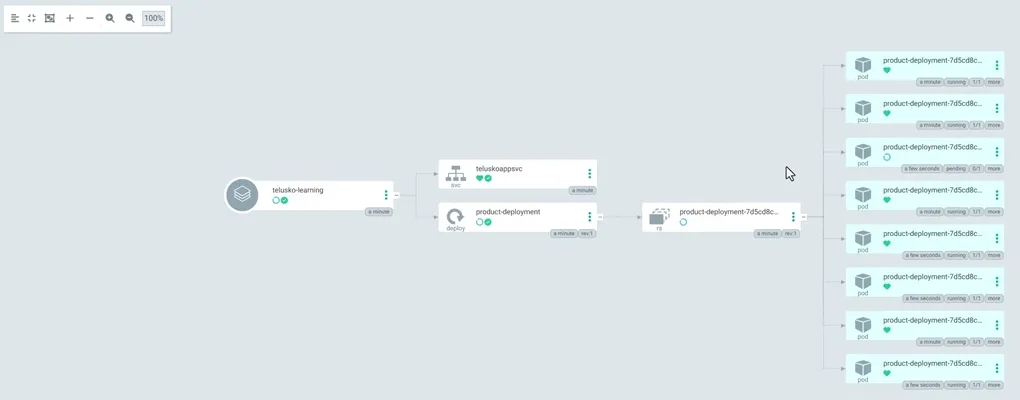
The Application tree right after the replica count in Git was changed to 8: new pods appear next to the existing ones.
The tree also has a network view (how traffic flows from the load balancer through the Service to each pod) and a list view. Click any pod for its events, logs and manifest.
The same Application as YAML, which is how teams usually store it (in Git, of course):
apiVersion: argoproj.io/v1alpha1
kind: Application
metadata:
  name: telusko-learning
  namespace: argocd
spec:
  project: default
  source:
    repoURL: https://github.com/<you>/k8s-argocd.git
    targetRevision: HEAD
    path: .
  destination:
    server: https://kubernetes.default.svc
    namespace: default
  syncPolicy:
    automated:
      prune: true
      selfHeal: true
Step 5: Deploy by committing
Edit argocd.yml in GitHub (or in VS Code and push) and change replicas: 4 to replicas: 8. Commit.
Back in Argo CD, click Refresh (or wait). The app goes OutOfSync for a moment, syncs, and eight pods are running. You did not touch kubectl. Change it back to 4 and commit again: Argo CD scales the Deployment back down.
Why the wait? By default Argo CD checks the repository about every 3 minutes (a 120-second interval plus up to 60 seconds of jitter). Refresh checks immediately, and a GitHub webhook pointed at Argo CD makes it react within seconds.
Sync options worth understanding
| Option | What it does |
|---|---|
automated | Sync automatically when Git changes |
prune: true | Delete objects from the cluster when you delete them from Git. Off by default, as a safety measure |
selfHeal: true | If someone changes the cluster by hand (kubectl scale, kubectl edit), Argo CD changes it back to what Git says, within seconds |
| History and Rollback (UI) | Sync to an earlier Git revision. With automated sync on, the usual GitOps way to roll back is git revert, so Git stays the truth |
Try self-heal: with it enabled, run kubectl scale deploy product-deployment --replicas=1 and watch Argo CD restore 4 pods.
Why teams use Argo CD
- Automated deployments: commit and it is deployed
- Git as the single source of truth: every change is a commit with an author, a message and a review
- Easy rollback: go back to any earlier commit
- Visibility: the UI shows what is deployed, whether it matches Git, and whether it is healthy
- Less manual work and fewer mistakes: no one needs cluster admin rights just to deploy
- Drift detection: manual changes are visible, and can be reverted automatically
In a full pipeline, Jenkins or GitHub Actions builds and pushes the image (CI), then updates the image tag in the Git repository, and Argo CD deploys it (CD).
Clean up
# in the UI: open the app, Delete, confirm (this also deletes its Deployment and Service)
# or:
kubectl delete application telusko-learning -n argocd
kubectl get svc -A | grep LoadBalancer        # make sure teluskoappsvc is gone

kubectl patch svc argocd-server -n argocd -p '{"spec":{"type":"ClusterIP"}}'   # removes the Argo CD load balancer
helm uninstall argocd -n argocd                                                # when you are done with Argo CD
kubectl delete namespace argocd
Check EC2, Load Balancers afterwards: both the app's and Argo CD's load balancers must be gone. Deleting an Application from the UI deletes its resources only if the cascade option is chosen (it is by default); deleting with kubectl cascades only when the Application has the resources-finalizer.argocd.argoproj.io finalizer, so check that the app's Service is really gone.
Try It Yourself
- Install Argo CD with Helm and log in using port-forward instead of a LoadBalancer.
- Create the
telusko-learningApplication from the YAML file above instead of the UI, withkubectl apply -f telusko-learning-app.yml. - With
selfHeal: true, scale the Deployment by hand and time how long Argo CD takes to undo it. Then setselfHeal: falseand repeat. - Add a ConfigMap to
argocd.yml, commit, then remove it and commit again. Withprune: trueand withprune: false, what happens to the ConfigMap in the cluster? - Change the image to a tag that does not exist and commit. What do Sync Status and App Health show? Fix it with
git revert.
Official references
- Argo CD: Getting Started
- Argo CD: Automated Sync Policy
- Argo CD: Declarative Setup
- Argo Helm charts (argo-cd chart)
Written By: Shramik Masti
How is this guide?
Last updated on
Helm: Kubernetes Package Manager
Understand why Helm exists, what charts, repositories and releases are, install Helm on the EKS home server, and learn the core commands to install, upgrade, roll back and uninstall applications.
Kubernetes Monitoring and Installing Prometheus
Learn what observability means for a Kubernetes cluster, how Prometheus and Grafana work together, and install Prometheus on EKS with its Helm chart in a monitoring namespace.