
Working With Remote Repositories
Once you have a GitHub repository, the next step is to connect it to your local Git repository.
This connection allows you to push your local commits to GitHub and, later, pull changes made by other developers.
The basic relationship looks like this:
Local Repository ←→ Remote Repository (GitHub)Connecting a Local Repository to GitHub
A local Git repository and a GitHub repository are separate repositories until you explicitly connect them.
Suppose you already have:
MyProject/
└── .git/
and a repository on GitHub:
github.com/username/MyProjectYou connect them by adding the GitHub repository as a remote.
Before doing that, you need a way to authenticate with GitHub.
GitHub supports two common connection methods:
- HTTPS
- SSH
HTTPS vs SSH
Both methods allow Git to communicate securely with GitHub, but authentication works differently.
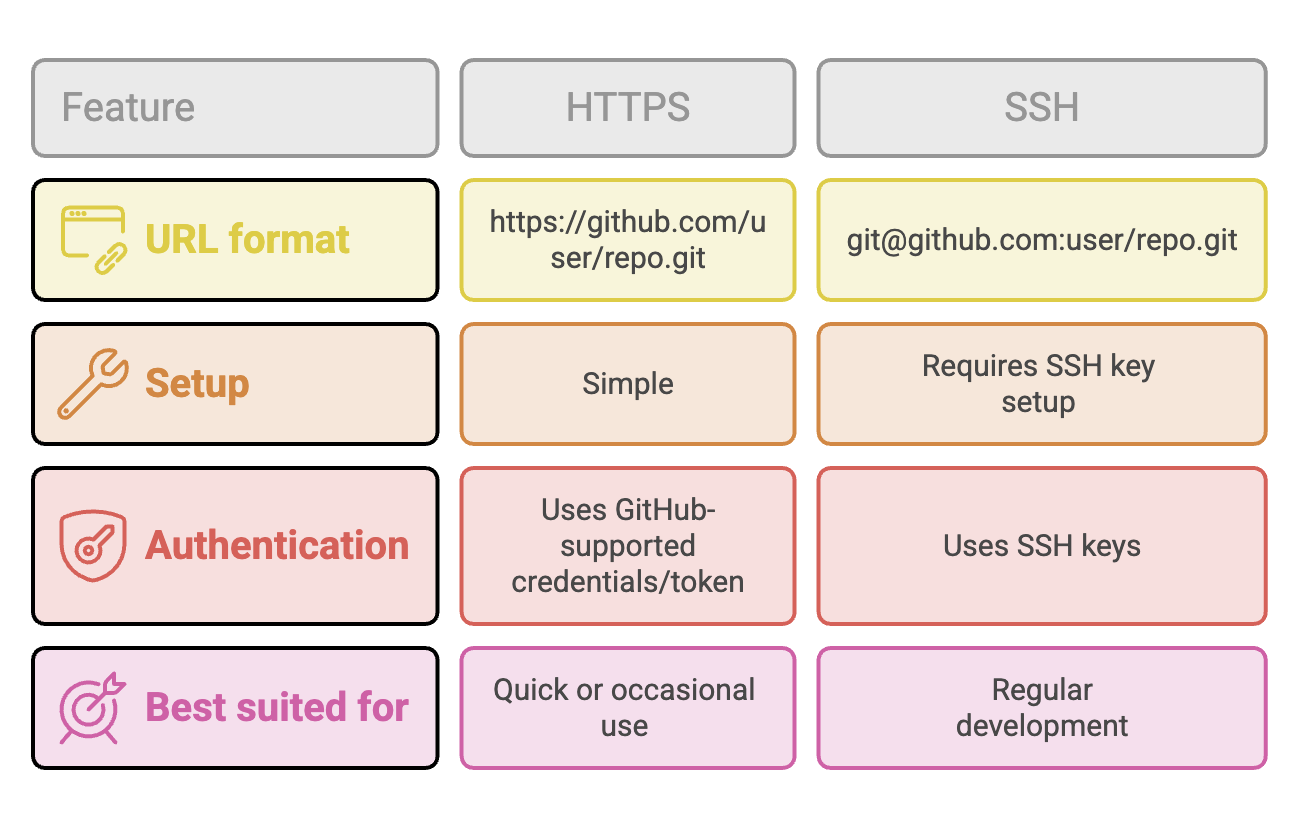
Note: With HTTPS, GitHub does not accept your account password for Git operations. Authentication typically uses a Personal Access Token (PAT) or a credential manager.
For developers who work with GitHub regularly, SSH is a convenient option because the authentication setup is done once per machine/account configuration.
Setting Up SSH Authentication
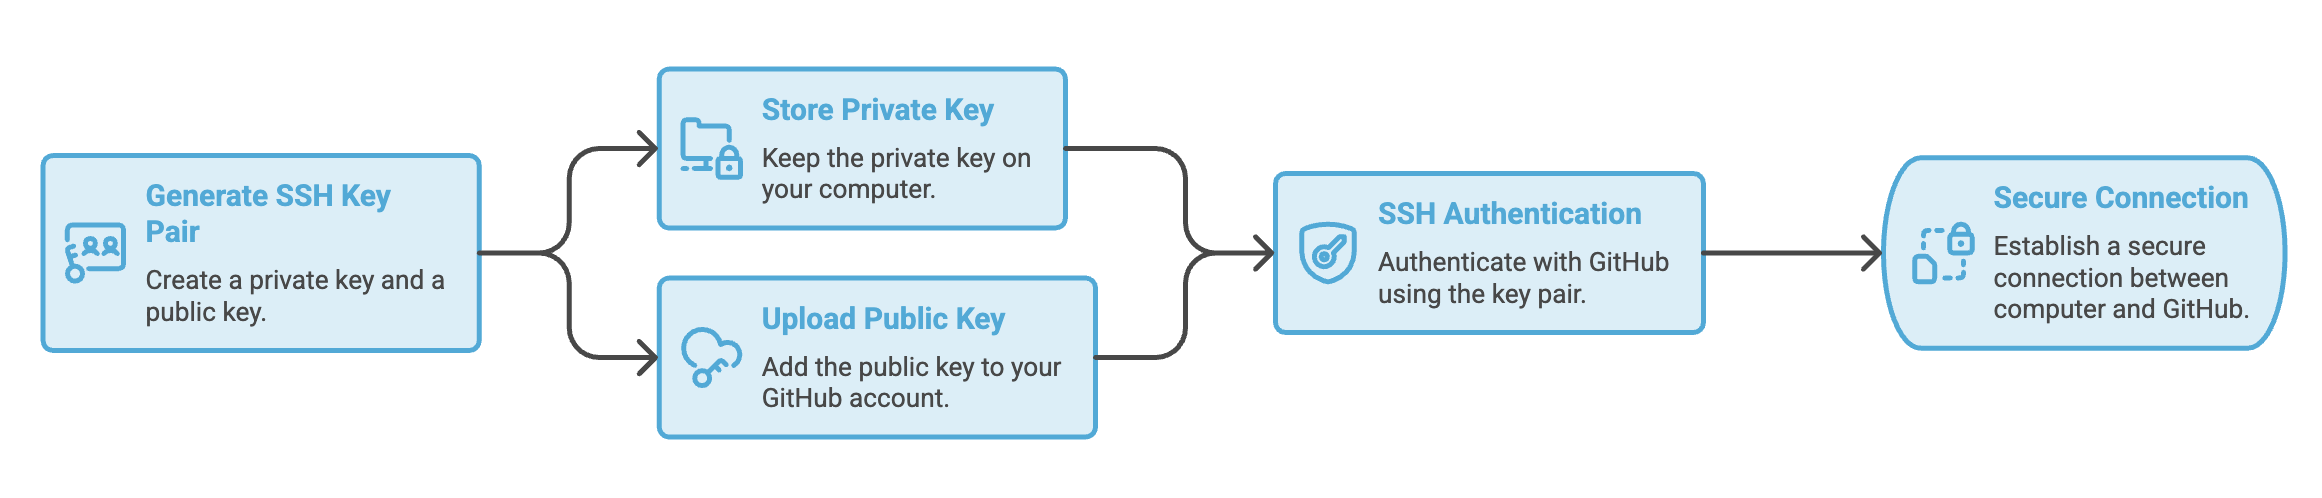
SSH stands for Secure Shell. It allows your computer to authenticate with GitHub using an SSH key pair.
An SSH key pair consists of:
- Private key - stays on your computer and must never be shared.
- Public key - added to your GitHub account.
Step 1: Generate an SSH Key
A modern and recommended approach is to generate an Ed25519 key:
ssh-keygen -t ed25519 -C "your_email@example.com"Follow the prompts to choose where to save the key and optionally set a passphrase.
You will typically get two files:
id_ed25519
id_ed25519.pub
Important
id_ed25519→ Private key. Never share it.id_ed25519.pub→ Public key. Safe to add to GitHub.
Older tutorials often use
ssh-keygen -oand refer toid_rsa.pub. For new setups, Ed25519 is generally preferred when supported.
Step 2: Copy the Public Key
Display the public key and copy its entire contents.
On macOS or Linux:
cat ~/.ssh/id_ed25519.pubOn Windows PowerShell:
Get-Content ~/.ssh/id_ed25519.pubThe output will look similar to:
ssh-ed25519 AAAAC3... your_email@example.comCopy the complete line.
Step 3: Add the Key to GitHub
In GitHub:
Profile Picture
      ↓
Settings
      ↓
SSH and GPG keys
      ↓
New SSH key
Provide:
- Title - For example,
My Laptop - Key type - Authentication Key
- Key - Paste your public key
Save the key.
Your GitHub account can now authenticate your computer using that SSH key.
Step 4: Test the SSH Connection
You can verify the connection with:
ssh -T git@github.comIf the setup is correct, GitHub will confirm that authentication succeeded.
Connecting the Local Repository
Once authentication is ready, connect your local repository to GitHub.
Step 1: Make Sure You're in the Project
Navigate to your project directory:
cd MyProjectIf the project is not already a Git repository, initialize it:
git initStep 2: Set the Main Branch
If your current branch has a different name, rename it to main:
git branch -M mainThis is a common convention for the primary branch.
Step 3: Add the Remote
Use:
git remote add origin git@github.com:username/repository.gitReplace the URL with the SSH URL of your GitHub repository.
For example:
git remote add origin git@github.com:john/MyProject.gitWhat does origin mean?
origin is simply a short name (alias) for the remote repository URL.
Instead of repeatedly typing:
git@github.com:john/MyProject.gityou can refer to it as:
originSo:
git push origin mainmeans:
Push the
mainbranch to the remote repository namedorigin.
Step 4: Checking the Remote Connection
After adding a remote, verify it with:
git remote -vExample:
origin  git@github.com:john/MyProject.git (fetch)
origin  git@github.com:john/MyProject.git (push)
This confirms that your local repository knows where the remote repository is located.
Pushing Local Commits to GitHub
Once your local repository contains commits, you can upload them to GitHub using:
git push -u origin mainThis sends the commits from your local main branch to the remote main branch.
Local Repository
      │
      │ git push
      ▼
GitHub Repository
Understanding -u
The -u option sets the remote branch as the upstream branch for your current local branch.
git push -u origin mainAfter this relationship has been established, future pushes from the same branch can usually be performed with:
git pushGit already knows that the local main branch should push to origin/main.
Complete Example
Suppose you have created a project locally and created an empty repository on GitHub.
The basic setup looks like this:
# Navigate to your project
cd MyProject

# Initialize Git if necessary
git init

# Rename the current branch
git branch -M main

# Add and commit your files
git add .
git commit -m "Initial project setup"

# Connect the GitHub repository
git remote add origin git@github.com:username/MyProject.git

# Verify the remote
git remote -v

# Push the first commit
git push -u origin main
After the final command, your committed project will be available in the GitHub repository.
Quick Revision
Local Repository
      │
      │ git remote add origin <URL>
      ▼
Remote Repository
      │
      │ git push -u origin main
      ▼
     GitHub
Written By: Muskan Garg
How is this guide?
Last updated on