
Agentic Workflow Basics
Get the starter Content Tracker frontend, open it in VS Code, and let Claude Code run it for you while you approve each step.
We are not going to vibe code this application. Vibe coding can produce a demo, but not something you would confidently run in production. Instead we follow a hybrid approach: we start with a frontend that already exists and use Claude Code to build everything behind it.
| Part | Where it comes from |
|---|---|
| Frontend (HTML, CSS, JavaScript) | Already built, provided in the repository |
| Backend (FastAPI, database, security) | Built by us, with Claude Code |
| Small frontend changes | Made with Claude Code when the backend needs them |
This is also how most real work looks. You rarely start from an empty folder. You join an existing codebase and extend it.
Step 1: Get the project
Clone the repository and take the original frontend from its first commit:
git clone https://github.com/navinreddy20/content-tracker.git
cd content-tracker
git checkout deffa7c -- frontend
Copy only the frontend/ folder into your own project folder. Your starting structure should look like this:
content-tracker/
└── frontend/
    ├── index.html     # the Kanban board layout
    ├── app.js         # board logic, roles and a mock API layer
    └── styles.css     # styling
Open the folder in VS Code.
Step 2: Start Claude Code in the project
Open the integrated terminal (or click the Claude icon if you enabled terminal mode) and start Claude Code:
claudeClaude Code asks whether you trust this folder. Since it is your project, choose Yes.
Step 3: Ask Claude to run the frontend
You could open index.html yourself, but let us see the agent at work:
Run this frontend code.Watch what happens:
- Claude gathers context: it looks at the folder and reads
index.htmlandapp.jsto understand what kind of app this is. - Claude decides on an action: this is a static site with no build step, so it can be opened directly in a browser or served with a simple static server.
- Claude asks for permission to run a shell command, for example
start frontend/index.htmlon Windows or a command likepython -m http.server 8000 --directory frontend.
You will see a prompt like this:
Bash command
  start frontend/index.html

Do you want to proceed?
❯ 1. Yes
  2. Yes, and don't ask again for start commands in this project
3. No, and tell Claude what to do differently (esc)| Option | Effect |
|---|---|
| Yes | Run this one command now |
| Yes, and don't ask again | Save an allow rule so similar commands run without asking in this project |
| No | Cancel, and tell Claude what to do instead |
Choose Yes for now. (The exact wording of the options can differ slightly between versions.) We will cover what "don't ask again" saves, and where, in Permissions and Checkpoints.
Claude Code is not only for chatting
The prompt box is not just a chat. Claude can execute real shell commands on your machine. That is what makes it powerful, and why the permission prompt exists. You can also run a shell command yourself by starting your input with !, for example !git status.
Step 4: Explore the app
The Telusko Workflow Engine opens in the browser:
- Five columns: Code & Examples Ready, Recorded, Editing in Progress, Uploaded (Pending Verify) and Verified & Published
- A role selector with Admin, Content Team, Video Editor and Uploader
- Cards with a Move Forward button, plus drag-and-drop for Admin
Try clicking Move Forward. Nothing changes, and an error toast appears. That is expected. The frontend calls an api layer that uses a mockFetch function, and mockFetch deliberately always fails. There is no backend yet.
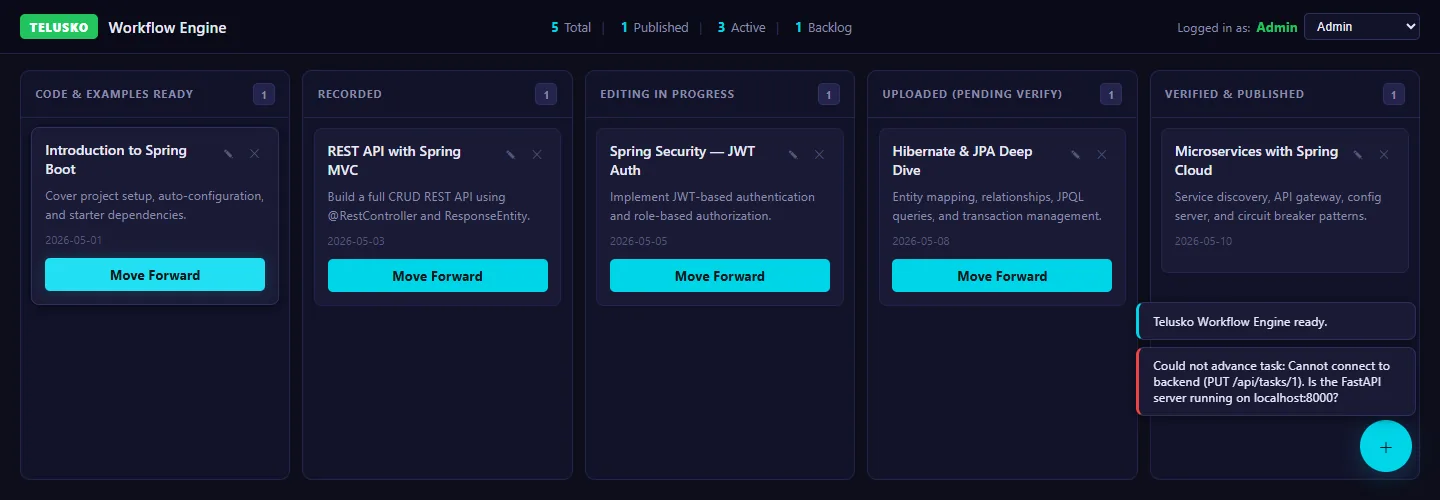
The starter board. Clicking Move Forward shows the "Cannot connect to backend" error, because no backend exists yet.
function mockFetch(url, options = {}) {
  return new Promise((_, reject) => {
    // Simulate network timeout before refusing
    setTimeout(() => {
      reject(new Error(
        `Cannot connect to backend (${(options.method || 'GET').toUpperCase()} ${url}). ` +
        'Is the FastAPI server running on localhost:8000?'
      ));
    }, 400 + Math.random() * 150);
  });
}
The error message even tells us what is planned: a FastAPI server on localhost:8000.
This design is intentional. Every UI action already goes through await api.*, so when we build the backend in Section 8, connecting it is a one-function change.
Roles in the frontend are UX only
The role dropdown only hides buttons in the browser. Anyone can bypass that with developer tools. Real security must be enforced on the server, which is exactly what we build in Section 10.
What you just saw
Even with a one-line prompt, Claude did not jump straight to an answer. It looked around, made a plan, asked before acting, and then reported back. That cycle has a name: the agentic loop. In the next lesson we look at it properly.
Official references
Written By: Shramik Masti
How is this guide?
Last updated on
Claude Code with a Local Model
Run Claude Code against an open-source model on your own machine using Ollama, with no Anthropic billing, and understand the trade-offs.
Agentic Loop Demo
Understand the think, act, observe cycle that drives Claude Code, see it live on a small task, and learn why the "act" step needs permissions.