
Rolling Updates & Rollbacks in Kubernetes Deployments
Expose a Deployment through a LoadBalancer, roll out a new image with zero downtime, watch the RollingUpdate strategy work, check rollout status and history, and roll back with one command.
Shipping a new version is the riskiest moment in an application's life. The old way was to stop the app, replace it, start it again, and hope. Users saw an error page in between, and if the new version was broken, getting the old one back was another stressful manual job.
A Deployment turns both of these into one command each. A rolling update replaces pods a few at a time, so some pods always serve traffic. A rollback returns to the previous version the same way. This is the main reason teams use Deployments.
Step 1: Put the Deployment behind a LoadBalancer
You need the telusko-deploy Deployment from the previous lesson running:
kubectl apply -f k8s-deploy.ymlReuse the LoadBalancer Service file from LoadBalancer Service Explained. Only the selector changes, so it points at the Deployment's pods:
apiVersion: v1
kind: Service
metadata:
  name: webapp-lbr-svc
spec:
  type: LoadBalancer
  selector:
    app: telusko-dp-webapp
  ports:
    - port: 80
      targetPort: 8080
kubectl apply -f k8s-lbr-svc.yml
kubectl get deploy,rs,pods,svcWait two to three minutes, open the EXTERNAL-IP hostname in the browser, and you see version 1 of the application. Keep the tab open.
Step 2: How a rolling update works
When you change anything in a Deployment's pod template (usually the image), the Deployment:
- Creates a new ReplicaSet for the new template
- Scales the new ReplicaSet up and the old one down, a few pods at a time
- Only removes old pods once new ones are ready
- Keeps the old ReplicaSet, scaled to 0, so it can roll back later
How many pods change at once is controlled by spec.strategy. You did not write it, so Kubernetes filled in the defaults. You can see them with kubectl get deploy telusko-deploy -o yaml:
spec:
  strategy:
    type: RollingUpdate
    rollingUpdate:
      maxSurge: 25%
maxUnavailable: 25%| Field | Meaning | With 3 replicas |
|---|---|---|
type: RollingUpdate | Replace pods gradually. The default | |
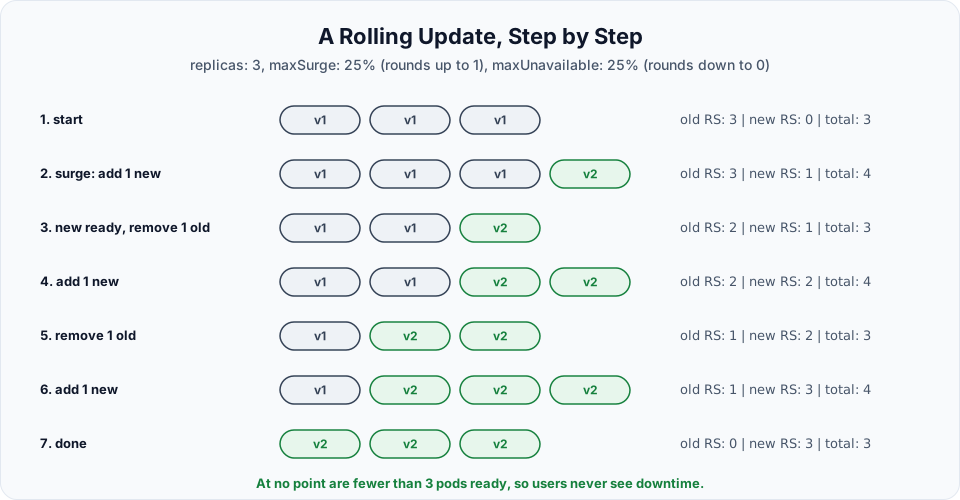
maxSurge: 25% | How many pods above replicas may exist during the update. Rounded up | 25% of 3 = 0.75, so 1 extra pod |
maxUnavailable: 25% | How many pods below replicas may be unavailable. Rounded down | 0.75 rounds down to 0 |
So with 3 replicas, Kubernetes adds one new pod, waits until it is ready, removes one old pod, and repeats. There are always at least 3 ready pods:
The other strategy is type: Recreate, which deletes all old pods first and then creates the new ones. That causes downtime, but it is useful when two versions must never run side by side (for example, an app that changes a database schema).
Step 3: Roll out a new version
The lecture edits the live Deployment with kubectl edit:
kubectl edit deploy telusko-deployThis opens the full live object in vi. Find image: under spec.template.spec.containers, press i, change the image to the new version, then Esc and :wq. The lecture switches to a second image of the application, my-web-app:latest:
      containers:
        - image: <your-dockerhub-username>/my-web-app:latest
          name: webapp-container
Saving the file starts the rollout immediately. Two other ways do the same thing:
# one-liner: container name = new image
kubectl set image deploy/telusko-deploy webapp-container=<your-dockerhub-username>/my-web-app:latest

# declarative, the best habit: change image in k8s-deploy.yml, then
kubectl apply -f k8s-deploy.yml
kubectl edit and kubectl set image are quick, but they make your YAML file out of date. In real projects the image change goes into the file in Git, and a pipeline applies it.
Watch it happen
kubectl rollout status deploy/telusko-deployWaiting for deployment "telusko-deploy" rollout to finish: 1 out of 3 new replicas have been updated...
Waiting for deployment "telusko-deploy" rollout to finish: 2 out of 3 new replicas have been updated...
Waiting for deployment "telusko-deploy" rollout to finish: 1 old replicas are pending termination...
deployment "telusko-deploy" successfully rolled outIn a second terminal, kubectl get pods -w shows old pods Terminating and new ones going ContainerCreating to Running, one at a time. And:
kubectl get rsNAME DESIRED CURRENT READY AGE
telusko-deploy-6c8d9b7f4 3 3 3 40s
telusko-deploy-f7fb7c599 0 0 0 25mTwo ReplicaSets: the new one with 3 pods, and the old one with 0, kept for rollback. Confirm the image:
kubectl describe pods -l app=telusko-dp-webapp | grep -i imageAll three pods now show my-web-app:latest. Refresh the browser: the new version of the site appears, at the same load balancer URL, and the site never went down.
Step 4: Roll back
The new version is not what we wanted. Go back:
kubectl rollout undo deploy/telusko-deploydeployment.apps/telusko-deploy rolled backThe rollback is itself a rolling update: the old ReplicaSet is scaled back up and the new one down, with the same zero-downtime behaviour. Check:
kubectl get pods -w                                                   # Ctrl+C to stop
kubectl describe pods -l app=telusko-dp-webapp | grep -i image        # springboot-app again
If describe says No resources found, check the label. In the lecture the first attempt used a wrong label value; -l must match exactly, here app=telusko-dp-webapp.
Refresh the browser and version 1 is back.
Rollout history
Each change to the pod template creates a revision:
kubectl rollout history deploy/telusko-deployREVISION CHANGE-CAUSE
2 <none>
3 <none>Revision 1 became revision 3 when we rolled back to it. To go to a specific revision rather than just the previous one:
kubectl rollout history deploy/telusko-deploy --revision=2    # show its template
kubectl rollout undo deploy/telusko-deploy --to-revision=2
CHANGE-CAUSE is empty because nothing recorded why each change was made. The old --record flag that used to fill it is deprecated. Set the annotation yourself after a change:
kubectl annotate deploy/telusko-deploy kubernetes.io/change-cause="switch to my-web-app image"By default a Deployment keeps the last 10 old ReplicaSets (spec.revisionHistoryLimit). Older ones are garbage collected and can no longer be rolled back to.
Other rollout commands
| Command | What it does |
|---|---|
kubectl rollout status deploy/<name> | Wait for and report rollout progress |
kubectl rollout history deploy/<name> | List revisions |
kubectl rollout undo deploy/<name> | Roll back to the previous revision |
kubectl rollout pause deploy/<name> | Pause, so you can make several changes and release them as one rollout |
kubectl rollout resume deploy/<name> | Continue a paused rollout |
kubectl rollout restart deploy/<name> | Replace all pods with fresh ones without changing the template (for example to pick up a new Secret value) |
Avoid the latest tag in real deployments
The lecture uses :latest tags. That works for a demo because the two versions are in different image repositories, but in real projects it causes trouble: the tag points to a different image every time someone pushes, so "roll back to the previous template" may pull a different image than the one that was running before, and nodes may serve different builds under the same tag. Use a unique tag per release, such as springboot-app:1.4.2 or the Git commit SHA. Then every revision maps to exactly one image.
Readiness probes make rolling updates truly safe
The Deployment treats a new pod as ready as soon as its container starts, unless you add a readiness probe. A Spring Boot app takes several seconds to start listening, so without a probe the load balancer may briefly send traffic to pods that cannot answer yet. Adding a readinessProbe (for example an HTTP check on /actuator/health) lets the rolling update wait until each new pod really works before removing an old one.
Clean up
kubectl delete -f k8s-lbr-svc.yml      # removes the AWS load balancer, do this first
kubectl delete -f k8s-deploy.yml       # removes the Deployment, its ReplicaSets and pods
kubectl get deploy,rs,pods,svc
Confirm in EC2, Load Balancers that the load balancer is gone. If you are finished for the day: eksctl delete cluster --name telusko-learning --region ap-south-1 --wait.
Try It Yourself
- Deploy
telusko-deploybehindwebapp-lbr-svc. In one terminal runwhile true; do curl -s -o /dev/null -w "%{http_code}\n" http://<elb-dns-name>; sleep 1; done, then roll out a new image in another terminal. Do you see any non-200 responses? - Set
maxSurge: 0andmaxUnavailable: 1ink8s-deploy.yml, apply, and roll out again. How is the order of steps different? - Roll out an image tag that does not exist. Run
kubectl rollout statusandkubectl get pods. Notice the old pods keep serving traffic while the new pod is stuck inImagePullBackOff. Fix it withkubectl rollout undo. - Make three changes, annotate each with a change-cause, and roll back to the first one with
--to-revision.
Official references
- Kubernetes: Deployments (updating, rolling back, strategy)
- Kubernetes: Performing a Rolling Update (tutorial)
- kubectl reference: rollout
Written By: Shramik Masti
How is this guide?
Last updated on
Kubernetes Deployments: ReplicaSets, Scaling & Self-Healing
Create your first Deployment, see how it creates a ReplicaSet that creates the pods, and confirm self-healing and manual scaling still work, with get, scale and get events.
Running Multiple Containers in a Single Pod
Run nginx and busybox side by side in one pod, read each container's logs with -c, open a shell inside a specific container, and learn when putting containers together in one pod makes sense.