
Running Pods on Every Node: DaemonSets
Learn why a Deployment cannot guarantee a pod on every node, create a DaemonSet that runs one pod per worker node, and see the DaemonSets EKS already runs for networking and kube-proxy.
Some software has to run on every machine in the cluster. A log collector has to read the log files of every node. A monitoring agent has to report the CPU and memory of every node. A network plugin has to configure networking on every node. If even one node is missing its copy, you have a blind spot.
A Deployment cannot promise that. A DaemonSet can.
Why not a Deployment?
With a Deployment you choose how many pods, and the scheduler chooses where they go, based on free CPU, memory and other rules. Ask for 3 replicas on a 3-node cluster and you might get two on node 1, one on node 2 and none on node 3. You cannot rely on one pod per node.
There is a second problem. Clusters grow and shrink. When a new node joins, a Deployment does nothing: it already has its 3 replicas. Your monitoring agent would never reach the new node.
What a DaemonSet does
A DaemonSet ensures that a copy of a pod runs on every eligible node in the cluster.
- No
replicasfield. The number of pods equals the number of nodes: 2 nodes, 2 pods; 10 nodes, 10 pods - New node joins: the DaemonSet controller creates a pod on it automatically
- Node removed: its DaemonSet pod is removed with it (garbage collected)
- Self-healing: delete a DaemonSet pod and it is recreated on the same node
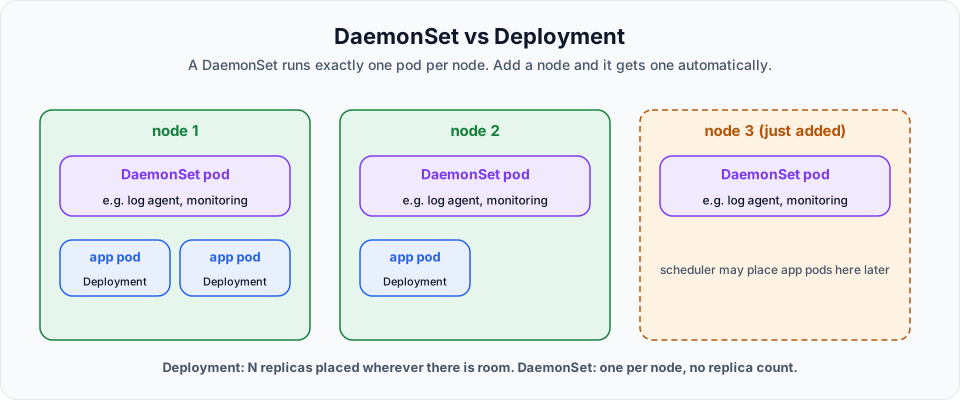
"Eligible" matters. You can limit a DaemonSet to some nodes with a nodeSelector or node affinity (for example only GPU nodes), and nodes with taints only get the pod if it has a matching toleration. Without such rules, every node gets one.
DaemonSets you already have
Your EKS cluster has been running DaemonSets since the moment it was created:
kubectl get daemonsets -n kube-system # short form: kubectl get ds -n kube-systemNAME DESIRED CURRENT READY UP-TO-DATE AVAILABLE NODE SELECTOR AGE
aws-node 2 2 2 2 2 <none> 1h
kube-proxy 2 2 2 2 2 <none> 1h| DaemonSet | Why it must be on every node |
|---|---|
aws-node | The Amazon VPC CNI plugin. It gives every pod on that node an IP address from your VPC |
kube-proxy | Programs the Service network rules on that node, from the architecture lesson |
Other common examples are Fluent Bit or Fluentd for logs, the Prometheus node exporter for node metrics, the CloudWatch agent, and storage drivers such as the EBS CSI node plugin.
Step 1: Write the DaemonSet
The lecture has no real monitoring agent at hand, so it uses the Spring Boot image as a stand-in. Any image works; the point is to watch where the pods land.
vi daemonSet.ymlapiVersion: apps/v1
kind: DaemonSet
metadata:
name: telusko-app
labels:
name: telusko-agent
spec:
selector:
matchLabels:
app: telusko-agent
template:
metadata:
labels:
app: telusko-agent
spec:
containers:
- name: telusko-agent-container
image: <your-dockerhub-username>/springboot-app:latest
ports:
- containerPort: 8080| Field | Meaning |
|---|---|
apiVersion: apps/v1, kind: DaemonSet | Same API group as Deployments and ReplicaSets |
metadata.labels.name: telusko-agent | A label on the DaemonSet object itself. It does not have to match the pod labels |
spec.selector.matchLabels | Which pods this DaemonSet owns. Must match the template labels |
spec.template | The pod template used for the pod on each node |
no replicas | Not allowed here. The node count decides |
Compare it with the Deployment manifest: the only real differences are kind and the missing replicas.
Step 2: Apply it, and fix two typical errors
kubectl apply -f daemonSet.ymlThe lecture hit two errors on the way, both worth recognising:
error: error when retrieving current configuration of:
Resource: "apps/v1, Resource=daemonsets", GroupVersionKind: "apps/v1, Kind=DaemonSet"
Name: "", Namespace: "default"
from server for: "daemonSet.yml": resource name may not be empty
Cause: metadata was misspelled as metada, so kubectl found no metadata.name at all. "Name may not be empty" almost always means a typo or wrong indentation around metadata.
The second error was strict decoding error: unknown field "spec.spec". Cause: the pod's spec: was indented at the same level as template: instead of inside it. It is the same template indentation mistake from the ReplicaSet lesson: template contains both metadata and spec.
After fixing both:
daemonset.apps/telusko-app createdStep 3: One pod per node
kubectl get nodesNAME STATUS ROLES AGE VERSION
ip-192-168-28-70.ap-south-1.compute.internal Ready <none> 31m v1.34.9-eks-7d6f6ec
ip-192-168-43-245.ap-south-1.compute.internal Ready <none> 31m v1.34.9-eks-7d6f6eckubectl get pods -o wideNAME READY STATUS RESTARTS AGE IP NODE
telusko-app-flhdd 1/1 Running 0 37s 192.168.30.11 ip-192-168-28-70.ap-south-1.compute.internal
telusko-app-rqbdj 1/1 Running 0 37s 192.168.50.24 ip-192-168-43-245.ap-south-1.compute.internalTwo nodes, two pods, one on each. We never wrote the number 2 anywhere.
kubectl get dsNAME DESIRED CURRENT READY UP-TO-DATE AVAILABLE NODE SELECTOR AGE
telusko-app 2 2 2 2 2 <none> 88sDESIRED is the number of eligible nodes.
Step 4: Add a node and watch
This is the real test, and it costs a few cents, so delete the extra node afterwards. Find the node group name, then scale it to 3:
eksctl get nodegroup --cluster telusko-learning --region ap-south-1
eksctl scale nodegroup --cluster telusko-learning --region ap-south-1 --name <nodegroup-name> --nodes 3 --nodes-max 3
In another terminal, kubectl get pods -o wide -w. A few minutes later, when the third node becomes Ready, a third telusko-app-xxxxx pod appears on it without you doing anything. Scale back to 2 with the same command and --nodes 2 and the extra pod disappears with the node.
Updating a DaemonSet
DaemonSets also support rolling updates. The default updateStrategy is RollingUpdate with maxUnavailable: 1, so when you change the image, the pods are replaced one node at a time:
kubectl rollout status ds/telusko-app
kubectl rollout undo ds/telusko-app
The alternative strategy, OnDelete, only updates a node's pod when you delete it by hand.
Pod, ReplicaSet, Deployment, DaemonSet
| ReplicaSet | Deployment | DaemonSet | |
|---|---|---|---|
| How many pods | Fixed replicas | Fixed replicas (or HPA) | One per eligible node |
| Where they run | Wherever the scheduler finds room | Wherever the scheduler finds room | Every eligible node, guaranteed |
| Self-healing | Yes | Yes | Yes |
| Scaling | Manual | Manual or automatic | Follows node count |
| Rolling update and rollback | No | Yes | Yes |
| Typical use | Used through Deployments | Your applications | Node agents: logs, metrics, networking, storage |
Clean up
kubectl delete -f daemonSet.ymlIf you scaled the node group up, scale it back to 2. If you are done for the day: eksctl delete cluster --name telusko-learning --region ap-south-1 --wait.
Try It Yourself
- Run
kubectl get ds -Aand list every DaemonSet in the cluster with its namespace. - Create
telusko-appand confirm with-o widethat each node has exactly one pod. - Delete one of its pods. Which node does the replacement go to?
- Add
nodeSelector: {kubernetes.io/hostname: <one-node-name>}undertemplate.spec, apply, and checkDESIRED. - Scale the node group to 3 and back to 2 while watching the DaemonSet pods.
Official references
- Kubernetes: DaemonSet
- Kubernetes: Perform a Rolling Update on a DaemonSet
- eksctl: Managing nodegroups
Written By: Shramik Masti
How is this guide?
Last updated on
Kubernetes Sidecar Containers
Build a sidecar pod where a busybox app writes logs to a shared emptyDir volume and an nginx sidecar reads them, then rewrite it as a native sidecar using initContainers with restartPolicy Always.
Kubernetes Pod Statuses
Understand the pod STATUS values you see in kubectl (ContainerCreating, Running, ErrImagePull, ImagePullBackOff, CrashLoopBackOff, Error), how they relate to pod phases, and the logs and describe routine for fixing them.