
Models, Settings and VS Code
Track your usage, understand effort levels, explore the settings panel, and run Claude Code inside VS Code the way professionals do.
Claude Code is installed and you are logged in. Before building anything, let us learn how to keep an eye on usage, tune the settings that matter, and set up the editor we will use for the rest of the project.
Tracking your usage with /usage
With a subscription you do not pay per token, but you do have a limit. To see where you stand:
/usageYou will see:
- Current session: how much of the current usage window you have consumed
- Current week: your weekly usage and when it resets
- A breakdown of what is driving your usage on Pro, Max, Team and Enterprise plans
Try this: check /usage, ask a simple question such as "Do I need to know Golang to build a project in Golang?", then check /usage again. A small question on Sonnet might use about 1% of the session. The same question on Opus uses noticeably more.
Claude's answer is worth remembering
Claude replied that yes, you need at least the basics of the language. That applies to every coding assistant. Treat them as assistants, not as the main developer. If you cannot read the code it writes, you cannot verify it.
/cost and /stats are aliases that open the same screen.
When you hit the limit
When you reach your plan's limit, you have two choices: wait for the reset, or turn on usage credits to keep working beyond your plan limit. Usage credits are managed with:
/usage-creditsIn older versions (and in the video) this appears as "extra usage". It is the same idea: it charges you beyond your plan. Only enable it when the work truly cannot wait.
Effort levels
Modern Claude models use adaptive reasoning: they decide how much to "think" on each step. The effort level tells the model how hard to try.
| Effort | When to use it |
|---|---|
low | Simple, quick tasks. Fast and cheap |
medium | Everyday work on the latest models |
high | Harder bugs and multi-file changes |
xhigh | Complex coding and long agentic tasks (on models that support it) |
max | The deepest reasoning, for the toughest problems. Applies to the current session only |
Change it with:
/effort highor with the left and right arrow keys inside the /model picker. Higher effort means better results on hard problems, but more tokens and more time. Not every model supports every level, and Claude Code falls back to the nearest supported level.
Choosing a model and effort together
A simple rule that works well:
- Plan with a stronger model (Opus) or a higher effort
- Implement with Sonnet at a moderate effort
- Quick lookups and small edits with Haiku or low effort
There is even a built-in alias, opusplan, that uses Opus while you are in plan mode and switches to Sonnet for execution:
/model opusplanThe settings panel: /config
/configThis opens an interactive settings panel. A few options worth knowing early:
| Setting | What it does |
|---|---|
| Auto-compact | Automatically summarises the conversation when the context window is nearly full (covered in Section 6) |
| Show tips | Turn off the tips shown while Claude works |
| Reduced motion | Fewer animations in the terminal |
| Thinking mode | Whether the model uses extended thinking |
| Theme | Colours of the interface |
| Model | Your default model |
You can also set a value directly, for example /config thinking=false.
Checking your session: /status
/statusShows the Claude Code version, the model, the account you are logged in with, the current working directory and connectivity. When something behaves unexpectedly, /status is the first thing to check.
Setting up VS Code
We will build the project in VS Code. Here is the setup.
Install the extension
Open the Extensions view (Ctrl+Shift+X on Windows and Linux, Cmd+Shift+X on macOS), search for Claude Code, and install the one published by Anthropic. The same extension works in Cursor.
Open a session
Click the Claude icon in the editor toolbar or the activity bar. By default, the extension opens a graphical chat panel with a prompt box, slash commands, inline diffs and conversation history.
Switch to terminal mode (recommended)
Some features, such as configuring hooks, tell you to "continue in the terminal" from the graphical panel. Since we come back to the terminal anyway, we use the CLI inside VS Code.
Open Settings (Ctrl+, or Cmd+,), go to Extensions → Claude Code, and tick Use Terminal (claudeCode.useTerminal). Now the Claude icon opens Claude Code in VS Code's integrated terminal.
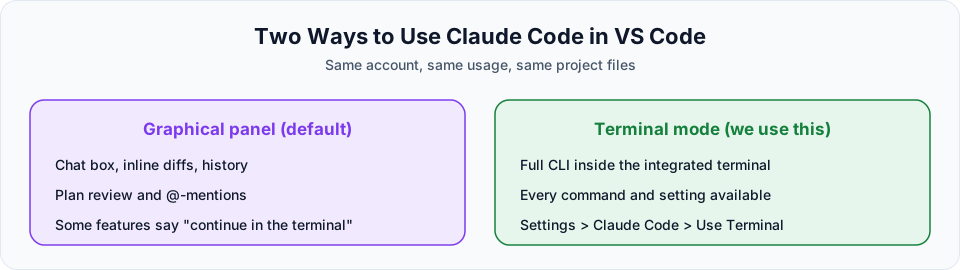
Your usage and account are shared across both modes. A new session does not reset your limits.
Why new sessions?
Just like you start a new chat in ChatGPT or Gemini for a new topic, starting a new Claude Code session gives Claude a clean context. We will see in Section 6 exactly when to start fresh, when to clear and when to compact.
Keep the official docs close
The official documentation covers installation for every platform, how Claude Code works, settings, and every command. Claude Code ships updates almost every week, so whenever something on your screen looks different from the video, check the docs first. It is a habit worth building for any tool you learn.
Try It Yourself
Before moving to the next section, practise what you learned:
- Run
claude --versionandclaude doctorand fix anything it reports. - Check
/usage, ask one small question, and check/usageagain to see the cost of a single prompt. - Switch between Sonnet and Haiku with
/model, and try two effort levels with/effort. - Enable Use Terminal in the VS Code extension and start Claude Code from the editor.
Official references
- Use Claude Code in VS Code
- Model configuration and effort levels
- Settings
- Manage costs effectively
- Commands reference
Written By: Shramik Masti
How is this guide?
Last updated on
First Launch and Login
Walk through the first-run setup, log in with a subscription or a Console account, and see how model choice affects what you spend.
Claude Code with a Local Model
Run Claude Code against an open-source model on your own machine using Ollama, with no Anthropic billing, and understand the trade-offs.