
Claude Code Workflow Overview
A tour of the Content Tracker application we build, the "done vs verified" mindset, and the roadmap from setup to deployment.
Before we talk about commands and configuration, let us look at what we are going to build. Learning a tool is much easier when you know where you are heading.
The project: Content Tracker
Creating a video, whether for YouTube or a full learning program, is a team effort. One team prepares the content and code examples. The trainer records. Editors edit. Someone uploads the video, and before it goes public, it is reviewed.
That is a pipeline with different people at different stages. You could track it in a spreadsheet or a generic Kanban tool, but we are going to build our own: the Content Tracker (internally called the Telusko Workflow Engine).
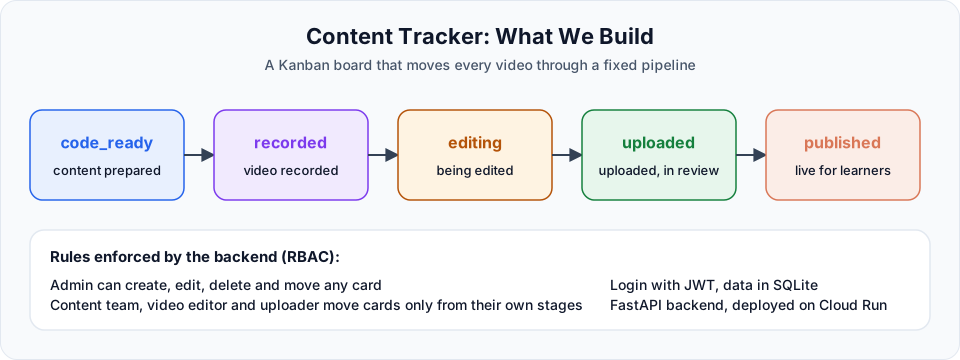
What the finished app does
- Shows every video as a card on a Kanban board
- Moves cards through five stages:
code_ready,recorded,editing,uploaded,published - Lets users log in with a username and password
- Enforces role-based access control (RBAC) on the server:
- Admin can create, edit, move and delete any card
- Content team, video editor and uploader can only move a card forward from the stages they own
- Runs live on Google Cloud Run
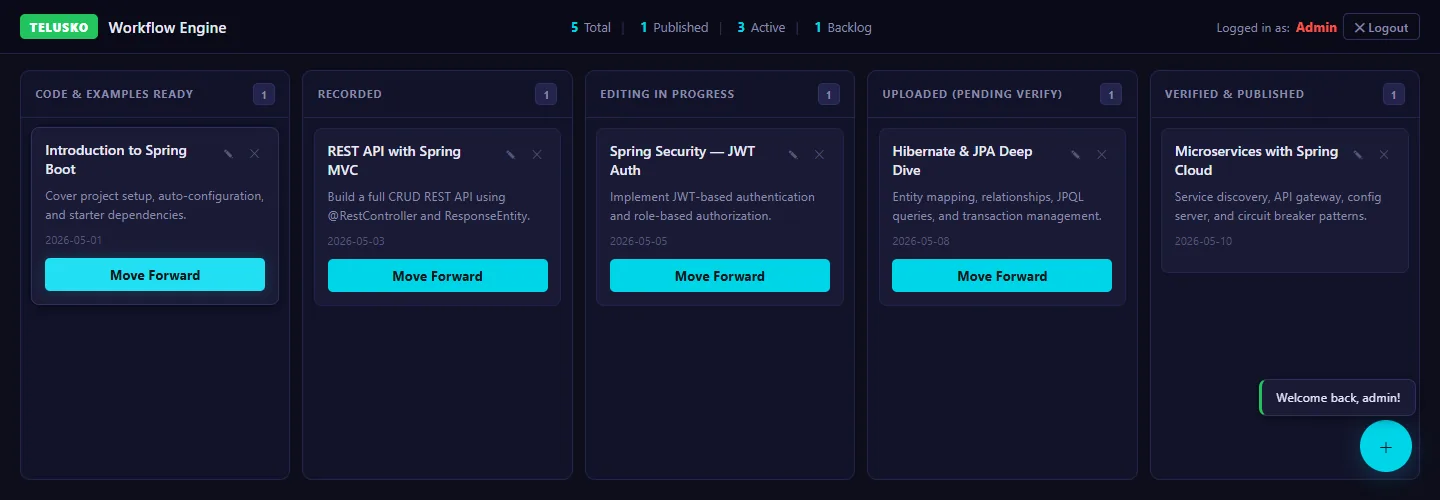
The finished app, logged in as Admin. Every column has a Move Forward button and cards can be deleted.
The tech stack
| Layer | Technology |
|---|---|
| Frontend | Vanilla HTML, CSS and JavaScript (no build step) |
| Backend | FastAPI with a service layer |
| Database | SQLite through SQLAlchemy 2.0 (async) |
| Migrations | Alembic |
| Validation | Pydantic v2 |
| Security | JWT (python-jose) and bcrypt password hashing |
| Package manager | uv |
| Deployment | Docker, Google Artifact Registry, Google Cloud Run |
We are not going to type most of this code by hand. We are going to direct Claude Code to build it, review every step, and verify the result. That is the real skill you will learn.
Done vs verified
This is the most important idea in these docs, so let us spend a minute on it.
Imagine you hire a contractor to build your house. After a few months, they call and say, "The work is done." Do you move in that day? No. You go there first and check everything: the doors open properly, the switches work, the lights turn on, the taps do not leak. Only after checking do you say it is verified.
Software works the same way:
| Done | Verified | |
|---|---|---|
| Who says it | Whoever did the work (Claude) | You |
| What it means | "I made the change and I think it works" | "I ran it, tested it, read the diff and it behaves correctly" |
| Safe to commit? | Not yet | Yes |
You might ask: if AI can write the code, can AI also verify it? It can help. You can use a second session, a different model or a review sub-agent. But having the same AI write and grade its own work is like a student checking their own homework. A human must stay in the loop, because when something breaks in production, a person is responsible, not the model.
Never push code just because Claude says it works. It may work now and fail later in a way you did not test. Verification is your job.
The roadmap
Here is how the sections build on each other.
| Phase | What we do |
|---|---|
| Setup (Sections 2 and 3) | Install Claude Code, choose a plan or API billing, pick models, connect VS Code, and optionally run a local model |
| How it works (Section 4) | Understand the agentic loop, permissions and checkpoints so you stay in control |
| Context engineering (Sections 5 and 6) | Use CLAUDE.md to store conventions, and slash commands to manage sessions and context |
| Scaling up (Section 7) | Create sub-agents for focused jobs, and use git worktrees to work on branches in parallel |
| Build (Section 8) | Take the starter frontend and build the FastAPI backend, database, migrations and seed data, then connect the frontend |
| Workflows (Section 9) | Turn repeated prompts into skills, and implement features from specs |
| Security (Section 10) | Add JWT login and server-side RBAC, driven entirely by a security spec |
| Integrations (Section 11) | Connect the GitHub MCP server to create issues and pull requests from Claude Code |
| Deployment (Section 12) | Dockerize the app and deploy it to Google Cloud Run |
Getting the starter code
The final project lives in this repository:
The main branch contains the finished application, including the login UI. To build along from the very beginning, you only need the original frontend/ folder. It is in the repository's first commit, where mockFetch still fails on purpose:
git clone https://github.com/navinreddy20/content-tracker.git
cd content-tracker
git checkout deffa7c -- frontend
Copy that frontend/ folder into your own fresh project folder and initialise a new git repository there. The backend is what we build together.
About the before-auth-impl branch
The videos mention the before-auth-impl branch. It is a snapshot of the project just before the security section: the backend is built and the frontend is already connected to it. Use it if you want to jump straight to Section 10, or to compare your work with a reference. If you take the frontend from that branch, the "Frontend Wiring" step in Section 8 is already done.
Prompts and specs
The repository includes a prompts.txt file with every major prompt used in the videos, plus the spec files under specs/. You can type your own prompts, but if you want to follow along exactly, copy them from there. Always read a prompt before you run it, so you know what you are asking Claude to do.
Try It Yourself
Before moving to the next section, practise what you learned:
- Open the live demo and log in as
admin, then aseditor. Note which buttons change. - In one sentence each, write down the difference between "done" and "verified" for a task in your own work.
- Fetch the original frontend with
git checkout deffa7c -- frontendand keep it in a new practice folder.
Official references
Written By: Shramik Masti
How is this guide?
Last updated on