
Ansible Config
Build a three-server Ansible lab on AWS EC2, install Ansible on the control node, set up passwordless SSH to the managed nodes, write the inventory and run your first ping.
Theory is done. Time to build a real lab where one machine controls two others. Everything in the rest of this course runs on this setup, so take your time and do every step on every machine.
The plan:
| Machine | Role | What we install or change |
|---|---|---|
control-node | Control node | An ansible user, Python, pip, Ansible, an SSH key pair, the inventory |
managed-node-1 | Managed node, in the webservers group | An ansible user with sudo rights, password login over SSH (temporarily) |
managed-node-2 | Managed node, in the dbservers group | Same as managed node 1 |
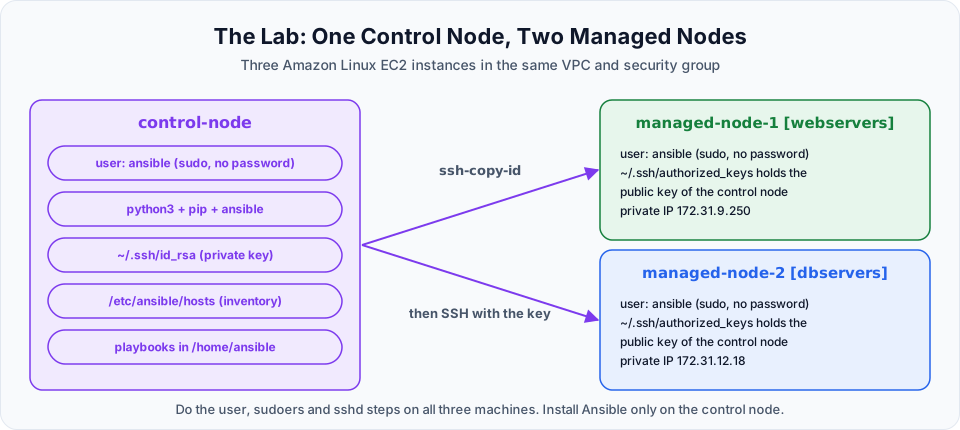
Step 1: Launch three EC2 instances
Open the launch wizard
In the AWS console go to EC2 > Instances > Launch instances. Give the instance a temporary name such as server. You will rename them after launch.
Pick the image and size
Choose Amazon Linux 2023 and a free tier eligible instance type (t2.micro or t3.micro, depending on your region). Ubuntu also works, but some package and service names differ, so stick with Amazon Linux to match every command in this course.
Create a key pair
Under Key pair (login) click Create new key pair, name it something like ansible-key-pair, keep the .pem format and create it. The file downloads to your machine. This key is only for you to log in from your laptop. Ansible will use a separate key that we generate later.
Security group and count
Select the default security group of your VPC (or create one), and set Number of instances to 3. Click Launch instance.
Rename the instances
In the instances list, rename the three instances to control-node, managed-node-1 and managed-node-2 so you never run a command on the wrong machine.
Why the default security group works here
The default security group has an inbound rule that allows all traffic from itself. Because all three instances share it, they can reach each other over SSH on their private IPs. To SSH in from your own laptop you still need an inbound rule for port 22 from your IP. If you use a custom security group instead, add a rule for port 22 with the security group itself (or the VPC CIDR) as the source.
Step 2: Connect to each instance
From the folder where the .pem file was downloaded, open Git Bash (Windows) or a terminal (macOS and Linux). Lock down the key file first, because SSH refuses keys that other users can read:
chmod 400 ansible-key-pair.pem
ssh -i "ansible-key-pair.pem" ec2-user@<public-ip-of-control-node>
Open one terminal window per instance. Many people give each window a different colour so the control node is easy to spot. If you have not connected to EC2 before, the Linux course walks through it.
Step 3: Prepare all three machines
Do this step on the control node and on both managed nodes. The lecture shows it on two machines and leaves the third for you, so do not skip it.
Create the ansible user
sudo useradd ansible
sudo passwd ansible
useradd creates the user with a home directory at /home/ansible. passwd asks for a new password twice. Use the same password on all three machines and one you will remember, because ssh-copy-id asks for it in Step 6.
Give the user sudo rights without a password
Ansible will often need root rights on the managed nodes (installing packages, starting services). Open the sudoers file with visudo, which checks your syntax before saving:
sudo visudoFind the line root ALL=(ALL) ALL and add this line directly below it:
## Allow root to run any commands anywhere
root    ALL=(ALL)       ALL
ansible ALL=(ALL) NOPASSWD: ALL| Part | Meaning |
|---|---|
ansible | The user this rule is for |
ALL=(ALL) | On any host, as any target user (including root) |
NOPASSWD: | Do not ask for the user's password when they run sudo |
ALL | Any command |
On the lecture's instance, visudo opened in nano: save with Ctrl+O, Enter, then exit with Ctrl+X (or press Ctrl+X, then Y and Enter). If it opens in vi, use Esc then :wq.
A cleaner alternative
Instead of editing the main file you can drop a separate file into /etc/sudoers.d/:
echo 'ansible ALL=(ALL) NOPASSWD: ALL' | sudo tee /etc/sudoers.d/ansible
sudo chmod 440 /etc/sudoers.d/ansible
sudo visudo -c
visudo -c validates all sudoers files. Both approaches give the same result.
Allow password login over SSH (temporarily)
EC2 images allow key-based SSH login only. To copy our new key with ssh-copy-id, the managed nodes must accept a password once. Open the SSH server configuration:
sudo vi /etc/ssh/sshd_configPress i for insert mode, find the PasswordAuthentication line and change it to:
PasswordAuthentication yesSave with Esc, :wq, and restart the SSH service:
sudo systemctl restart sshdThe lecture uses sudo service sshd restart. On Amazon Linux 2023 that command is redirected to systemctl, so both work.
Leave PermitEmptyPasswords set to no
The lecture also changes PermitEmptyPasswords to yes. That setting allows logins for accounts that have no password at all, and it is not needed for this lab because our ansible user has a password. Leave it at no (or commented out). Also keep in mind that password login exposes your servers to password guessing, so we switch it off again at the end of this lesson.
Step 4: Install Ansible on the control node
Only the control node needs Ansible. Switch to the ansible user and go to its home directory:
sudo su - ansibleThe lecture runs sudo su ansible and then cd. Adding - gives you a full login shell and puts you in /home/ansible directly.
Install Python 3 and pip, then install Ansible with pip:
sudo yum install python3 -y
python3 --version
sudo yum install python3-pip -y
pip3 install ansible --user
ansible --version| Command or flag | What it does |
|---|---|
yum install ... -y | Installs the package and answers "yes" to the confirmation. On Amazon Linux 2023 yum is a shortcut for dnf |
python3-pip | pip, the Python package manager, used to install Ansible |
pip3 install ansible | Installs the ansible package, which pulls in ansible-core plus the community collections |
--user | Installs into ~/.local for the current user only, so you do not need root and do not disturb system Python packages |
The output of ansible --version looks like this:
ansible [core 2.15.13]
  config file = None
  configured module search path = ['/home/ansible/.ansible/plugins/modules', ...]
  ansible python module location = /home/ansible/.local/lib/python3.9/site-packages/ansible
  executable location = /home/ansible/.local/bin/ansible
  python version = 3.9.x
Why ansible-core 2.15 and not the latest?
Each ansible-core release supports only recent Python versions on the control node. The current release, ansible-core 2.21, needs Python 3.12 to 3.14. Amazon Linux 2023 ships Python 3.9, so pip picks the newest release that still runs on 3.9: ansible 8.7.0 with ansible-core 2.15.13, exactly what the lecture shows. That is fine for learning, and every playbook in this course works on it. For a newer version, install a newer Python first, for example sudo dnf install python3.12 python3.12-pip -y, then python3.12 -m pip install --user ansible. The official guide also recommends pipx install --include-deps ansible where pipx is available.
If ansible --version says command not found, ~/.local/bin is not on your PATH yet. Log out of the ansible user and run sudo su - ansible again, or run export PATH=$HOME/.local/bin:$PATH.
Create the configuration folder
Installing with pip does not create /etc/ansible, so create it yourself. This is where the inventory will live:
sudo mkdir /etc/ansibleStep 5: Generate an SSH key on the control node
Still as the ansible user on the control node:
ssh-keygenPress Enter at every prompt to accept the default file (/home/ansible/.ssh/id_rsa) and an empty passphrase. You now have:
| File | What it is | Where it goes |
|---|---|---|
~/.ssh/id_rsa | Private key | Stays on the control node. Never share it |
~/.ssh/id_rsa.pub | Public key | Copied to every managed node |
The OpenSSH version on Amazon Linux 2023 creates an RSA key by default, as in the lecture (OpenSSH 9.5 and later default to Ed25519, and the file is then ~/.ssh/id_ed25519). ssh-keygen -t ed25519 creates a shorter, more modern key on any version and works the same way with Ansible.
Step 6: Copy the public key to the managed nodes
In the EC2 console, copy the private IPv4 address of managed-node-1. Private IPs do not change when you stop and start an instance, and traffic stays inside the VPC.
ssh-copy-id ansible@172.31.9.250The authenticity of host '172.31.9.250 (172.31.9.250)' can't be established.
ED25519 key fingerprint is SHA256:...
Are you sure you want to continue connecting (yes/no/[fingerprint])? yes
ansible@172.31.9.250's password:
Number of key(s) added: 1Type yes to trust the host (this also stores its fingerprint in ~/.ssh/known_hosts), then the ansible user's password. ssh-copy-id appends your public key to /home/ansible/.ssh/authorized_keys on the managed node. Repeat for the second managed node:
ssh-copy-id ansible@172.31.12.18Test it. This must log you in without a password:
ssh ansible@172.31.9.250
exit
Step 7: Write the inventory
Open the default inventory file:
sudo vi /etc/ansible/hostsPut each managed node in its own group, using the private IPs:
[webservers]
172.31.9.250

[dbservers]
172.31.12.18
/etc/ansible/hosts is the location Ansible reads by default, so you do not need to pass -i on every command. Groups are optional, but they let you target a subset of machines later. Check what Ansible sees:
ansible-inventory --graph@all:
|--@ungrouped:
|--@webservers:
| |--172.31.9.250
|--@dbservers:
| |--172.31.12.18Step 8: Ping the managed nodes
The moment of truth:
ansible all -m ping172.31.9.250 | SUCCESS => {
"ansible_facts": {
"discovered_interpreter_python": "/usr/bin/python3.9"
},
"changed": false,
"ping": "pong"
}
172.31.12.18 | SUCCESS => {
"ansible_facts": {
"discovered_interpreter_python": "/usr/bin/python3.9"
},
"changed": false,
"ping": "pong"
}ping here is not the network ping command. It is an Ansible module that logs in over SSH, checks that a usable Python exists on the managed node, and replies pong. If you see SUCCESS for both hosts, your lab is ready. The next lesson explains this command properly.
You will probably also see a purple warning like "Platform linux on host ... is using the discovered Python interpreter at /usr/bin/python3.9". It is harmless: Ansible found Python on its own and is telling you so. We silence it with ansible.cfg below.
Step 9 (recommended): Create ansible.cfg
ansible --version showed config file = None, which means Ansible is running on built-in defaults. The lecture does not create a config file, but a small one makes the lab quieter and more explicit. Ansible looks for it in this order and uses the first one it finds:
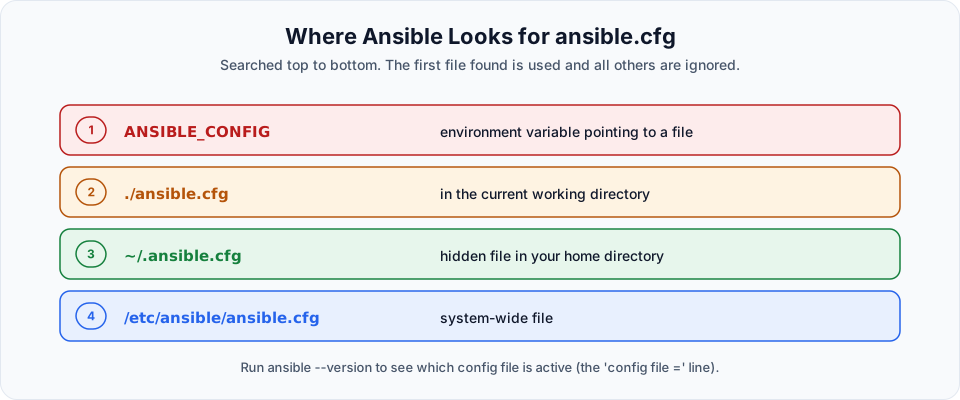
Create a system-wide one:
sudo tee /etc/ansible/ansible.cfg > /dev/null <<'EOF'
[defaults]
inventory = /etc/ansible/hosts
remote_user = ansible
interpreter_python = auto_silent
EOF
ansible --version | grep "config file"| Setting | Meaning |
|---|---|
inventory | Default inventory path (this is already the default, now it is written down) |
remote_user | The user Ansible logs in as on the managed nodes |
interpreter_python = auto_silent | Discover Python automatically, without the warning |
To see every possible setting with its default value, generate a fully commented template:
ansible-config init --disabled > ~/ansible.cfg.example
ansible-config dump --only-changed
ansible-config dump --only-changed lists only the settings you changed, which is the fastest way to debug "why is Ansible doing this?".
ansible.cfg in a world-writable folder is ignored
For security, Ansible skips an ansible.cfg in the current directory if that directory is world-writable (for example /tmp). Keep project configs in a normal folder you own.
Step 10: Turn password login off again
Key-based login now works, so the managed nodes no longer need password authentication. On each managed node:
sudo sed -i 's/^PasswordAuthentication yes/PasswordAuthentication no/' /etc/ssh/sshd_config
sudo systemctl restart sshd
From the control node, ansible all -m ping must still succeed, because it uses the key.
Common errors
| Error | Likely cause and fix |
|---|---|
ansible: command not found | You are not the ansible user, or ~/.local/bin is not on PATH. Run sudo su - ansible |
Permission denied (publickey) during ssh-copy-id | Password authentication is still off on that node. Check sshd_config and restart sshd |
UNREACHABLE! ... Connection timed out | Security group does not allow port 22 between the instances, or the IP is wrong |
UNREACHABLE! ... Permission denied during ping | You ran ssh-copy-id as a different user. Keys belong to the user who created them |
Missing sudo password later in playbooks | The NOPASSWD sudoers line is missing on that managed node |
Try It Yourself
- Add a third managed node to the lab, prepare it, copy the key and add it to a new
[appservers]group. - Run
ansible webservers -m pingandansible dbservers -m pingand confirm each one only touches its own host. - Run
ansible-config dump --only-changedbefore and after creating/etc/ansible/ansible.cfgand compare the output. - Stop and start
managed-node-1from the console. Does its private IP change? Does the ping still work?
Official references
- Installing Ansible
- How to build your inventory
- Ansible configuration settings
- Releases and maintenance (Python support per version)
Written By: Shramik Masti
How is this guide?
Last updated on
More on Ansible Architecture
Learn the difference between the control node and managed nodes, what each one needs installed, and how Ansible pushes work to servers over SSH without an agent.
Ansible Adhoc commands
Run one-off Ansible commands from the control node without writing a playbook, target all hosts or a single group, and read the SUCCESS and CHANGED output.