
Connecting to EC2 Instance Using Git Bash
After launching your EC2 instance, the next step is to connect to it and start working with Linux.
Since the virtual machine is hosted on AWS, we need a way to access it remotely. This is where SSH (Secure Shell) comes in.
In this lecture, we'll connect to our AWS Linux server using Git Bash, authenticate with our private key, and verify that we're successfully logged in.
What is SSH?
SSH (Secure Shell) is a network protocol that allows you to securely access and manage a remote computer over an encrypted connection.
It is commonly used by developers and system administrators to connect to Linux servers, execute commands, transfer files, and perform administrative tasks.
For our Linux lab, SSH establishes a secure connection between your local machine and the EC2 instance.
+---------------------------+
|      Local Machine        |
|         Git Bash          |
|                           |
|      Private Key (.pem)   |
+---------------------------+
              |
              | SSH (Port 22)
              | Encrypted Connection
              v
+---------------------------+
|       AWS EC2 Instance    |
|        Linux (Ubuntu)     |
|                           |
|     Execute Linux         |
|        Commands           |
+---------------------------+
Once connected, you can interact with the remote Linux server through your terminal, just as you would with a local Linux machine.
Connecting to an EC2 Instance Using SSH
Get the SSH Connection Details
First, retrieve the connection information for your EC2 instance.
- Sign in to the AWS Management Console.
- Navigate to EC2 → Instances.
- Select your running instance.
- Click Connect.
- Open the SSH client tab.
AWS displays the connection instructions, including the public DNS name and an example SSH command.
Keep this information handy, as you'll need it to connect to your instance.
Open Git Bash in the Key Pair Location
Locate the .pem private key file that you downloaded when creating your EC2 instance.
For example:
Downloads/
└── Linux-shell.pem
Open Git Bash in the directory containing your key file.
Tip: On Windows, you can right-click inside the folder in File Explorer and select Git Bash Here, if the option is available.
This allows you to run SSH commands without specifying the full path to the key file.
Set Permissions on the Private Key
Before connecting, restrict access to your private key file.
Run the following command in Git Bash:
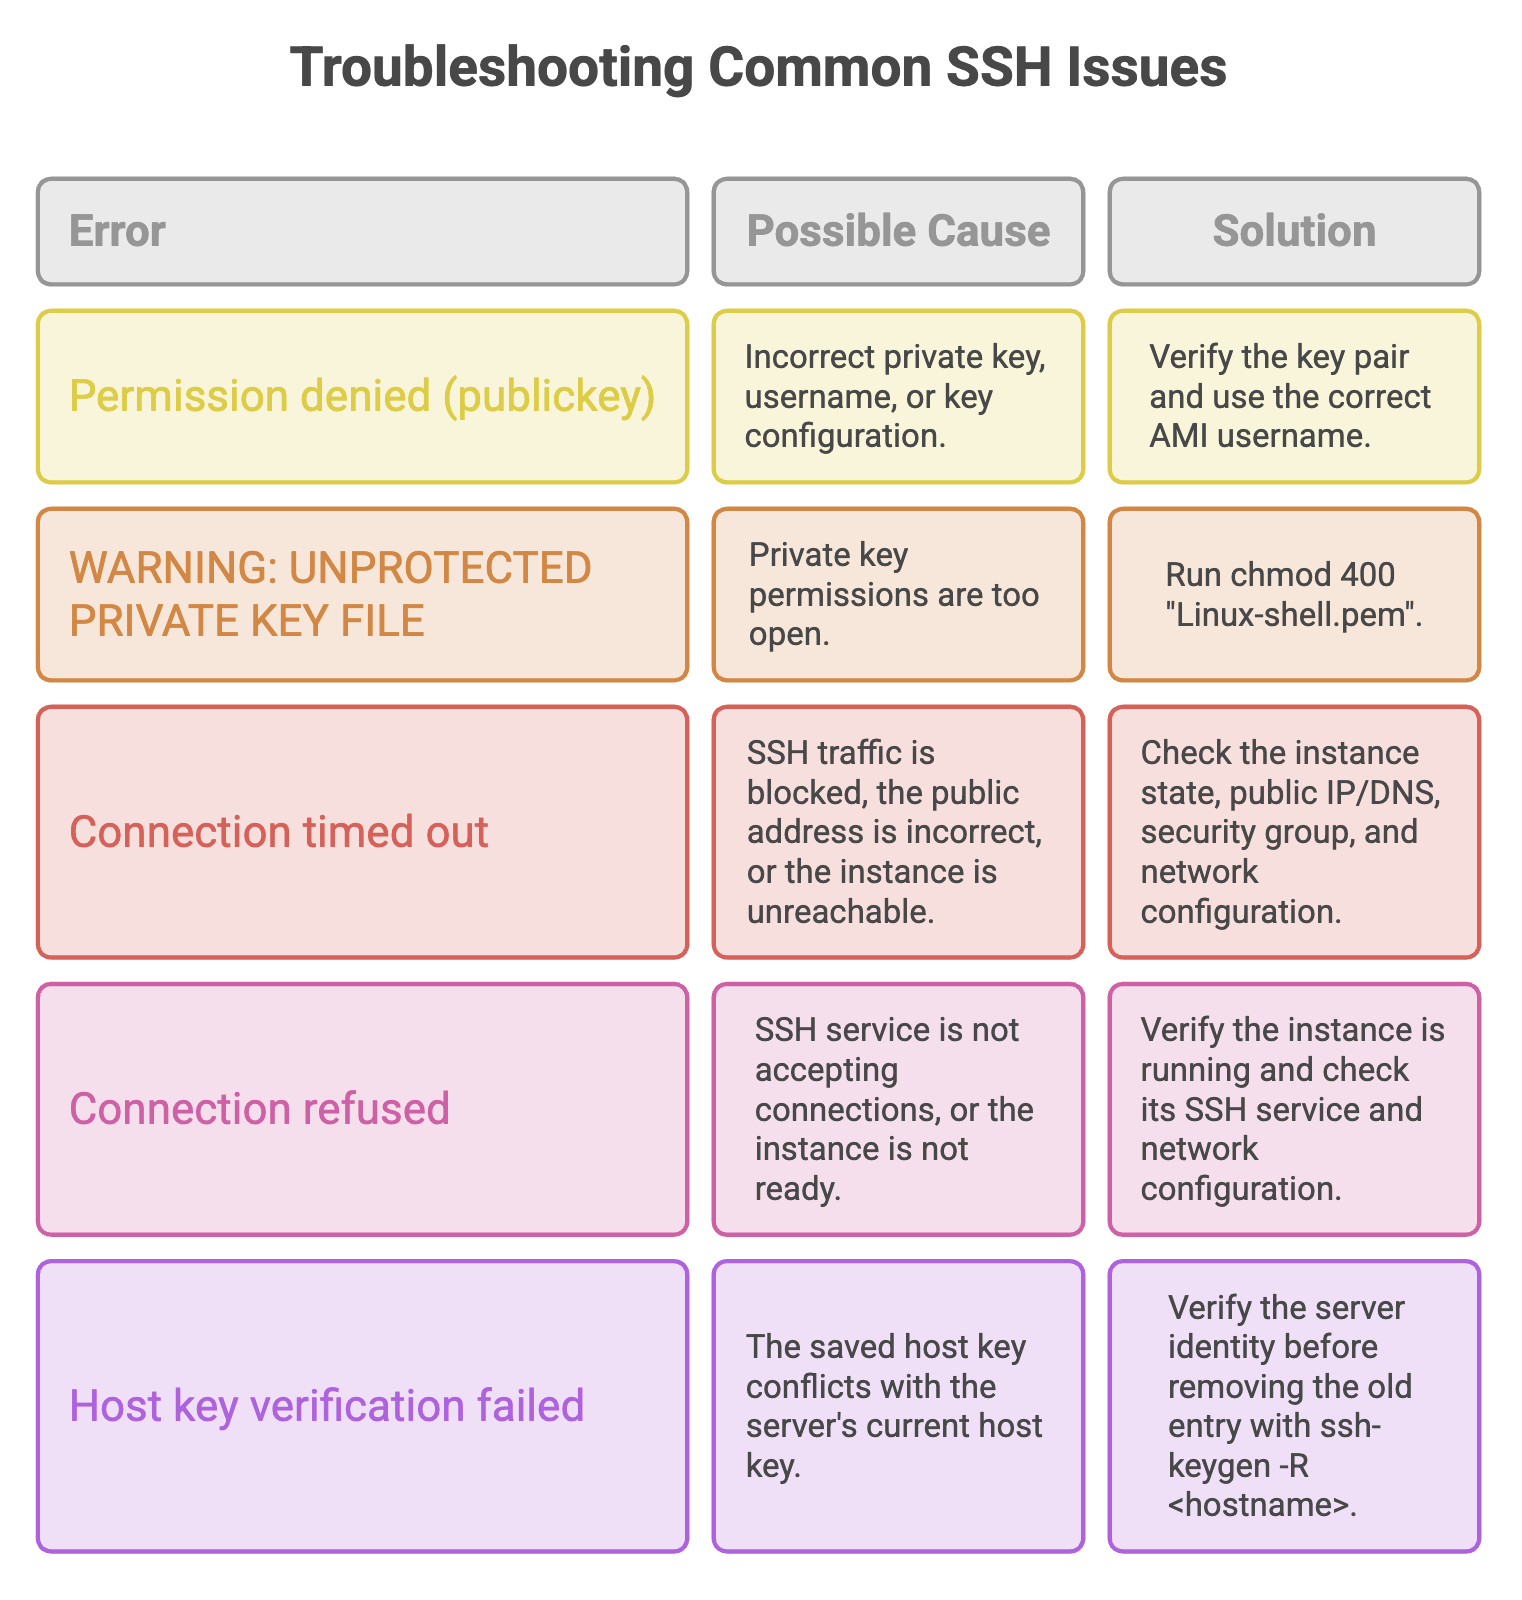
chmod 400 "Linux-shell.pem"Understanding the Command
| Component | Meaning |
|---|---|
chmod | Changes file permissions. |
400 | Gives the file owner read permission only, with no permissions for group or others. |
Linux-shell.pem | The private key file whose permissions are being changed. |
SSH requires private key files to be properly protected. If the permissions are too open, the SSH client may refuse to use the key.
Note: You generally need to set the permissions once. You don't need to repeat this command every time you connect, unless the file permissions change.
Connect to the EC2 Instance
Use the SSH command provided by AWS. The general syntax is:
ssh -i "Linux-shell.pem" ubuntu@<EC2-PUBLIC-DNS>Replace <EC2-PUBLIC-DNS> with the public DNS name of your instance.
For example:
ssh -i "Linux-shell.pem" ubuntu@ec2-xx-xx-xx-xx.ap-south-1.compute.amazonaws.comBreaking Down the SSH Command
| Component | Purpose |
|---|---|
ssh | Starts an SSH connection. |
-i | Specifies the private key file used for authentication. |
Linux-shell.pem | The private key downloaded from AWS. |
ubuntu | The username used to log in to the Ubuntu instance. |
@ | Separates the username from the remote server address. |
| EC2 public DNS | Identifies the remote EC2 instance. |
Default SSH Usernames
The default username depends on the Linux distribution and AMI.
| Linux Distribution | Default Username |
|---|---|
| Ubuntu | ubuntu |
| Amazon Linux | ec2-user |
| Red Hat Enterprise Linux (RHEL) | ec2-user |
| CentOS | centos |
| Debian | admin (commonly used by official AWS Debian AMIs) |
Important: Always verify the correct username for your selected AMI. Using the wrong username can result in an authentication failure, even if your private key is correct.
Accept the Host Key (First Connection)
When connecting to a server for the first time, SSH may display a message similar to this:
The authenticity of host 'ec2-xx-xx-xx-xx...' can't be established.

Are you sure you want to continue connecting (yes/no)?
This message appears because your SSH client has not yet recorded the server's host key.
If you're sure you're connecting to the correct EC2 instance, verify the host key fingerprint when possible, then type:
yesSSH records the server's host key in the known_hosts file. On subsequent connections, it uses this record to help identify the server.
Confirm the Connection
After successful authentication, you'll see a terminal prompt similar to:
ubuntu@ip-172-31-xx-xx:~$Congratulations! You're now connected to your remote Linux server.
Any Linux command you execute in this SSH session runs on the EC2 instance, not on your local Windows machine.
Verify the SSH Connection
Let's confirm that we're connected to the expected Linux environment.
Check the Current Directory
pwdExample output:
/home/ubuntuThe pwd command displays your current working directory. For a typical Ubuntu EC2 login, this is the home directory of the ubuntu user.
Check the Logged-In User
whoamiExample output:
ubuntuThe whoami command displays the username of the currently logged-in user.
If these commands return the expected results, your SSH connection is working.
Complete SSH Connection Flow
Here's a quick overview of how all the pieces fit together:
+--------------------------------+
|         Local Machine          |
|                                |
|          Git Bash              |
|              |                 |
|       Linux-shell.pem          |
|              |                 |
|         SSH Command            |
+--------------+-----------------+
               |
               | SSH Connection
               | TCP Port 22
               v
+--------------------------------+
|           AWS Cloud            |
|                                |
|         EC2 Instance           |
|                                |
|        Ubuntu Linux            |
|                                |
|     SSH Authentication         |
|              |                 |
|              v                 |
|       Linux Terminal           |
+--------------------------------+
The private key is used for authentication, while SSH provides the encrypted connection to the remote server.
Quick Reference: SSH Commands
Keep these commands handy while working with your Linux lab.
# Set private key permissions (usually one-time)
chmod 400 "Linux-shell.pem"

# Connect to the Ubuntu EC2 instance
ssh -i "Linux-shell.pem" ubuntu@<EC2-PUBLIC-DNS>

# Verify the current directory
pwd

# Check the logged-in user
whoami

# Disconnect from the remote server
exit
Replace the placeholder with your instance's actual public DNS name.
Summary
- SSH allows you to securely connect to and manage remote Linux servers.
- The
.pemprivate key is used to authenticate your connection to the EC2 instance. - Use
chmod 400to restrict access to your private key. - The SSH username depends on the Linux distribution or AMI.
- Once connected, commands run on the remote EC2 instance.
- Use
pwdandwhoamito verify your session. - Use
exitto disconnect from the remote server.
Remember: SSH is your gateway to the cloud-based Linux environment. Once connected, you're ready to explore directories, manage files, execute commands, and practise Linux directly on your EC2 instance.
Written By: Muskan Garg
How is this guide?
Last updated on